Pages - Menu

Search This Blog

Showing posts with label Plaid. Show all posts

Monday, July 3, 2017

Beach Life Decorative Frame


Materials: 
Makin's Clay® - Earth Tones Multi Pack, Black, White 
Makin's® 
  • Clay Mixing Ruler
  • Sea Shell Push Mold 

Makin's Professioanl® Cutting Mat 
Wooden star frame 
Round mirror 
Alphabet push mold 
Cheese cloth 
Beacon Tacky Glue®
Proxxon® Delta Sander
Plaid® Coastal Paints - High Tide, Sand Dollar and Seal Gray 
Alphabet stickers or die cut lettering
Etchall® Dip n' Etch
Tattered Angels Copper Glimmer Mist
Script stamp
Permanent ink 
Paint brush 


Instructions:

Use the Clay Mixing Ruler to create your own colors of shells, adding different colors of clay in any number of holes.  I initially chose 3 colors from the Earth Tones pack to work with.  Then I simply removed the clay balls and mixed them together.  This way you can create some very realistic looking shells.

Place the clay in the Sea Shells push mold gently pushing the clay into the cavities so the clay picks up the all the details in the mold.

Once removed, you have beautiful shells to work with.


To create the letters to spell LIFE, mix black and white clays together until you've created gray.  Then place the clay in an alphabet mold.

To create the mirror/frame, begin by sanding the frame with the Proxxon Delta Sander.

Paint the frame with  Plaid Coastal Paints using High Tide for the base color.  Then add touches of Sand Dollar and Seal Gray to create a beachy feel.  Once dry, use Tacky Glue to adhere some mesh around the right side of the opening.


Determine the placement of the shells and use Tacky Glue to glue them around the frame.  Glue LIFE in the opposite corner.


Use etchall® dip 'n etch to etch Beach into the mirror.  Directions on how I etched the mirror can be found on my blog.

Spritz Tattered Angels Copper Glimmer Mist on the shells and the mesh.  The glimmer mist adds a nice tone to the shells when it gets into the crevices.

Use a script stamp with black ink and stamp it randomly around the frame to create some additional detailing.

I hope I've got you in a beachy mood today.

What will you create today?

Steph


Tuesday, June 6, 2017

Steampunk Flash Drive

Steampunk Flash Drive by Patricia Krauchune 
 MAKIN'S® IN A FLASH!

 For my June Makin's Clay® project, I decided to cover a flash drive with clay in a Steampunk motif. 

Supply List: 

Makin's Clay® Black 


Bead Caps 


FolkArt® Metallic Antique Copper 
Flash Drive 
Kemper 1/4" Circle Punch 
DecoArt® Splendid Gold 
Gears 
Copper Wire 
FolkArt® Solid Bronze 
Letter Stamps 
Krazy Glue® 
Diamond Glaze™ 
Watch Stems 
FolkArt® Brushed Pearl Gold 
Beacon™ Fast Finish Decoupage 

Recommended Makin’s Professional® Tools: 

Cutting Mat 


Ultimate Clay Machine® 
Professional Clay Tools: Fine Point 
Instructions:

Here are the parts I used, yours may differ depending on what you have available. 
Roll out some Black Makin's Clay® on the #1 setting on the Ultimate Clay Machine®.


Wrap the clay around the main body of the flash drive.  I added some texture by rolling the handle of the Makin's Professional® Tool over the fresh clay. 


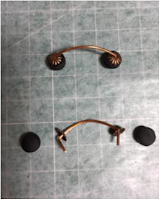
Punch out (4) circles using the Kemper 1/4" circle punch.  I bent two pieces of copper wire into an arch, then slipped a bead cap on each end. Push each end of the wire into one of the clay circles then attach to the side of the flash drive. Repeat for the other side.


Here's how it looks so far. Using the letter stamps, I spelled out "FLASH" and stamped the word into the back side of the flash drive. 


The next steps all depend on what you have available for parts.  On the opposite side of the flash drive, I attached some gears and used a watch stem to hold in place. I added a dab of Krazy Glue® to assure a bond. On the side with the word "FLASH", I made a "steam pipe" from some copper wire and glued it in place. 


Now the cap of the flash drive needed to be covered in clay.  I added a gear on both sides of the cap. I also added a coil I made from copper wire to the top of the cap.


This is what my flash drive looked like before painting. 


You can paint your flash drive in the Steampunk colors of your choice.  I named the paints I used in the above supply list. I also added a little Diamond Glaze™ into the gear slots for a secure adhesion. The finished drive was then coated with Beacon™ Fast Finish Decoupage. 

So there you have it, a Steampunk Flash Drive made possible with Makin's Clay®, the No Bake Clay®!

See you soon.  


Friday, November 11, 2016

Mr. Snowman Ornament


Mr. Snowman Ornament by Patricia Krauchune 

"MAKIN® FROSTY" - One of my favorite things about Makin's Clay® is the versatility of being able to form something over plastic. I took a simple clear plastic ornament and made it into this cute little snowman. Let me show you how... 


Supply List:

Plastic Bulb: (Michael's)
Beacon™ Fast Finish Decoupage
Plastic Hat
Beacon Quick Grip™
Plaid® Sparkle Mod Podge®
Krazy® Glue
Glitter / Orange Paint
Jewelry Thread
Makin's Clay®: White/Red/Black
Paper towels

Recommended Makin’s® Tools: Instructions:

Makin's Professional® Ultimate Clay Extruder®/Disc Set C #3
Makin's® Professional Cutting Mat
Makin's® Push Mold: Christmas Decor

Instructions:

Extrude some white Makin's Clay® using the Makin's Professional® Ultimate Clay Extruder® with the Discs Set C #3 disc. I used some damp paper towels on my work surface to keep the clay moist. Wrap around the plastic bulb and let dry overnight.


Mix some glitter in Beacon's™ Fast Finish Decoupage and use the mix to secure the wrapped clay onto the bulb. When dry, add a second coat to the bulb of Plaid® Sparkle Mod Podge®. Let dry overnight.


Cut a small piece of the dried extruded clay and with a craft knife trim to look like a "carrot". Then paint the "carrot" orange.


Make two red bows using the Christmas Decor push mold.

Brush some Tacky Glue to the top metal part of the bulb then wrap with some white clay to form the snowman's head. Let dry. Attach the jewelry thread to the bulb hanger.


Drill a small hole in the top of the plastic top hat. Pass the jewelry thread through the hole in the top hat. Now glue the top hat to the head with Beacon™ Quick Grip. Add a small band of red clay to the top hat and one of the red bows with the Tacky Glue. Glue the other red bow under the snowman's chin. At this point, using Krazy® Glue, I glued the "carrot" nose on and cut up small pieces of dried black clay for the eyes and mouth to resemble coal.

When the face parts were totally dried, I added another coat of Sparkle Mod Podge.


So here he is, ready to hang on your tree. Happy Holidays from Makin's Clay® and Frosty. 


Friday, October 9, 2015

Wednesday, July 24, 2013

BOYS Scrapbook Album with Makin's Clay® Ribbon Slide Embellishment


My boys are always "colorful", often into mischief, forever dirty.  They live to catch (and release luckily) frogs, toads, snakes, lizards, turtles, caterpillars, and other assorted critters.   Their BOYS 100% and their adventures inspired this album cover with a custom made Makin's Clay® ribbon slide. - Cindi Bisson

Materials:

Makin’s Clay® - 120g Multi-Color
12x12 Black leather album
Plaid Industries & Making Memories acrylic paints
“BOY” text rubber stamps (unknown brand)
Tsukineko Brilliance Graphite Black inkpad
Unknown brand of striped ribbon
Unknown brand of flat top black eyelets
Sherwin Williams Krylon Crystal Clear spray finish
Non-stick mat, heat tool, craft knife, embossing stylus, pencil, paintbrushes in assorted sizes
ProvoCraft Silent Setter eyelet setting tools
Font:  Hopscotch Plain downloaded from the internet

Instructions:


Open a blank document in a word processing program and select a font for your text.   Enlarge the size of the letters as large as possible to fit onto the cover the album.  For my lettering, I chose Hopscotch Plain and enlarged the font to 850 and printed one letter per page.

Cut out each printed letter and use as a tracing template on the cover of your album.


Select your color palette.  My choices were based on the striped ribbon I chose for the project.  Begin by painting your background
color on the traced lettering, allow to dry.   I found that 3 coats worked best for a good, solid coverage.  For this project, I chose chartreuse green.
For the stamping, choose a permanent black ink.  If you use a product like Staz-On or Palette, create use the scrap paper from the lettering you cut out as a MASK before stamping so you do not get the
text onto the black background of the album.  If you use Brilliance ink as I did, immediately remove any overstamped text using a cotton swab or small cloth from the background.  Ink assorted text stamps (I chose “boy” words) and randomly stamp over the painted letters.  If using a heat setting ink, heat set with a heat tool.
Paint a thin outline around each letter in a contrasting color.  Once dry, paint a second outline in another contrasting color.  For this project I used teal and white.

The frog embellishment was created by mixing bright green Makin’s Clay® and yellow paint together to create a lighter green.  It was then rolled out thin onto a non-stick mat.  A craft knife was used to hand cut the frog image.  An embossing stylus was used to gently push a bumpy “texture” into the frog.  (Makin's Clay® texture sheets would have been perfect for texturing this quickly and easily!) Tiny black balls of clay were flatted to 
create his eyes and spots.  Allow embellishment to dry overnight.  Another option would be to roll out the Makin’s Clay® and use a Makin's Brand® clay cutter, or a large cookie cutter to cut the desired shape, remembering to use a knife to cut the ribbon slits before the shape dries.  Or an image could be printed off the computer, cut out and traced onto the clay for a custom shape.  A chipboard shape, large silk flower, or die cut image could also be used.

Cut the ribbon to approximately 11 ½ inches and gently fray the ends.  Coat frayed ends with clear
nail polish, or any clear drying finish to prevent further fraying if desired.

Slide the dry embellishment onto one piece of the ribbon. 


Use a craft knife to carefully cut slits* on either side of the bottom of the “Y” to slide the ribbon under and then back out to the other side.  * Be sure to use a protective surface under the top cover before cutting, or you may cut through to the back cover.


Use flat top black eyelets to mount the ribbon to the album.

Spray finished album with Krylon Crystal Clear finish.


Contact us

Name

Email *

Message *