Pages - Menu

Search This Blog

Showing posts with label snowman. Show all posts

Wednesday, January 2, 2019

Mr. Snowman


Hi everyone, Steph Ackerman here today with a fun winter project to share.  With winter upon us that means snow will be here shortly.  Since it can be a little too cold outside to make snowmen, why not create your own snowmen from the comfort of your home.  

​Supplies:
​ Tattered Angels Baseboard - Lava
​ Ribbon
​ Leaves
​ Wiggly Eyes
 Adhesive 
​Instructions:​ 

Start by creating the snowman using tinfoil which has been tightly rolled into 3 balls.  Continue adding tinfoil until you have 3 different sized shapes.  Place toothpicks between the balls and glue in place to hold the shape.  Put aside to dry.
Using the Ultimate Clay Machine®, roll each piece of clay starting at the thickest setting (#1).

Continue putting the sheets of clay through the clay machine, moving up the settings one at a time, until the panels are the thickness desired.


Wrap the clay around the snowman, folding and pinching where necessary to achieve a desirable snowman.  Since snowmen are not always smooth, don't worry about the lumps and bumps that show as a result of the underlying tinfoil.

Allow the snowman to dry 24 hours, then paint with white paint.
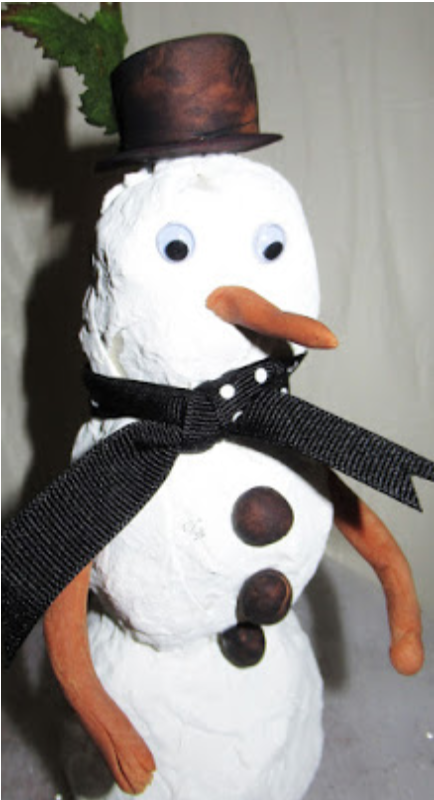


Roll out terra cotta clay to create the arms.  Allow the edges to be a little raggedy so they look like tree limbs.  Adhere to the sides of the snowman. 

I had no black clay handy so I rolled out 3 little balls of terra cotta clay for his buttons and his hat.  Then I spritzed them with Tattered Angels Lava mist to change the color of the clay. 
I placed the hat on his head and added leaves to the side.  Finally I tied ribbon around his neck.

​Standing about 7" tall, he is a reminder of the winter weather that is to come.

​Thanks for stopping by.

Steph


Wednesday, December 6, 2017

Vintage Frosty Ornament

FROSTY Vintage Ornament by Patricia Krauchune

For my December Makin's Clay® project, I made a little snowman from a very small old Christmas bulb. The old bulb I used was under 2" tall. 

Supply List: 

Makin's Clay® White/Red           Eye Screw                           Beacon™ Fast Finish Decoupage
Old Christmas Bulb                      Black & Orange Paint        Beacon™ Dazzle Tac Jewelry Glue™
Plastic Top Hat                             Krazy® Glue                      Beacon™ Tacky Glue
Glitter                                           Diamond Glaze™

Recommended Makin's® Tools: 

Makin's Professional® 
  • Ultimate Clay Machine®
  • Professional Clay Tools
  • Cutting Mat

Start with an old Christmas bulb. Roll out a small ball of White Makin's Clay® and using the Beacon's™ Tacky Glue cover the end of the bulb. With a Makin's Professional® Clay Tool, make some indentations for the eyes, mouth and nose. Small pieces of dried clay are inserted into the indentations for the mouth, eyes and nose. I also painted, with the black and orange paints, the pieces of clay that were inserted.


Red Makin's Clay® was rolled out to the #6 setting of the Ultimate Clay Machine®.  I used the knurling pattern on the handle of the clay tool to give some texture to the sheet of clay.


Now cut a small narrow strip of clay to form a scarf and with the Tacky Glue attach it around the neck of the snowman.  I also added a small strip of clay around the top hat.  Let the pieces dry overnight.


I mixed some glitter into a small amount of Beacon's Fast Finish Decoupage. Brush the glitter mixture onto the head, scarf and top hat band. Let dry. 

I drilled a tiny hole into the top hat and glued an eye screw in place for hanging. A drop of Krazy® Glue was added inside the top hat to insure the eye screw stayed in place. 
Frosty's top hat was glued in place with Beacon's™ Dazzle Tac Jewelry Glue™. 
Coat all the glittered surfaces with Diamond Glaze™ to further adhere the glitter. Let dry. 


For a final touch, I topped all the clay surface and the top hat with another coat of Diamond Glaze. This gives the appearance of wet snow. Let dry.  

You are now ready to hang Frosty on your tree. Happy holiday! 


Monday, December 4, 2017

Christmas Gift Tags

Christmas Gift Tags by Steph Ackerman

Getting ready for Christmas, I realized I needed tags.  Makin's Clay® was a great choice to create fun, dimensional accents! 

Supplies:

Makin's Clay - Light Adobe Brown, Concord Blue, Red, White
Makin's ProfessionalⓇ Cutting Mat
Makin'sⓇ Clay Push Mold - Christmas Décor, Christmas Nature
Makin's Clay Cutters - Christmas, Christmas A, Christmas C
Makin'sⓇ Clay Roller and Cutters Set
Beacon Adhesives - 3-in-1
Joy Clair stamps
Memento Inks
Whisker Graphics Twine
Cardstock
Pattern Papers

Instructions:

I rolled out the clay on the cutting mat.

Using a variety of clay cutters, I created an assortment of clay elements.  I used the push molds to create additional embellishments. 


Look at all these amazing clay elements that can be used for a variety of projects.


Now it was time to create my tags.  Using left over scraps, I assembled my tags, I used Beacon Adhesives to adhere the clay pieces.   The pinecones were inked with brown ink and the ornament was inked with red ink.


The mitten was inked with black ink before adhering to the tag.  A snowman was added to the other tag.


Both sizes of pointsettias were created from red clay then added to the tags.  Sentiments were then added.

Makin's Clay® elements are light weight and add almost no weight to a project.   They were perfect to add to my tags.

What do you think?

Friday, November 18, 2016

Sparkling Snowman Ornament


MAKIN® FROSTY by Patricia Krauchune
One of my favorite things about Makin's Clay® is the versatility of being able to form something over plastic. I took a simple clear plastic ornament and made it into this cute little snowman. Let me show you how... 

Materials:

Plastic Bulb: (Michael's)
Beacon™ Fast Finish Decoupage
Plastic Hat
Beacon™ Quick Grip™
Plaid® Sparkle Mod Podge®
Krazy® Glue
Glitter / Orange Paint
Jewelry Thread
Makin's Clay®: White/Red/Black
Paper towels
Makin's Professional® Ultimate Clay Extruder®/Disc Set C #3
Makin's® Professional Cutting Mat
Makin's® Push Mold: Christmas Decor

Instructions:

Extrude some white Makin's Clay® using the Makin's Professional® Ultimate Clay Extruder® with the Discs Set C #3 disc. I used some damp paper towels on my work surface to keep the clay moist. Wrap around the plastic bulb and let dry overnight.


Mix some glitter in Beacon's™ Fast Finish Decoupage and use the mix to secure the wrapped clay onto the bulb. When dry, add a second coat to the bulb of Plaid® Sparkle Mod Podge®. Let dry overnight.


Cut a small piece of the dried extruded clay and with a craft knife trim to look like a "carrot". Then paint the "carrot" orange.

Make two red bows using the Christmas Decor Push Mold .


Brush some Beacon's™ Tacky Glue to the top metal part of the bulb then wrap with some white clay to form the snowman's head. Let dry. Attach the jewelry thread to the bulb hanger.

Drill a small hole in the top of the plastic top hat. Pass the jewelry thread through the hole in the top hat. Now glue the top hat to the head with Beacon™ Quick Grip. Add a small band of red clay to the top hat and one of the red bows with the Tacky Glue. Glue the other red bow under the snowman's chin. At this point, using Krazy® Glue, I glued the "carrot" nose on and cut up small pieces of dried black clay for the eyes and mouth to resemble coal.

When the face parts were totally dried, I added another coat of Sparkle Mod Podge.


So here he is, ready to hang on your tree. Happy Holidays from Makin's Clay® and Frosty. 


Friday, November 11, 2016

Mr. Snowman Ornament


Mr. Snowman Ornament by Patricia Krauchune 

"MAKIN® FROSTY" - One of my favorite things about Makin's Clay® is the versatility of being able to form something over plastic. I took a simple clear plastic ornament and made it into this cute little snowman. Let me show you how... 


Supply List:

Plastic Bulb: (Michael's)
Beacon™ Fast Finish Decoupage
Plastic Hat
Beacon Quick Grip™
Plaid® Sparkle Mod Podge®
Krazy® Glue
Glitter / Orange Paint
Jewelry Thread
Makin's Clay®: White/Red/Black
Paper towels

Recommended Makin’s® Tools: Instructions:

Makin's Professional® Ultimate Clay Extruder®/Disc Set C #3
Makin's® Professional Cutting Mat
Makin's® Push Mold: Christmas Decor

Instructions:

Extrude some white Makin's Clay® using the Makin's Professional® Ultimate Clay Extruder® with the Discs Set C #3 disc. I used some damp paper towels on my work surface to keep the clay moist. Wrap around the plastic bulb and let dry overnight.


Mix some glitter in Beacon's™ Fast Finish Decoupage and use the mix to secure the wrapped clay onto the bulb. When dry, add a second coat to the bulb of Plaid® Sparkle Mod Podge®. Let dry overnight.


Cut a small piece of the dried extruded clay and with a craft knife trim to look like a "carrot". Then paint the "carrot" orange.


Make two red bows using the Christmas Decor push mold.

Brush some Tacky Glue to the top metal part of the bulb then wrap with some white clay to form the snowman's head. Let dry. Attach the jewelry thread to the bulb hanger.


Drill a small hole in the top of the plastic top hat. Pass the jewelry thread through the hole in the top hat. Now glue the top hat to the head with Beacon™ Quick Grip. Add a small band of red clay to the top hat and one of the red bows with the Tacky Glue. Glue the other red bow under the snowman's chin. At this point, using Krazy® Glue, I glued the "carrot" nose on and cut up small pieces of dried black clay for the eyes and mouth to resemble coal.

When the face parts were totally dried, I added another coat of Sparkle Mod Podge.


So here he is, ready to hang on your tree. Happy Holidays from Makin's Clay® and Frosty. 


Contact us

Name

Email *

Message *