Pages - Menu

Search This Blog

Showing posts with label Tattered Angels. Show all posts

Wednesday, January 2, 2019

Mr. Snowman


Hi everyone, Steph Ackerman here today with a fun winter project to share.  With winter upon us that means snow will be here shortly.  Since it can be a little too cold outside to make snowmen, why not create your own snowmen from the comfort of your home.  

​
​Supplies:
​
​ Tattered Angels Baseboard - Lava
​ Ribbon
​ Leaves
​ Wiggly Eyes
 Adhesive 
​
​
​Instructions:​ 
​
Start by creating the snowman using tinfoil which has been tightly rolled into 3 balls.  Continue adding tinfoil until you have 3 different sized shapes.  Place toothpicks between the balls and glue in place to hold the shape.  Put aside to dry.
​
Using the Ultimate Clay Machine®, roll each piece of clay starting at the thickest setting (#1).
​
Continue putting the sheets of clay through the clay machine, moving up the settings one at a time, until the panels are the thickness desired.
​


Wrap the clay around the snowman, folding and pinching where necessary to achieve a desirable snowman.  Since snowmen are not always smooth, don't worry about the lumps and bumps that show as a result of the underlying tinfoil.
​
Allow the snowman to dry 24 hours, then paint with white paint.
​


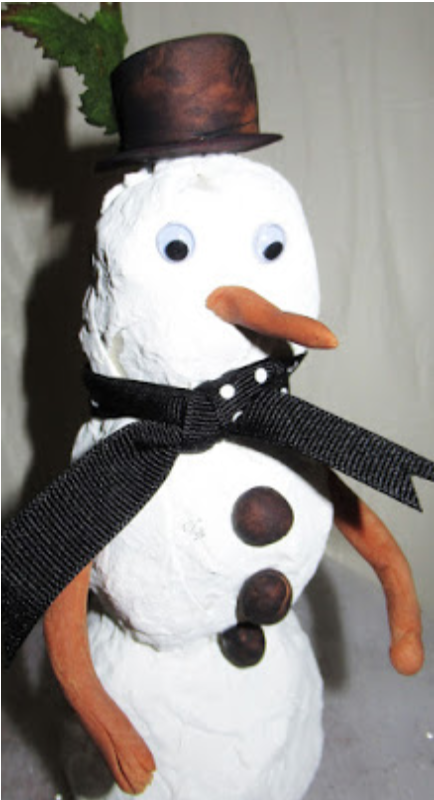
Roll out terra cotta clay to create the arms.  Allow the edges to be a little raggedy so they look like tree limbs.  Adhere to the sides of the snowman. 

I had no black clay handy so I rolled out 3 little balls of terra cotta clay for his buttons and his hat.  Then I spritzed them with Tattered Angels Lava mist to change the color of the clay. 
​I placed the hat on his head and added leaves to the side.  Finally I tied ribbon around his neck.
​
​Standing about 7" tall, he is a reminder of the winter weather that is to come.
​
​Thanks for stopping by.
​
​Steph
​
​
​
​
​
​
​
​

Friday, November 3, 2017

Blessings Canvas Panel


Blessings Canvas Panel by Steph Ackerman

Supplies:

Makin'sⓇ Clay - Persimmon, White, Green
Makin's ProfessionalⓇ 


Makin'sⓇ 


Beacon Adhesives - 3-in-1
Joy Clair stamps - Fall Leaves
Tattered Angels spray inks, paints
Memento Inks
Spellbinders dies
Raffia
Doily
Canvas Panel

Instructions:

Roll white clay in the clay machine on setting #1.  Reduce the setting on each pass until you have the
thickness you need for your project.
I wanted to add texture to a canvas panel, so I placed the clay on the canvas panel.  Then I used the roller to roll out the clay so it fit the panel.

Next, I scrunched the clay to give it some texture.

I carefully unfolded the clay and glued it to the canvas panel.  Once it dry, I cut off the excess which I put aside for another project.


Using assorted Tattered Angels spray inks, I added color to the background.   Once it dried, I inked over the textured background.
Using left over white and green clays, I created assorted sized leaves using the Leaves push mold.  To simulate the colors of all, I inked the leaves with a variety of colors.  Next, I poured on embossing powder and heat set quickly for a shiny effect.
Roll out light adobe clay and use oval clay cutters to cut 6 large ovals and 3 small ovals.  Adhere 3 pieces together to create each pumpkin.  While still wet, clay will adhere to clay.  But if you need to you can add adhesive. 

Add the larger pumpkins to the canvas then paint the bottom edges.  Add the small pumpkin on top of the larger ones.  Place die cut swirls behind the pumpkins and scatter the clay leaves.  Roll up some little scraps of clay to create the pumpkin stems then paint them brown.  Glue the stem behind the pumpkins.  
Stamp the phrase on white cardstock using green ink.  Die cut and add to pattern paper then place on top of a doily.  Adhere to the canvas.  

Glue raffia to the lower left corner surrounding the pumpkin.

Glue raffia to the top of the panel pulling the doily forward creating a 3 dimensional effect.


Are you ready for fall?

Thanks for stopping by.

Friday, February 3, 2017

Clay Roses


Hi everyone, Steph Ackerman here today with a bouquet of roses created with Makin's Clay®.

Supplies:

Makin's Clay® - White Yellow, Green
Makin's Professional®


Makin's®


Beacon Adhesives - 3-in-1 Adhesive
Spellbinders® leaf dies

Instructions:

Using the roller, I rolled out white clay on the cutting mat until I had the thickness I desired.

Then I used the medium sized round cutter to cut 6 white circles from the clay.


Next, I lined up each circle one at a time and pressed them firmly in place.  Fresh clay sticks to wet clay so no adhesive is necessary at this stage. 

I allowed the circles to set for a few minutes, then used a thin paint brush (you can use a straw or wood skewer)  to roll them up.  Gently push the piece off the paint brush and seal the edges together.


I thought this rose was a little too thick, so I took some more white clay and ran it through the clay machine.  I started at the highest setting and ran it through the Ultimate Clay Machine® until I had the thin layer I wanted.

To add some color to the clay, I spritzed on Tattered Angels Glimmer Mist and allowed it to dry.


I also painted additional white clay with Prima Gold Metallic Paint.

Once the paint was dry, I cut out circles with the round cutter.


I also wanted some leaves, so I mixed green, yellow and white clays then ran them through the clay machine until I had the thickness I wanted.

Using Spellbinders dies, I then die cut an assortment of leaves.  Fresh clay die cuts easily, but remember to use wax paper between the layers so the clay does not stick to the dies.

I wanted some shape to the leaves, so I placed them on pens and let them set over night.


I placed the roses on skewers and formed the petals.  Using Beacon 3-in-1 Adhesive, I adhered the leaves then let them sit overnight before proceeding further.


I arranged the roses in a watering can, pushing the skewers into styrofoam to hold them in place.  Next, I added shred around the roses.  These roses look extremely life-like and look amazing in the watering can.

It's almost Valentine's Day and this would be a wonderful gift for someone special.  But also think Mother's Day or a birthday as these roses will last forever.


Thanks for stopping by.

Steph


Monday, January 23, 2017

Steampunk Mini Hearts


Steampunk Mini Hearts by Erin Reed

I wanted to make some fun hearts steampunk style to give out in an embellishment swap.  The ideas is to make 9 embellishments roughly about the same to send off to a single person, then she mails back 9 different ones back to me to use how wish.  I thought how fun to make little Valentine hearts, but then post Valentine's Day that might seem a little over done, so how about generic hearts than can be used any time, and why not do a little steampunk in it all for fun.
I find that when I want to make my own DIY embellishments, clay is my go to choice as it can be any color, shape and texture I want it to be.
Materials:

Makin's Clay® - White 120g
Makin's®

  • Texture Sheet Set F - Sprockets
  • Clay Tools
Makin's Professional® Cutting Mat

Tattered Angels
Eyelet Outlet Pearls
Heart Cutter
Beacon 3-in-1 Adhesive

Instructions:
Roll out white Makin's Clay® to about 1 cm depth and use the Sprockets texture sheet to create a gear pattern in the clay.

Cut out 12 hearts with a heart shaped cutter.

Roll the Merlot clay into little balls (36 total) with your palm and flatten onto the mat.
Paint the hearts with silver Tattered Angels paint to make them look metallic

Glue the little Merlot balls onto the top left corner in a cluster of 3 using Beacon 3-in1 Adhesive™.  Also glue on 3 little black pearls to the bottom right.
Paint the little merlot balls with shimmer watercolor paint in red to make them sparkle.

Here is a full video tutorial on how to make these fun little hearts!
https://youtu.be/IkOV4TAP9gU
Now you an use these little embellishments for planner clip toppers, on cards, scrapbook pages, in mini albums, really any craft project you need a little heart for!


Tuesday, December 6, 2016

Christmas Angels


Christmas Angels by Martha Lucia Gomez
This month Makin's Clay® challenged it's Design Team members to select a Pin from our Tutorials & Techniques Board or our Polymer Clay Inspiration Projects Board and create a project using Makin's Clay® based upon/inspired by the chosen pin.

Hello dear friends, Martha Lucia here with you. Today I want to share some Angels for the Christmas season that I made using Makin's Clay® white with die cuts and applying one easy texture technique that you can find on our Tutorials & Techniques Pinterest board.

https://www.pinterest.com/pin/501588477227991796/
Let me share with you how I made my version:

Product List:

Circle and Heart Dies (Makin's® 4 Piece Large Circles and Hearts Clay Cutter Sets could also be used)
Crochet Doily
Tattered Angel Glimmer Mist

Instructions:

Take a small amount of white clay and smooth it with your hands to create an uniform ball. Create a thin layer of clay using the roller. The size of the layer depends on the size of the circle die cut that you want to use or the size of your angel. I used a 3" diameter circle.

Place the circle die cut over the layer of the clay and cut around using the cutter tool. (Or use a large circle from the Makin's® 4 piece circles clay cutter set).  I used a cross stitched die cut from Gina Marie Designs to impress a special design on the border.


Now it is time to apply an easy and simple texture technique using a crochet doily. Just turn over the clay circle and place the doily over the circle and press over it. With more pressure you get more texture, however, be careful you don't lose the original form.  (Optional - texture your clay then cut the circle.)


Create a "semi" cone with the circle leaving a tiny space on top to put the head of the angel.


Roll additional white clay to make the wings. For these you will use a heart die(or clay cutter). Just cut the form using the cutter tool.


Paste the heart behind of the cone with a few drops of water. (Fresh

clay will stick to fresh clay without additional adhesive - by moistening it a bit you ensure a good adhesion.  If adhesive is needed, us a clear drying adhesive such as Beacon Adhesives Tacky Glue™).


With a little small amount of white clay, create a ball and paste on top of the cone with a few drops of water. If you want you can create at the same time the halo and paste it behind the head.


Now that your angel is ready, you can decide if you want to keep it white or if you want to add a few touches of color. I am here to show you the difference.

I added some shimmer to one of mine using Glimmer Mist Poppy Pink from Tattered Angels.


I hope my project inspires you. Makin's Clay® has a lot of colors and shares a lot of techniques on their Pinterest Boards and you can visit us HERE to find inspiration to create your special decorations. Thank you for stopping by and see you soon!


Contact us

Name

Email *

Message *