Pages - Menu

Search This Blog

Showing posts with label winter. Show all posts

Wednesday, January 2, 2019

Mr. Snowman


Hi everyone, Steph Ackerman here today with a fun winter project to share.  With winter upon us that means snow will be here shortly.  Since it can be a little too cold outside to make snowmen, why not create your own snowmen from the comfort of your home.  

​Supplies:
​ Tattered Angels Baseboard - Lava
​ Ribbon
​ Leaves
​ Wiggly Eyes
 Adhesive 
​Instructions:​ 

Start by creating the snowman using tinfoil which has been tightly rolled into 3 balls.  Continue adding tinfoil until you have 3 different sized shapes.  Place toothpicks between the balls and glue in place to hold the shape.  Put aside to dry.
Using the Ultimate Clay Machine®, roll each piece of clay starting at the thickest setting (#1).

Continue putting the sheets of clay through the clay machine, moving up the settings one at a time, until the panels are the thickness desired.


Wrap the clay around the snowman, folding and pinching where necessary to achieve a desirable snowman.  Since snowmen are not always smooth, don't worry about the lumps and bumps that show as a result of the underlying tinfoil.

Allow the snowman to dry 24 hours, then paint with white paint.
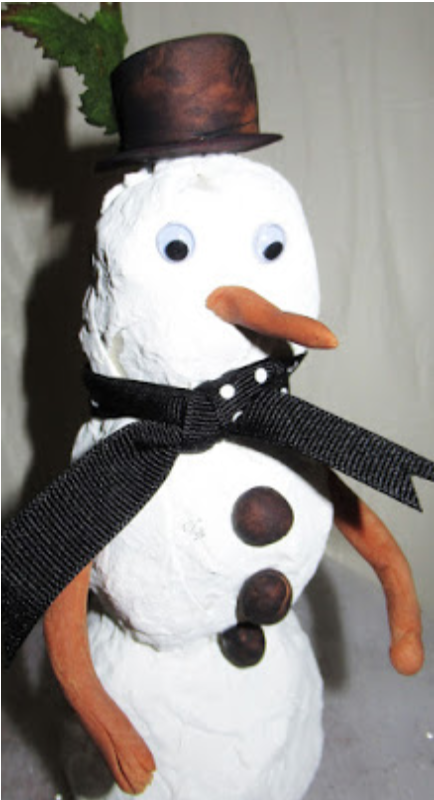


Roll out terra cotta clay to create the arms.  Allow the edges to be a little raggedy so they look like tree limbs.  Adhere to the sides of the snowman. 

I had no black clay handy so I rolled out 3 little balls of terra cotta clay for his buttons and his hat.  Then I spritzed them with Tattered Angels Lava mist to change the color of the clay. 
I placed the hat on his head and added leaves to the side.  Finally I tied ribbon around his neck.

​Standing about 7" tall, he is a reminder of the winter weather that is to come.

​Thanks for stopping by.

Steph


Monday, December 24, 2018

Saturday, January 6, 2018

Winter "Time" Pendant


Winter "Time" Pendant by Patricia Krauchune
 For my January Makin's Clay® project, I made a Winter scene inside a watch case. I used a lot of dried scrap pieces of clay that I had from previous projects. That's one of the reasons I love this clay, there is no waste. 

Supply List:

Makin's Clay® in White, Black, Green          Tim Holtz IDEA-OLOGY Pocket         Diamond 
Yellow, Red                                                     Watch Case                                            Glaze™
Krazy® Glue                                                   Glass Glitter                                           Sky Blue and 
Weldbond™ Adhesive                                    Black Marker Pen, Fine Tip                   White Paint 
                                                                                                                                        Circle Paper        
                                                                                                                                        Punch
Recommended Makin’s® Tools: 

Makin's Professional® Ultimate Clay Machine® 


Makin's® Professional Mat 


Makin's Professional® Clay Tools 


Remove back from the watch case. Using the Makin's Professional® Ultimate Clay Machine®, roll out some white clay on the # 2 setting of the clay machine. 


Fill the back of the watch case with the White clay that you just rolled out. Set aside to dry. 
Some Black clay was rolled out on the #6 setting of the clay machine and when dried, I cut out a house shape. Green clay was rolled out to the # 7 setting and set aside to dry. When dried, with scissors, I cut out 2 evergreen tree shapes. Set the house and trees on the back piece and arrange to please, then remove. Small pieces of Yellow and Red clay were rolled out on the #7 setting and when dried I glued them to the back of the house shape using Weldbond™ adhesive. Let dry. 


When the back was completely dry, I painted the clay a sky blue color. 
Using a dried paint brush with a very small amount of white paint, I painted in some cloud streaks. 
Using a circle paper punch, I made a sun from some of the dried Yellow clay. I also made a little cloud from some of the dried White clay. 

Now the fun part will be to arrange your little Winter scene to your pleasing. All the components were glued down with Krazy® Glue. 

I added some glass glitter to the roof top, under the windows and front yard secured with Krazy® Glue. 

I also used a marker pen to draw in three birds flying in the sky. 


The finished scene was coated with a layer of Diamond Glaze™. 

There...Winter Time. That was easy. 


Saturday, December 23, 2017

Happy Penguin

Happy Penguin by Carole Monahan 
Just in time for our 1st snow of the season!  This happy penguin is fun and easy to make.

Materials:

Makin's Clay® - black and white and a tiny bit of yellow
An egg shape hollow form    
Beacon’s Tacky Glue

Tools:

Makin's Professional® 
  • Ultimate Clay Machine®
  • Professional Clay Tools 


Large round cookie cutter and large heart cutter

Instructions:

Roll out about 2 oz of black clay with the Ultimate Clay Machine® starting on setting #1, then progressing to #2, and ending on setting #3 - you will need enough enough to cover the egg.

Lightly cover egg with tacky glue. Trim the edges and cover the egg with the black clay and use your sculpting tool with the large ball tip to smooth any edges.


Roll out the white clay about 1 oz to setting 3. Then cut out a heart shape to make the face.
Use the large round cutter from the trio cutter set for the base.


Cut out a pie shape piece with your flay blade from the pro sculpt kit (have I mentioned THIS is my favorite tool set!?)

Attach the notched out disc to the bottom and the heart shape onto the front.


Use the large ball tool to make eye sockets. Roll out 2 small black balls of clay for the eyes.
I added a little tiny bit of white to accent the eyes.


Roll out a small amount of yellow clay.  Roll out one end to come to a point.  Cut the tip off using your flat cutter.

Attach the beak and don’t forget to add his little nose holes so he can breathe.


Don’t forget to give him wings! They fly in the water so they do need them! 


 However you celebrate the holidays make it warm wonderful and hand made with love!

Contact us

Name

Email *

Message *