Pages - Menu

Search This Blog

Showing posts with label polymer clay. Show all posts

Tuesday, October 29, 2019

Adult Coloring with Makin's Clay® - Butterfly Wing

ADULT COLORING WITH MAKIN'S CLAY® by Cynthia Gougian 
It’s October, Pinterest, Instagram and Facebook are filled marvelous Halloween creations!

Unfortunately, here in Georgia, my outdoor thermometer was telling me it was still summer!   My original intent was to design some Halloween dragon fly wings.  But, my muse and the weather took me in another direction.  And, I am so glad that happened!  I stumbled on an adult coloring technique using Makin’s Clay®  and Prismacolor® pencils!  I am just so excited to share it! 
Materials:
·     Makin’s Professional® Ultimate Clay Machine®
·     Makin’s Clay®  15 g in black (1/4 of a 60 gram package)
·     Christi Friesen’s Flutter Wings ©2015 texture sheet, deep texture sheet of your choice.
·     An acrylic roller
·     Prismacolor® colored pencils, or soft colored pencils of your choice
·     Small embroidery scissors
·     A craft knife
·     Cornstarch, or powder
·     Grumbacher® Matte Final Fixative
·     1.5 mm Wire ferrule (Sometimes labeled for 16 AWG wire)
·     4 mm and 6 mm jump rings, or jump rings in sizes of your choice
·     Necklace cord of your choice

Instructions:
Step 1:  I used scissors to cut off about a ¼ block of 60 gram Makin’s® black clay. 
Step 2:  I wrapped the remaining clay in the plastic packaging, then immediately put it in a plastic bag with a wet paper towel.  I removed the excess air from the bag and sealed it tightly.  Makin’s® clay will remain fresh for quite sometime if you store it carefully.
Step 3:  I dusted the mold with some cornstarch.  You can dip a soft artist brush into some cornstarch, then brush it on the mold.  But, I use an old trick from my cake decorating days.  I place a clean, knee -high stocking into another knee-high stocking. I then fill the stockings with corn starch, and knot the top.  This makes a corn starch pounce.   I just pat the mold with the pounce to apply the cornstarch.  It’s less messy!
Step 4:  I rolled the black Makin’s® clay through the thickest setting of the Makin’s Ultimate Clay Machine®.  Then I placed the clay over the mold, and rolled over it with an acrylic roller. 


Step 5:  After rolling, I pressed the clay into the mold with my fingers.  I wanted to make sure I got all the details! 
Step 6:  Once I demolded the wings, I cut of most of the excess clay with embroidery scissors. I didn’t try to cut too close to the wings at this point.  
Step 7:  I stored the excess clay away so that I could use it again. 
Step 8:  I used the 1.5 mm wire ferrule to cut holes at the top of the wings.  Then I let the wings dry for 24 hours. 


Step 9:  Once the clay was thoroughly dry, it was easy to cut out the wings with embroidery scissors. 
Step 10:  Here’s a close up of the wing completely trimmed.  
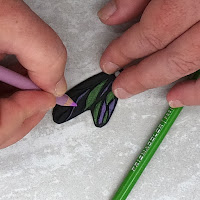
Step 11:  I used Prismacolor® Apple green to color some of the cells of the wing. I found it was best to use gentle pressure on the pencil. I also found that small circular strokes worked best to obtain full coverage.  Long strokes left the colored areas looking streaky. 
Step 12:  I used Prismacolor® Lilac to color the remaining cells.  


Step 13:  Once the wing was fully colored, I added Prismacolor® Parrot Green to just the inside corner of the green cells. 
Step 14:  Then I added Prismacolor® Violet to just the inside corner of the lilac cells. 
Step 15:  Then, I used a Prismacolor® Colourless Pencil to blend the darker colors into the lighter colors.  If you don’t have a Prismacolor® Colourless pencil, you can use a white pencil, or a very light grey pencil to blend.   
Step 16:  Once or twice, I had slipped with my colored pencils.  I had gotten some color where I wanted the only the black clay to show. But, I was able to touch up the black areas with a Prismacolor® Black pencil.    


Step 17:  When I had finished coloring the wing, I applied two coats of Grumbacher® Matte Final Fixative, allowing the wing to dry thoroughly between coats. 


I was very happy with how well the Prismacolor® Pencils laid down on the Makin’s Clay®! Even though I used black clay, I got great coverage.  Dry Makin’s Clay® has a nice “tooth” (slightly rough texture). This makes it easy to add layers of beautiful color with the Prismacolor® Pencils.  I am looking forward to exploring this technique further and sharing more adult coloring projects!
When the fixative was dry, I used a jump ring to attach the wing to a necklace cord. 

Monday, October 28, 2019

Autumn Leaves Photo Frame


Materials:
  • Makin's Clay® white 
  • Makin's Professional® cutting mat
  • Mini leaves cutters
  • Roller
  • Chalk pastels in fall colours
  • White glue
  • Soft paint brushes
  • A blade
  • Plastic bag or foil

Instructions:

This project was born really fast as I had a great helper, my daughter Liza.  I actually,find Makin's Clay® one of the best clays to work with when working with - there are tons of possibilities and it is easy to use.  

1.  Take a piece of white clay out of a package and roll it to a thin layer  (the rest of the clay should be kept in a zip lock with a w et wipe inside.)
2   Add some chalk dust in autumn shades right on the white sheet. 
3.  We used a blade to make the dust.  
4.  Use a soft brush to spread the chalk powder over the clay.  
5.  Blow the rest.  Keep a sheet so that you collect the colourful dust. 
6.  Put the colouful dust you collected on the other side of the clay sheet. Repeat  steps 4 and 5.


7.  Use mini leaves cutters to cut as many leaves as you wish.

8.  Some leaves will separate well, and some will not, so leave the sheet for 30-50 minutes and then use regular scissors to cut them out. The chalks help the clay dry faster. Let the leaves dry completely for about 20-24 hours.


9.  Meanwhile, let us prepare the picture and the paper frame – I have coloured it with gold acrylic and left some fingerprints, to add some texture. I use double side tape to adhere the pic and the frame.
10. Prepare the cardboard, I glued “knitted” scrap paper on it, and some embellishments.  The main embellishments are the leaves.  For them to be a bit glossy I have used white glue.  Just take each leaf and brush some white glue over from both sides.  Leave to dry for about 30 minutes. (NB! This was my biggest discovery in this project, as I had no clue what to use to make the leaves glossier and had no special mediums).  Attach the leaves chaotically with tacky glue.  


You may use this frame as a frame, or make a page in a scrapbooking album, or make a magnet out of it.  It is up to you! Go and create!!!

Sunday, October 27, 2019

Feather Card


Feather Card by Nancy Nickel
Materials Used:

Makin's Clay® - Blue Clay
Feathers Mold  
Carta Bella  Wildflower Paper
Recollections - Cardstock
Enamel Accents - White
White Seam Binding

Instructions:

1.   Start with making the three clay feathers. Press the blue clay into the feather mold. Allow to air dry in mold, or remove from mold.
2.   When feathers are dry, dab with white Enamel Accents, to bring out all the details.
3.   Adhere decorative paper to card base.
4.   Adhere feathers in place, on the decorative paper. Position them in the center towards the top.
5.   Tie the seam binding into a bow, and adhere in place over the clay feathers.


Makin's Clay® is so much fun to work with, and it offers endless creative possibilities!


Wednesday, October 23, 2019

Tuesday, October 22, 2019

Sunday, October 20, 2019

"Cute Scary" Little Pumpkins


Do you like Halloween?  Me too, but not too scary, rather cute scary. I think these little pumpkins are perfect.

Supplies

About 30 gr (1 ounce) of white Makin's Clay® for each little pumpkin
Makin's Professional® Clay Texture Set
Ball point tool with a rather small ball
Makin's Professional® Cutting Mat
Acrylic paint

Materials

I started with creating a rolled ball approx 4 cm or 2 ¾ “ diameter. Then I squished it somewhat flat.

For the arm, I made a log, which I made somewhat flat and then cut some fingers. Some have 3 fingers, some have 5 fingers.

Slightly dampen your fingers and  shape the pumpkin's fingers further.


I used the clay texture set tool to make a hole where I can insert the little arms.

I also have made the typical pumpkin ridges. For the eyes, I used the professional clay texture set, but this time the tip you can see in the picture below.

I simply twisted it above the mouth and then with the pointy tool I added some nostrils.

I made a long slit for the mouth with the pointy tool and then added either teeth or a tongue.
As some last steps I added a twisted piece to the top and textured the whole pumpkin with the small ballpoint tool.

In the end I had 3 little pumpkins which now had to dry for about 2 days. 


I used different acrylic paint mainly orange, some yellow a tiny bit of a bronze color, for the body. 

I added patina to the ridges with a flat brush with the some brown as I have used for the little stem at the top.

With some fluorescent color I added some dots to the eyes.


Contact us

Name

Email *

Message *