Pages - Menu

Search This Blog

Showing posts with label DecoArt®. Show all posts

Thursday, September 26, 2019

Copper Autumn Mums Earrings

Copper Autumn Mums Earrings by Cindi McGee
Materials:

Makin’s Clay® - White (or any scrap colors) 
Makin’s Professional® Professional Clay Tools - Sphere tool 
Makin’s® Clay Tool Set 
Makin’s® Clay Roller 
Makin’® Circle Clay Cutter Set 
Beacon Mixed-Media Glue®
DecoArt® Dazzling Metallics® - Copper 
Fine paintbrush 
Bronze/Copper French earring wires, jump rings, eye pins
Copper toned crystal beads 
Jewelry pliers 

Instructions:

I save “extra” Makin’s Clay® from my projects for use in future projects. As long as you store it in an airtight container, such as a zipper bag, with a damp paper towel or moist towelette, the clay will remain fresh for later use. For this project, I actually used some of that scrap clay - I have one bag that is small bits of assorted colors - so please disregard the fact that the clay I used appears “dirty.” The finished earrings are painted so it does not really matter what color your base clay is.  The flexible and lightweight nature of Makin’s Clay® when it is dry makes it ideal for delicate projects like this, as the petals will bend a bit rather than be fragile and break off easily. 

Roll clay into two balls about 3/4”, flatten the balls. It is okay if they are irregular. 

Roll a strand of clay about 1/8” in diameter (Optional: Use the Makin’s Professional® Ultimate Clay Extruder®  and single hole disc #2 or #3 to extrude a strand for this step.) 

Use tool to cut pieces about 1/4” from the strand. Take your fingertip and gently roll the pieces to a point on one end to create petals.

Place the flat edge of the tool onto the petals to create an indentation from the point to the end. 


Place the first row of petals onto the disc, using the sphere tool to gently push the ends against the disc.  

Repeat with a second layer, alterating placement of the petals. Then, repeat with additional layers as desired, using less petals each time, bringing them in closer and closer toward the center as you go until your mum is fully formed. 

Let dry 24 hours. 


Roll clay to about 1/8”.  Use circle cutter large enough to cover the base area of each mum. 

Assemble French earring wires, adding a crystal on an eye pin, and then a small jump ring to each. Trim 2 more eye pins to about 1/2”.  Attach the earring wires. Place the pins against the back of each earring. Add a touch of Mixed-Media Glue and place the cut circles over the pins, pressing into place to adhere and secure the pins. 

Let dry 24 hours. 


Paint each mum with Dazzling Metallics copper paint. 


Sunday, February 10, 2019

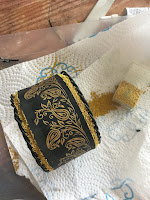
Black & Gold Paisley Bangle Bracelet

Black & Gold Paisley Bangle Bracelet by Cindi McGee
Materials:

Makin’s Professional® Ultimate Clay Extruder® - 3 hole disc 
Makin’s Professional® Ultimate Clay Machine®
Wooden bangle 
JudiKins™ Diamond Glaze 
Gold microbeads 
DecoArt® Americana® Multi-Surface Satin™ - Gold 
CreateAlong.com Peacock Borders Silkscreen by Cindi McGee Designs
Paintbrush 
Scissors 
Squeegee 
Beacon™ 527 Adhesive 

Instructions:

Often when I am working on a project and have “leftover” clay I will roll it into thin sheets and allow it to dry. Then I have sheets ready to die cut or craft punch, etc. when I’m ready to create. To create the sheets I simply roll black Makin’s Clay® beginning on setting #1 of the Ultimate Clay Machine®, the moving up one setting at a time and in this case ending at a setting #6. 

Place silkscreen orange side down over the clay sheet. Apply gold metallic paint to squeegee.  While holding the silkscreen in place, carefully use the squeegee to apply the paint over the silkscreen, transferring the image to the clay sheet. Immediately wash the silkscreen and squeegee, and let paint dry on clay sheet. Then repeat to make a second border. 
 

When silkscreening is dry, use scissors to trim around the borders and create two rectangular strips of equal size. I purposely made mine about 1/4” narrower than the width of the bangle as I wanted to add a row of gold microbeads. 

Paint inside of wooden bangle with gold paint. Let dry.


Apply 527 Adhesive to back of first strip of clay.  Wrap around bangle. Trim second strip to fill in any remaining space, being careful to match pattern as best as possible. Glue in place. Let glue dry. 


 Use Ultimate Clay Extruder® and 3 hole disc to extrude black clay. Twist three strands. Add adhesive to top edge of bangle, wrap twisted clay around the top edge, trim to fit. Repeat on opposite side of bangle. Let dry 24 hours.
Apply Diamond Glaze to area between silkscreened clay and the twisted border piece. Add gold microbeads.  Repeat all around the bangle, on top and bottom edges. Let dry. 


Tuesday, June 19, 2018

Sea Turtle Polymer Clay Pendant


Sea Turtle Polymer Clay Pendant by Cindi McGee

Materials:

Makin’s Clay® - Olive, Grape Leaf, Neon Green 
Makin’s Professional® 
  • Ultimate Clay Machine®
  • Cutting Mat 
Makin’s® 
  • Clay Roller
  • Texture Sheet Set A - Cobblestone
  • Clay Cutter Set - Bugs 

Eye pin 
Pearl
Decorative bead (I used a starfish shape) 
Satin cording 
DecoArt® Metallic Lustre - Iced Expresso 
Beacon® 3-in-1 Adhesive 

Instructions:

Begin by making a blend of the three shades of green clay.  I cut pieces approximately 2 1/2”, and 1/4” wide of each color.  Align them as shown with Grape Leaf in center, then Neon Green on each side, then Olive on the outsides.  

Roll with the clay roller to begin to flatten and create a sheet.  


You can continue to roll with the hand roller at this point, but I find it quicker to use the Ultimate Clay Machine®.  Roll the sheet through on setting #1.  Fold in half so ends of “stripes” are touching and roll again.  Continue until the shades begin to blend.   I pushed the outer edges inward each time to prevent a wide strip instead of a longer strip from forming.   I did not want to create a true, finished Skinner Blend, so I stopped blending when I got the effect I desired to mimic the shades of a sea turtle’s shell.   My finished “sheet” is a little less than 1/4” thick. 


Select the area you want to use for the shell and use the turtle clay cutter to cut out.  

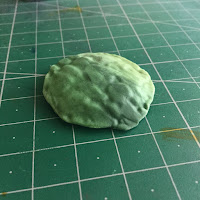
Trim legs and head from around shell.   Place the The cobble stone texture sheet, with the texture facing upward (you want the raised texture, not the inset texture) and roll with the clay roller to transfer the texture.  Apply enough pressure to begin to flatten the shell and cause it to expand a bit so it will extend beyond the body and over the legs a bit.  I did not want a perfect circle, as real turtle shells are not round and do not have perfectly smooth edges... 


Roll the scraps from the head and legs to create a small ball about 1/4” in diameter.  Flatten slightly.  Place the shell over the flattened ball and use the palm of your hand to gently press to adhere the two pieces together (fresh clay will stick to fresh clay, if needed moisten slightly with water or add adhesive).  Using the palm of your hand ensure the shell remains in a rounded shape.  I allowed the edges of my shell to extend beyond the mound in the center.


Carefully re-blend the remaining clay and roll again to a little less than 1/4” thick.  Place the texture sheet over the clay with the texture facing upwards and roll to transfer texture to clay.
  
Use turtle cutter to cut out a second turtle from textured clay. 


Re-blend scraps and roll out again, cut third turtle. 

Add pearl and decorative bead to eye pin.  Apply an even coat of 3-in-1 Adhesive over entire surface of last turtle cut.  Place eye pin over head of turtle so that the beads extend out from the head.   Place the textured turtle over the top and gently press with your fingers to adhere the two layers together everywhere. 


Add adhesive to back of turtle shell and mount to body of turtle. 


Use fingertips to apply a very light touch of Iced Expresso Metallic Lustre.  This highlights the texture and gives the mottled effect much like real sea turtles have on their skin and shells. 

Let dry 24 hours. 


Add satin cording and closure.


Wednesday, April 11, 2018

Sonic the Steampunk Robot


 SONIC THE ROBOT by Patricia Krauchune 

For my April Makin's Clay® project, I decided to upcycle a few things I had in my studio. I used the base of an electric toothbrush replacement head for my robot's body. I also used some other random parts I had to adorn him. 

Supply List:

Makin's Clay® in Black     Small Gear                       Copper Wire             Small Piece of Ball Chain
2 Gear Plunger Cutters       Mini Gauge                      Misc. Parts               DAP Rapid Fuse™ Glue
Toothbrush Base                 Createx™ Pearlized         BSI™ 5 Minute       Victoria James Lava Rock
Old Light Bulb                       Copper Paint                  Quik-Cure™              Real Texture Sheet 
2 Square Eyelets                 Beacon™ Tacky Glue       Epoxy                      2 Electrical Ring Terminals
DecoArt® Metallic 
   Lustre™ Silver Spark

Recommended Makin’s® Tools:

Makin's Professional® 
  • Ultimate Clay Machine®
  • Mat
  • Professional Clay Tools

Instructions: 
                                    

Roll out some Black Makin's Clay® on the #1 setting on the Makin's Professional® Ultimate Clay Machine®.  I used two different size gear plunger cutters to cut out two gears. I left the clay in the cutters for 2 days to completely dry out. It is a little bit of a challenge to remove the gear cut outs from the plungers but it can be done gently.
 

This is what the cut out gears look like after drying. I trimmed away any extra clay to give the gears a nice sharp look.


The center of the smaller gear was cut out and then I painted both gears with the Createx™ Pearlized Copper paint.  Set aside to dry. 


I cut out a small piece from each electrical ring terminal to give the appearance of a robot hand.  Then I placed each terminal in a small vise and added the ball chain gluing in place with the BSI™ 5 minute Quik-Cure™ Epoxy and let dry overnight. 


More black clay was rolled out on the #1 setting of the Makin's Professional® Ultimate Clay Machine® and applied to the toothbrush base.  I first brushed on some Beacon's™ Tacky Glue for better adhesion.  I then immediately textured the base using the Victoria James Art Lava Rock Real Texture sheet. 


While the clay was still wet, I pushed a small gear into the middle of the robot body.  Dry overnight.  
When dry I glued a small gauge onto the gear using DAP Rapid Fuse™ Glue. 


I used a Japanese Screw punch to make small holes on either side of the robot's body for the arms.  I then used epoxy to glue the eyelets, then the ball chain are into each eyelet.


I had a spring part from an old phone that I attached to the top of a light bulb using epoxy.  A small gear was added to the body as well as a little coil I made from copper wire. 

I used my finger to apply the DecoArt® Metallic Lustre™ Silver Spark paint to the robot's body. 

At this point you can adorn your robot with whatever parts you have on hand and make him your own. 

Next I used the epoxy to glue the larger gear to the base of the robot's body and the smaller gear to the top followed by the light bulb.


FINISHED! I think Sonic looks pretty cool and I used some parts that would normally just get tossed out. 


Contact us

Name

Email *

Message *