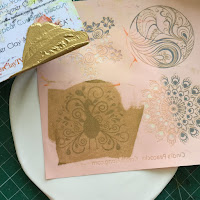
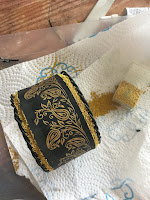
Design Team Member Cynthia Gougian recently shared these fabulous "Cinnamon & Gold" Paisley earrings made with Makin's® Water Drop clay cutters.
Pages - Menu
Search This Blog
Showing posts with label paisley. Show all posts
Showing posts with label paisley. Show all posts
Friday, August 30, 2019
Tuesday, May 28, 2019
Golden Peacock Polymer Clay Pendant
Materials:
Makin’s Clay® - White
Makin’s Professional® Cutting Mat
Makin’s® Clay Roller & Clay Tools
Makin’s® Round cutters 4 piece set
Makin’s® Floral Texture Sheet - Peacock Feathers
Makin's Professional® Ultimate Clay Extruder® - Multi-hole disc
CreateAlong.com Cindi McGee Designs Peacocks Silkscreen
Gold acrylic paint
Gold DecoArt® Metallic Lustre™
Gold satin cording
Instructions:
Roll white clay to about 1/4” thick.
Select desired image from silkscreen and place silkscreen orange side down onto rolled clay sheet.
Use scraper or squeegee to apply gold metallic paint to silkscreen. Lift silkscreen to reveal image, wash silkscreen immediately for later use.
Let silkscreened image dry. Use round cutter approximately same size as image and cut out image.
Roll another sheet of white clay about 1/4” thick. Place Peacock Feathers texture sheet over the sheet and roll with roller to texture the sheet with the feathers. Note: You can use Makin’s® texture sheets on both sides, to create raised or inset images. I chose to make my feathers raised up.
Apply gold Metallic Lustre to highlight details of feathers.
Use larger round cutter to cut disc from textured clay sheet.
Use Ultimate Clay Extruder® to extrude thin strands of white clay. Make small coils of clay. Use tacky glue to add them around the outer edge of the peacock disc.
Paint the coils with gold paint. Let dry.
 Place peacock disc off center onto feather disc. Fresh clay will stick to fresh clay, but add a bit of tacky glue if you desire to ensure good adhesion.
Make a small hole at the top center of the textured disc for the cording.
Let dry 24 hours.
Sunday, February 10, 2019
Black & Gold Paisley Bangle Bracelet
 |
| Black & Gold Paisley Bangle Bracelet by Cindi McGee |
Materials:
Makin’s Clay® - Black
Makin’s Professional® Ultimate Clay Extruder® - 3 hole disc
Makin’s Professional® Ultimate Clay Machine®
Wooden bangle
JudiKins™ Diamond Glaze
Gold microbeads
DecoArt® Americana® Multi-Surface Satin™ - Gold
CreateAlong.com Peacock Borders Silkscreen by Cindi McGee Designs
Paintbrush
Scissors
Squeegee
Beacon™ 527 Adhesive
Instructions:
Often when I am working on a project and have “leftover” clay I will roll it into thin sheets and allow it to dry. Then I have sheets ready to die cut or craft punch, etc. when I’m ready to create. To create the sheets I simply roll black Makin’s Clay® beginning on setting #1 of the Ultimate Clay Machine®, the moving up one setting at a time and in this case ending at a setting #6.
Place silkscreen orange side down over the clay sheet. Apply gold metallic paint to squeegee. While holding the silkscreen in place, carefully use the squeegee to apply the paint over the silkscreen, transferring the image to the clay sheet. Immediately wash the silkscreen and squeegee, and let paint dry on clay sheet. Then repeat to make a second border.
When silkscreening is dry, use scissors to trim around the borders and create two rectangular strips of equal size. I purposely made mine about 1/4” narrower than the width of the bangle as I wanted to add a row of gold microbeads.
Paint inside of wooden bangle with gold paint. Let dry.
Apply 527 Adhesive to back of first strip of clay. Wrap around bangle. Trim second strip to fill in any remaining space, being careful to match pattern as best as possible. Glue in place. Let glue dry.
 Use Ultimate Clay Extruder® and 3 hole disc to extrude black clay. Twist three strands. Add adhesive to top edge of bangle, wrap twisted clay around the top edge, trim to fit. Repeat on opposite side of bangle. Let dry 24 hours.
Apply Diamond Glaze to area between silkscreened clay and the twisted border piece. Add gold microbeads. Repeat all around the bangle, on top and bottom edges. Let dry.
Labels:
air dry clay,
bangle,
Beacon Adhesives,
bracelet,
Cindi McGee,
CreateAlong.com,
DecoArt®,
fashion,
jewelry,
Judikins,
Makin's Clay®,
Makin's Professional®,
no bake clay,
paisley,
polymer clay,
silkscreen
Sunday, October 21, 2018
Peacocks & Paisleys Veneer
Cindi McGee recently shared this layered veneer created with Makin's Professional® Ultimate Clay Machine®, Makin's Professional® Ultimate Clay Extruder®, the Makin's® Water Drop Clay Cutters, and the Makin's® Flower/Leaf Clay Cutter Set!
Tuesday, June 28, 2016
Zentangle Drop Pendant by Lucy Reese
Zentangle Drop Pendant
Designed by Lucy Reese
Hello everyone! Since its summer, I thought what a great opportunity to break out the Makin's Clay® Neon pack and being that Zentangling is so popular right now, why not combine the two? If you have seen my previous work on the blog, I'm sure you can tell by now that I absolutely love using Makin's Clay® for pendants. Due to it being lightweight and durable it's a great material to use in jewelry making. Enough talking, lets get to "Makin's" this pendant...see what I did there?😉
Supplies:
Makin's® Clay Roller
Makin's Professional® Cutting Mat
Makin's Clay® Water Drop Cutters
Makin's Clay® - Black, Neon Yellow
Lisa Pavelka Texture Stamp- Cloodlettes
Dylusions Paint- Black
Judikins- Diamond Glaze™
Helmar Glue
Sharpie Fine Point- Black
Instructions:
 Begin by taking the your clay from its package. Take what you need and remember to put the rest in a Ziplock with a wet paper towel or baby wipe so that its stays fresh and ready to use. Now, take your neon yellow clay and roll it out to the desired thickness. You can see that I did end up picking up some other colors that were left on my mat, which didn't bother me. But, you can prevent it by making sure your work surface is clean.
Using the Dylusions Paint in Black Marble ink up the Cloodlettes texture stamp by Lisa Pavelka and stamp onto the clay.
Your clay should now look something like this. If your image has some skipping in it, no worries, we can fix that later.
Take out the Makin's Clay® Water Drop Cutters. Being that they come graduated, you want the 2nd to largest one. Place the cutter lightly on top of your clay and with firm even pressure press down and pull it out. If your clay is still inside the cutter, you can use a tool to push it out..careful not to distort or leave tools dents. (Tip: If you lace plastic wrap over the clay before you use the cutters, then simply lift the plastic wrap, the shape comes free and eliminates the issue of removing it from the cutter.)
To make the base, roll out the Black Makin's Clay® to desired thickness and lay one of the neon cutouts on top and repeat the cut with the largest water drop cutter.
 We are now at the touch-up part of the project. This is where we can grab our black fine liner Sharpie and fill in the parts of your image that had skipped during the stamping step. After your finished, take the Helmars and glue your focal to the base. Let the piece dry completely before proceeding to the next step.
For a beautiful shiny finish, use Judikins™ Diamond Glaze™ and let dry. To complete this project glue on a bail..and your ready to add to a necklace of your choice!
I hope you enjoy this project as much as I did. If you would like to see more of my projects visit my blog at tecniquefreak.wordpress.com.
~Lucy
Labels:
air dry clay,
Diamond Glaze,
Dylusions,
fashion,
Helmar,
jewelry,
Judikins,
Lisa Pavelka,
Lucy Reese,
Makin's Clay®,
Neon Colors,
no bake clay,
paisley,
pendant,
polymer clay,
teardrop,
Zentangle
Subscribe to:
Posts (Atom)


