Pages - Menu

Search This Blog

Showing posts with label bangle. Show all posts

Sunday, February 10, 2019

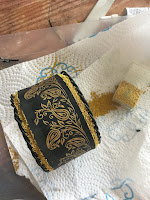
Black & Gold Paisley Bangle Bracelet

Black & Gold Paisley Bangle Bracelet by Cindi McGee
Materials:

Makin’s Professional® Ultimate Clay Extruder® - 3 hole disc 
Makin’s Professional® Ultimate Clay Machine®
Wooden bangle 
JudiKins™ Diamond Glaze 
Gold microbeads 
DecoArt® Americana® Multi-Surface Satin™ - Gold 
CreateAlong.com Peacock Borders Silkscreen by Cindi McGee Designs
Paintbrush 
Scissors 
Squeegee 
Beacon™ 527 Adhesive 

Instructions:

Often when I am working on a project and have “leftover” clay I will roll it into thin sheets and allow it to dry. Then I have sheets ready to die cut or craft punch, etc. when I’m ready to create. To create the sheets I simply roll black Makin’s Clay® beginning on setting #1 of the Ultimate Clay Machine®, the moving up one setting at a time and in this case ending at a setting #6. 

Place silkscreen orange side down over the clay sheet. Apply gold metallic paint to squeegee.  While holding the silkscreen in place, carefully use the squeegee to apply the paint over the silkscreen, transferring the image to the clay sheet. Immediately wash the silkscreen and squeegee, and let paint dry on clay sheet. Then repeat to make a second border. 
 

When silkscreening is dry, use scissors to trim around the borders and create two rectangular strips of equal size. I purposely made mine about 1/4” narrower than the width of the bangle as I wanted to add a row of gold microbeads. 

Paint inside of wooden bangle with gold paint. Let dry.


Apply 527 Adhesive to back of first strip of clay.  Wrap around bangle. Trim second strip to fill in any remaining space, being careful to match pattern as best as possible. Glue in place. Let glue dry. 


 Use Ultimate Clay Extruder® and 3 hole disc to extrude black clay. Twist three strands. Add adhesive to top edge of bangle, wrap twisted clay around the top edge, trim to fit. Repeat on opposite side of bangle. Let dry 24 hours.
Apply Diamond Glaze to area between silkscreened clay and the twisted border piece. Add gold microbeads.  Repeat all around the bangle, on top and bottom edges. Let dry. 


Wednesday, January 11, 2017

Bright Magnet Note Holders with Clay Flowers


Polymer Clay Artist Seems SJ recently shared these stunning, bold and bright magnet note holders with hand made Makin's Clay® flowers.  View more of Seems SJ's work here on Seema Clay Jewelry  Facebook page. See more of her work here at her Seema Clay Flower Facebook page.

Tuesday, September 6, 2016

Easy Extruded Clay Autumn Bangle DIY Video


Ultimate Clay Extruder™
Cindi McGee shares a DIY video showing how to make an easy extruded Autumn bracelet with Earth Tones & Vineyard Tones Makin's Clay® and the Makin's® Professional™ Ultimate Clay Extruder™.  

Strands of Autumn bracelet designed by Cindi McGee


Thursday, April 14, 2016

Tropical Sunset Bangle (Redo the Redo!) by Carole Monahan


REDO the REDO
or the 3rd time is a charm: or on this case a bracelet...

By Carole Monahan

Materials:

Makin's Clay® in White, Yellow and Red
Pan Pastels
Beacon™ Tacky Glue
Wooden bracelet blank

Tools:

Stencil of choice

Instructions:

This was intended to be a lesson on using the color mixer ruler which it STILL is but………
It soon became a lesson in resilience and tenacity!
The mixing of the colors as shown below was the ONLY thing that DID go right the 1st time!
Just follow the recipe on the color chart to achieve the color you want.
I was going for a subtle tangerine/soft orange sherbert.

Using the Makin’s® Ultimate Clay Machine™ roll out the new color keeping in mind you have to cover a bracelet note the size placed into the machine. I rolled it out at a #2 setting.


Then trim the clay with the plain cutter wheel from the professional tool kit.
Note in photo I made a template that I know would cover the length and width of the bracelet.

Lay you CLEAN stencil over your clay and burnish it so it stays in place while applying the colors.
OOPS NUMBER 1 - my stencil left a mark on the clay.
So I turned the clay over to the clean side and cleaned my stencil (DUH moment.)


Add the pan pastels starting with the lightest colors 1st.

OOPS NUMBER 2 (enter BIG sigh here) - 
Now I messed up the OTHER SIDE!!!!
SOO I started all over again.

OOPS 3!!!!! this one was too humiliating to even photograph - 
I thought HEY maybe I should use a different stencil and make the stencil slightly damp so it stays down on the clay.  Uuummmm DON’T DO THAT, I will spare you now! The clay stuck to the stencil. UGH it was too damp.

But I did let the clay dry completely and slowly peeled it off and it looks pretty good. I see earrings in the near future.
                                                                                                                                    
So NOW WHAT ??????

Back to side 1; yeah the one with the stencil residue………….
I free handed the Pan pastels over the ghost image of the “residue” I think it came out pretty!


Well I FINALLY got my romantic sunset image I was striving for.
NOW to assemble this bad boy!

I let the clay dry for about 1-2 hours before adhering it to the wooden bracelet just so it was still pliable and stretchy.

Cover the bracelet blank with a thin coat of Beacon’s Tacky glue.

Then position the clay on the bracelet.


To make sure the clay stayed put while it dried completely I put a weighted box on it while it dried.
When it was almost dry completely I trimmed off the access clay.


Now I’m all set to wear my sunset bracelet while I watch an amazing sunset in
KEY WEST !!!

Come check out more of my creations as well as my errors! I goof up to hopefully save you from doing it!

Contact us

Name

Email *

Message *