Makin’s Clay® is truly the “ultimate” artists medium. It can be used for jewelry, home décor, scrapbooking, fashion, and more. Makin’s Clay® can be textured, molded, stamped, die cut, punched, cut with scissors, sanded, drilled, painted, sewn, and more. Amazing colors can be created by blending clays, or by mixing in artist grade acrylic or oil paints, pigment powders, and more. One of the most unique properties of Makin’s Clay® is that it remains lightweight and flexible after drying. Today we are sharing instructions for making a coin purse using Makin's Clay® and Makin's Brand® tools.
Designed by
Cindi Bisson - Behind These Eyes™
Materials:120g package Terra Cotta
Makin’s Clay®
Makin’s Clay® – Ultimate Clay Machine TM #35054
Makin’s Clay® Cutter wheel & hand roller from Roller & Cutters Set TM #35001
Makin’s Clay® Sand Texture Sheet – Makin’s Texture Sheet Set A TM #38001
Makin’s® Pinking decorative edge scissors
Non-stick surface
Rubber stamps – Cat and verse stamps designed by Cindi Bisson
Stewart Superior Noir Black Palette inkpad
Earth Safe Finishes Copper Shimmer Opaque
Regular edge scissors
Paper trimmer
Embroidery needle
Fibers of choice
Crop-A-Dile punch or hand hole punching set
E-6000 Adhesive or any brand strong permanent adhesive
Black Sharpee marker or any brand black permanent marker with bullet tip
Krylon Matte Spray Finish
Magnetic closures
½” Wide faux “cheetah” print furry trim
Instructions:
 |
| Back of coin purse |
Begin by using scissors to cut an approximately 2”x 3” piece of Makin’s Clay®. This is approximately ½ a 120g package. Remove from clear packaging.
Gently kneed in your hand to form a 5” tube of clay.
Place 5” tube of clay onto Makin’s® Ultimate Clay Machine™ set on #5. Roll clay through machine.
Place rolled clay onto non-stick surface.
Lay Makin’s® Texture Sheet™ over rolled sheet of clay. (Sheets are double sided, debossed and embossed, just select which texture you want for this project). Use Makin’s® Roller tool to gently apply pressure to Makin’s® Texture Sheet™ and transfer texture to clay.
Gently lift one edge of texture sheet, while holding clay down with opposite hand, and peel off texture sheet. Trim any excess clay around the transferred textured image using Makin’s® cutting tool.
Cut a 2nd piece of terra cotta Makin’s Clay® approximately 1” wide and roll into a 3-4” tube. Adjust Makin’s® Ultimate Clay Machine™ to #6 and roll through clay. Set on non-stick surface and allow to dry.
Allow rolled clay to dry for 12-24 hours. 24 Hours is recommended to assure clay is completely dry, but clay rolled this thin is workable in approximately 12 hours.
To create the coin purse, using a template if desired, or free cut, rectangular shape from dry sheet of textured clay using decorative edge scissors. For this project, I used pinking edge scissors to cut a 4”x6” rectangle.
Fold down top (4”) edge of clay approximately 1” to create fold-over cover. Fold bottom section of clay up to meet fold line for cover.
Fold flat again. For added pizzazz and iridescence, use your fingertip or a paintbrush to apply a thin layer of Earth Safe Finishes Copper Shimmer Opaque over entire textured surface of clay. Allow to dry for approximately 5 minutes.
Refold purse to closed position. Use smaller hole punch (3/16”) of a Crop-A-Dile to punch a row of holes along both outside edges of coin purse. Holes should be approximately ¼” apart.
Thread an embroidery needle with fibers of choice. Tie a small knot at one end of threaded fibers. Begin on bottom hole on one side of coin purse, and using an over/under stitch, stitch side through punched holes. Tie off using knot at end. Repeat on 2nd edge.
Ink stamps with permanent black ink. Stamp onto smooth sheet of clay. Allow to dry for approximately 1 minute.
Use scissors or paper trimmer to closely crop stamped images into square and rectangular shapes. For this project, I used the pinking scissors on two edges for added interest.
Using a black permanent marker, apply a thin black border around outside edges of stamped pieces.
Using a strong permanent adhesive, mount stamped verse to folded over cover portion of coin purse. Mount stamped cat image to left side of front of coin purse. Allow to dry.
Cut strips of furry faux cheetah trim to same width as coin purse. For added strength at fold lines, use E-6000 adhesive to mount strips of fur trim over fold lines. Let dry.
To ensure your coin purse stays closed in your purse, use a strong permanent adhesive to add magnetic closures to the inside cover/flap.
If desired, spray finished project with a clear sealant such as Krylon Matte Spray.
Makin’s® Push Molds are perfect to make embellishments for your coin
purse or other artwork. For
this pink coin purse, white and bright pink
clays were blended using the Skinner Blend method, then rolled and
textured. The floral embellishments were made with the Makin’s® Florals
(#39005) push mold. Once dry, the finished flowers were coated with Earth Safe Finishes Shimmer Opaque. Other embellishments such as covered
chipboard accents, faux flowers, gemstones, and more also work well.
The monogram coin purse features 2 shades of clay blended, texturing,
and Shimmer Opaque. A covered chipboard monogram colored with alcohol inks,
then sealed with a clear lacquer serves as the accent. The third sample
is blended clay, textured, also with Shimmer Opaque, with a faux flower
embellishment.

 Design Team Member Patricia Krauchune recently shared this customized steampunk Christmas ornament. Pat used an image transfer technique to transfer the photo to a sheet of clay. She used a Makin's® Texture Sheet to create her background texture.


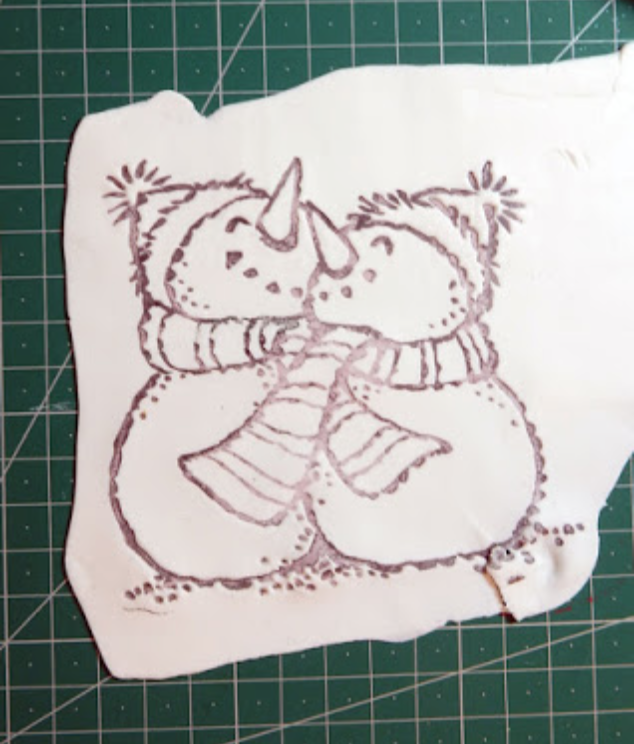


 Once you've cut out the image, color in the scarves, hats and noses with Tombow Markers.
 Next, create the letters by placing white clay in a letter mold.
 Stamp and emboss snowflake images on the pennant board. Using Beacon Tacky Glue, adhere the snowmen in the center of the pennant board and place the letters around it.
  Cindi McGee re-shared a 2014 When Creativity Knocks DIY video on her blog featuring Makin's Clay® and many other great products combined by she and other Artists Jonathan Fong, Judi Watanabe, and Ana Araujo to make some creative hand-made holiday gift ideas. Makin's Clay® was used in Cindi's monogram wall-art project, and in Ana Araujo's stitched, stamped clay bracelet. We thought we'd share it here for our viewers too!


 page to to see lots of great examples for your projects.

