Pages - Menu

Search This Blog

Showing posts with label die cutting clay. Show all posts

Saturday, April 27, 2019

Butterfly Polymer Trading Coins


Butterfly Polymer Trading Coins by Bea Grob
Let's make some Artist Trading Coins from Makin's Clay®.  It is all the rage right now, the Artist Trading Coins, so I jumped on the band wagon and made my own version of Trading Coins.

Materials:

Makin's Clay® - Concord Blue, Olive, White 
Makin's Professional® Ultimate Clay Machine® 
2 1/4" Round circle cutter 
Script rubber stamp, butterfly rubber stamp 
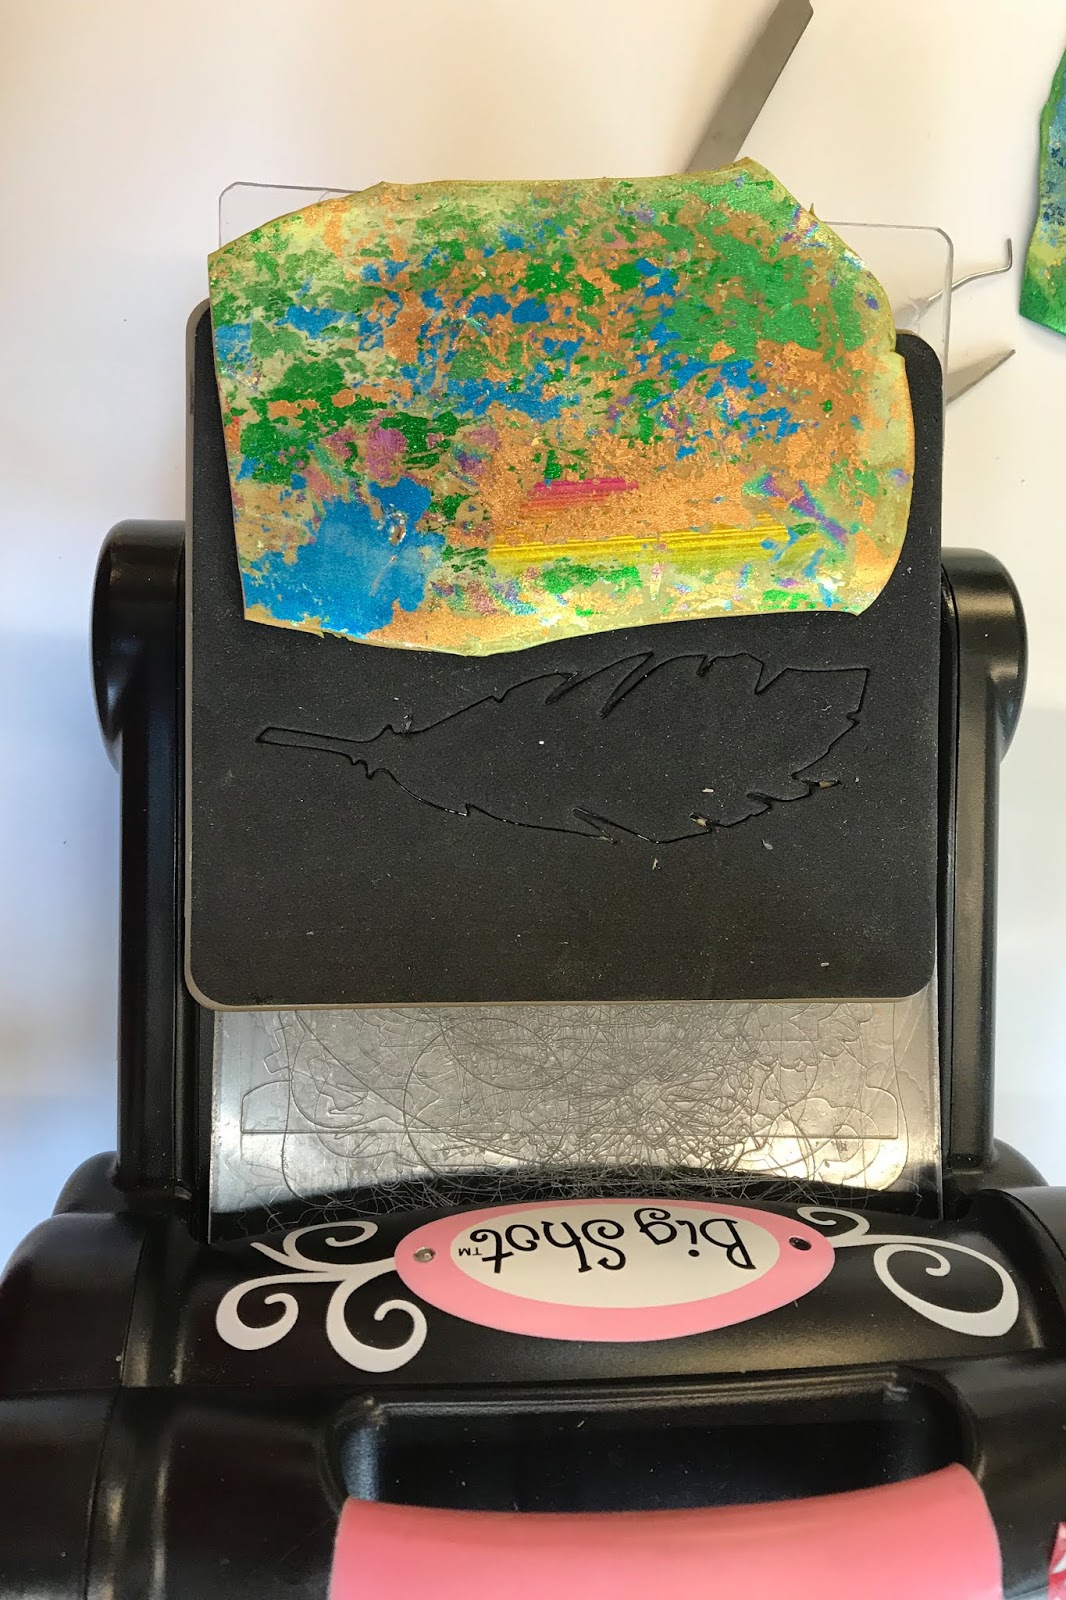
Butterfly die and die cutting machine 
Embossing ink
Embossing powder (pink)
Makin's® Leaves Push Mold 
Kraft colored cardstock 
Tacky glue 
Faux rhinestones 

Instructions:

I started off with some Concord Blue Makin's Clay® which I ran through the Makin's Professional® Ultimate Clay Machine® on the setting #4.

I put the sheet on a tile and then added some script with a rubber stamp, by pressing it into the clay.

Next I used a 2 1/4” circle cutter to make some round shapes from the printed sheet.


Next, I ran some white clay starting at setting #1 and progressing through setting #9, the thinnest setting. Again I placed it onto a tile and then I dusted the whole sheet with some cornstarch.

 My next step was to add some stamping with embossing ink.


 Next I sprinkled some red embossing powder onto my butterflies.

And yes, you can heat set it with the heat gun. Just make sure that you aren't to close to the clay and that you move the heat gun around all the time. And a nice side effect it does try your clay at the same time, especially because we have the thinnest sheet possible.

Did you know that you can die cut Makin's Clay® when it is dry? As you can see here when you go thin you can use your die cut for making embellishments.


I also made some leaves with the leaves push mold. I simply pressed in some green clay, which I have previously mixed using some olive and white clay.

Next I sanded the blue base for the coins with a simple nailfile, just to make sure that I have a nice and smooth edge.


To jazz it up a bit I used some gold colored wax paste and rubbed it just on the top of the coin.


Now comes the fun part, putting all together. I had my coins made with craft colored cardstock (the size of those is 2.5 inch, which is the size a trading coin is usually) , my blue/gold circles from Makin's Clay®, my butterflies and my leaves. I have also grabbed some bling in form of rhinestones.

I used tacky glue to assemble everything together.


I hope you give them a try too, I think they are pretty cute. 
Until next time.

Bea

Saturday, February 2, 2019

Polymer Clay Embellished Valentines' Day Cards


Hi everyone, Steph Ackerman here today with a pair of Valentine's Day cards.  Valentine's Day is right around the corner so it's time to start creating your cards.  ​Makin's Clay can be used for the main element on your cards, or even as smaller elements that help set a theme and add a great dimensional touch to your cards.  Makin's Clay® remains flexible, and is acid free when dry, making it a perfect choice for paper crafting!


​ 
Supplies:
​Cuttlebug Embossing Folder
​Crafter's Companion, Spellbinders dies
Paint
​Instructions:

​As I wanted a darker red for my first card, I added some brown paint to the red clay then conditioned the clay to mix in the paint to achieve an even color.  Next, I ran the clay through the clay machine starting on the highest setting (#1).

I continued putting the sheet of clay through the clay machine, reducing the setting each time, until I had the panel at the desired thickness.


Once the panel was ready, I cut it to fit an embossing folder, then used the clay roller to imprint the words onto the clay.  With fresh clay and medium pressure, the words become imprinted quickly.  You can also use a die cut machine if desired, just be careful of the pressure used.

I trimmed the panel with the Cutter to approximately 4" square.


Using the left over clay, I  die cut some arrows.

Allow all the elements to dry at least 24 hours before continuing.

​For the first card, I matted the clay panel with layers of cardstock and adhered it to a striped card.  For a little shimmer, I rubbed  silver paint lightly over the panel.   Love was adhered across the bottom edge.


For my second card, I used the roller to roll out red clay, then placed a die onto the clay.  Using the roller again, I  forced the die into the clay, cutting the design.  Since the clay was fresh, I only needed light pressure to cut the clay.

I created my card and added a large die cut heart.  In the center of the heart I added a die cut arrow, then placed Love across the center.


Happy Valentine's Day.
​Thanks for stopping by.

Steph


Wednesday, September 26, 2018

Die Cut Makin's Clay® Flowers


Cindi McGee recently shared  these pretty die-cut Makin's Clay® flowers she used to embellish a mixed-media project.  Makin's Clay® is amazingly versatile as it can be molded, die cut when rolled thin, rubber stamped, is lightweight, flexible, and acid free when dry.


Saturday, June 23, 2018

Polymer Clay Feathers Wind Chime

Polymer Clay Feathers Wind Chime by Bea Grob 

I'm back with another project with Makin's Clay®, some bead and wire to make a wind chime or chandelier.

Supplies:

Makin's Clay® 60g Straw, Blue, Green 
Several colors of Decofoil (this is a good project to use up leftovers
Steel Rule Die Feather and Flower (or any other shape you like)
A top Ring, mine was in a starform, but plain circle would work too
An assortment of Beads and Crimp Beads
Wire I used Soft flex Nylon coated Beading wire Diameter .019 inch,  49 Strands

Tools:          

Makin's® Clay Roller
Makin's Professional® Ultimate Clay Machine®
Sidecutter for cutting wire
Crimp plier

Instructions:   
 
I started by rolling the clay through the Makin's Professional® Ultimate Clay Machine®, beginning on setting #1 and proceeding through each setting ending on #5.  I made three sheets from the three colors. The color doesn't matter so much as we going to go over it in the next step.

Whenever I want to use Decofoil on a large piece I spray the rolled out clay and let it set for about 1 minute. Just to make sure that it is sticky enough to pull of the metallic from the foil

Next, I started applying only parts of the foil. As usual, I do burnish a bit and then rip it off like a Band-Aid. As you can see I did use first all my leftovers and I used different colors of foil.

When most of the clay is already covered you can go on easily with the foil allover and use an old giftcard to burnish the foil. Sometimes it takes several passes until the foil decide to stick.


At the end I had these pieces all covered with foil from both sides, as you can see.

I let it dry completely over night and the next day I ran it through the Big Shot die cutting machine with a Steel Rule die. I made Feathers and flowers.

I had no exact plan how many of those feathers I needed, so in the end I had 4 leftover and also some flowers, but I certainly can use them in other project.

I grabbed an assortment of beads, my ring and the feathers and flowers.

Next, I punched with a handheld punch some holes at the top, I also snipped off the feather stalk at the top.  I  prepared 12 wires as I was going to use 12 feathers.


Now I had to string up everything. I started with a crimp bead and then added first the feather and then the beads. To attach them to the ring I made a loop which I secured again with a crimp bead.


Tuesday, September 5, 2017

Fall Banner


Hi everyone, Steph Ackerman here today with a Fall Banner.

Supplies:

Makin's® Clay - White, Terra Cotta, Earth Tones, Brown
Makin's Professional® Cutting Mat
Makin's® Ultimate Clay Machine
Makin's® Texture Sheets
Makin's® Roller and Cutter Set
Beacon® Adhesive - Tacky Glue
Mod Podge Letter Mold
Spellbinders dies
Sizzix Dies
Canvas

Instructions:

Using the Earth Tones clays, condition clay.  Place the green, brown and beige clays together.  Run through clay machine, starting at setting 1.  I repeated this process, moving the dial to the next setting until I had the dimension I wanted at setting 5.


Place the clay between 2 sheets of wax paper, then use a Sizzix die to create the leaves.  Die cutting
fresh clay does not harm dies and the wax paper keeps the clay from sticking to the dies.

The clay die cuts beautifully!  No torn, ragged or uneven edges!


Use texture sheets and the clay roller to add texture to each leaf.  Paint over the textured leaves with assorted colors of paint.

Run brown clay through the clay machine as indicated above.  Do the same with white clay.  Then
use Spellbinders dies to die cut 4 scalloped circles from the white clay.  Again, since the clay was fresh, I placed it between 2 layers of wax paper first.
I allowed the brown clay to dry overnight, then die cut circles from the brown clay using Spellbinders dies.  Since the clay had hardened, there was no need to place the clay between 2 layers of wax paper.  Again the clay cut evenly and without issue. 
Now it was time to assemble the leaves.  Using Beacon Adhesives, I adhered the brown circle to the white scalloped circle and then to the painted leaves.


Next I conditioned additional green clay and ran it through the clay machine as indicated above.

Since the clay was fresh, I placed it between 2 layers of wax paper and die cut it with Spellbinders dies.  Again, the wax paper protects the die and allows for easy die cutting.

To create the letters, I used a Mod Podge mold with Terra Cotta clay.  Next, I placed the letters in the center of the brown circles.  Finally, I die cut acorns from scraps of white and brown clay dry clay using Spellbinders dies.   The white acorns didn't look quite right, so I inked them with brown ink before placing them on the larger brown acorn.  Using Beacon Adhesives, I adhered the acorns to the smaller leaves and placed them on the circles around the letters.


I cut assorted canvas banners, placed them on twine and added the leaves on top. 


Now I'm ready for fall.  Are you?

Thanks for stopping by.

Steph

Thursday, October 20, 2016

Autumn Leaves Votive Ring


Autumn Leaves Votive Ring by Irit Shalom

Hello my dear crafty friends and welcome to my October Fall votive tutorial made for you with Makin's Clay® products.

First, I need to say that I meant to make a clay covered fall bangle. I opened the bangle and it was so tiny to wear that I decided to go to Plan B and to use the wooden base as my glass candle votive holder. And yes, Plan B actually worked.

So here is my tutorial for you and I hope that you will always keep Plan B in your crafty mind.

Materials:

Makin's Clay® - Natural, Light Adobe, Olive, Yellow, Peach and Merlot
Makin's Professional®: 
Makin's® Push mold - Leaves
Beacon® 3-in-1 Adhesive 
Wooden bangle bracelet
Glass candle votive 
Gel medium based paints 
Paintbrushes 
Die cutting machine
Leaf dies 

Step by step tutorial:
E
1.  Mix Natural, Light Adobe and Merlot Makin's Clay® and insert into the Ultimate Clay Extruder® with round hole disc #4.


2. Cover the wooden bare bangle with the extruded clay all around.


Push mold leaves
2. Use the Ultimate Clay Machine®  to roll three piece of clay in Yellow and Peach, beginning on setting #1 and rolling progressively through the settings to end on setting #4.  Let dry.

3. Make Olive clay leaves using the Leaves push mold and let them dry.


4. This next step has a new technique I have not seen done before.  I tried to die cut the dry clay sheet with the very delicate die and was unsuccessful.  I decided to experiment and  die cut it with two layers and it worked.
So let me show you the technique of die cutting clay sheets with a very delicate die.
First make a cut and do not even try to pull the cut shape out of the die.

Put the die with the first clay layer in it over the second sheet of dry clay and now die cut both layers.

Die cut first leaf
Die cut leave again
And now the big surprise: you can take the clay cut out of the die and it has two gorgeous layers!
You will also need to remove any remaining clay from the die. 

Two layered leaf 
Here are just a few more leaves I made with the same technique:

More leaf examples
5. Paint the votive and  all the die cut and molded leaves with a mix of gel medium based paint. I
 used Art Anthology paints, but any gel medium based paint will work.

First, I painted the base with two colors of paint and you can already see the yellow glass votive inside the bangle. I was very happy to find one that was a perfect fit for the bangle size.  Next, I painted all leaves with more colors:
Add color over bangle
Add color to leaves
6. Let the paint dry and arrange the leaves of both kinds over the clay base using Beacon® 3-in-1 Adhesive. As  you can see, the cluster  of leaves is not  flat and there are layers of leaves glued one over another.

Glue leaves to bangle

 And here is how nice it looks on my vintage things table.

Finished candle holder on display

Contact us

Name

Email *

Message *