Pages - Menu

Search This Blog

Showing posts with label Irit Shalom. Show all posts

Sunday, March 26, 2017

Natural Beauty Art Board


Design Team Member Irit Shalom recently shared this mixed-media art board with die cut & push molded Makin's Clay® flower & leaf accents.   Makin's Clay® is a great embellishment for almost any project because it is lightweight, flexible, and can be molded, stamped, die cut, cut with craft punches, and more.

Tuesday, March 21, 2017

Fairy Collage Frame


Fairy Collage Frame by Irit Shalom

Hello my dear crafty friends and welcome to my very last inspirational post as part of the Makin's Clay® Design Team  It's not a real tutorial, but just a kind of " how to make this project" with photo steps.

Product list:

Makin's Clay® - White and Natural
Makin's Professional® Cutting Mat
Makin'sR Roller & Cutter set
Beacon 3-in-1 Adhesive™
Assorted molds
Pentart Acrylic paints
Die Versions Die
$1 shop frame

Instructions:

As the first step I made those two Makin's Clay® hearts using  white Makin's Clay® rolled thin and die cut with Die Versions XL Heart die.  As you can see the die cutting was just partial, the intricate details are embossed onto the clay instead of cut from it.  The technique leaves you with fantastic elements for your projects. 

I used different molds  to  cast a variety of shapes using White and Natural clay. I let all the shapes dry 24 hours.

\


I used Pentart Acrylic paints (some are metallic) to paint all dry clay shapes. Don't try to paint them perfectly, just add some color over the shapes and let them dry.

Next, I arranged the shapes over the clay hearts and make the collage of vintage shapes, fairies and butterflies.  Beacon 3-in-1 Adhesive holds the pieces together.  Arrange the whole collaged piece over the frame.


Monday, February 20, 2017

Winter Themed Holiday Card


Design Team Member Irit Shalom recently shared this winter themed holiday card with dimensional Makin's Clay® accents created with a Makin's® Christmas Decor push mold.  Makin's Clay® is perfect for paper crafting because it is lightweight and flexible, acid free when dry, can be rubber stamped, and can be die cut and craft punched when rolled thin.

Friday, February 17, 2017

Winter Banner

Winter Banner by Irit Shalom
Hello my dear crafty friends and welcome to my new Makin's Clay® tutorial.  This time I decided to make a mixed-media Winter banner.

Materials:

Makin's Clay®  -  Black and White
Makin's®

  • Roller & Cutter Set
  • Push Molds - Christmas Decor, Christmas Nature 

Makin's Professional®

  • Ultimate Clay Machine™
  • Cutting Mat 
Decorative round frame push mold 
Light blue, white, yellow, red paint 
Stencil 
Ribbon 
Scissors
Paintbrush 


Instructions:

1. Roll black Makin's Clay®  using Ultimate Clay Machine® beginning on setting #1 and ending on setting #2. Hand cut the flag shapes as shown and let them dry.

2. Mix white clay with blue acrylic paint and make the light blue color piece of clay.
Roll to setting #3 and tear part of clay to fit the banners as shown.


3. Use stencil and texture paint to make the background squares and let them  dry.
Punch holes over each piece for the ribbon.

4. Cover the edges of torn pieces with clear  glitter texture paint and let them dry. When dry they look translucent and not so white.


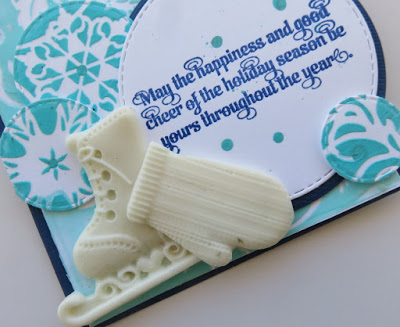
5. Use Christmas Nature and Christmas Decor push molds to make large star, ice skate, bow, snowflakes and mitten, and decorative round frame mold to piece behind large star for the banner.
Use white clay and then paint the parts into the desired colors.

6. When dry paint the molded shapes into gold, red and shiny clear colors.


7. Arrange the parts over the banner and glue them with Beacon 3-in 1 Adhesive™.  Tie the ribbons.

 And now to some close ups of the finished project:

Wednesday, January 25, 2017

A Fairy Door


Design Team Member Irit Shalom recently shared this charming fairy door on her blog.   Irit used Makin's Clay® to make her fairy accents.


Thursday, January 19, 2017

Wings of Hope Bottle of Hope


Wings of Hope Bottle of Hope by Irit Shalom

Note - Here is a bit more information about what Bottles of Hope are - Makin's Clay® is proud to have our designers supporting this worthy effort through the creation of Bottles of Hope featuring Makin's Clay®.  

Bottles of Hope are small glass bottles covered with polymer clay and given to cancer patients. They symbolize a wish and a hope for health.  This project was started in 1999 by a Rhode Island cancer survivor and has spread internationally. Bottles are made by artists, students, survivors, seniors and many more who volunteer their time and love.   Learn more about this worthwhile project, see a gallery of many creative bottles and more here on their website

Hello my dear crafty friends and welcome to my Makin's Clay® January post.  This month we were challenged to make Bottles of Hope.  This is my very first time to make such a small project and I never ever covered any bottle of this size with clay.

Materials:


Makin's Clay® - Blue, White 

Makin's Professional®
Makin's®
Instructions:

1. Roll the blue clay to the size that will cover your small bottle using the clay roller from the tool set.

2. Use the weave texture sheet to make the texture over your rolled blue clay.


3. Cover the small glass bottle with your textured clay and roll over the mat.  If the texture diminishes when rolling the bottle, simply roll the bottle over the texture sheet again.

4. Use small circle cutter from circles clay cutters set and make the bottom circle to cover the bottle.

5. Use Easy Mold Silicone Putty and metal wings from your stash to make your own mold for future use with the clay.

Work according to manufacturer's instructions that are in the putty box.


6. Cover the bottle to the edge with blue clay and make the top with the original cork inside a white piece of clay.

7. Cast the wings with white clay in your self made mold.

Cast the small owl in another mold (Plaid).

Cast the bow using the Christmas Nature push mold.

Cast the top piece with another Plaid mold.

Paint the dry shapes with acrylic paints (I used DecoArt Media Line).


This is the top piece over the bottle.

And the bottle with a cork and the closure.


I hope that you liked my small tutorial and will do some Bottles of Hope for anyone  who needs a bit of hope.  But don't we all need some?

Friday, December 16, 2016

Dragon Egg Jewelry

Dragon Egg Jewelry by Irit Shalom


This month Makin's Clay® challenged it's Design Team members to select a Pin from our Tutorials & Techniques Board or our Polymer Clay Inspiration Projects Board and create a project using Makin's Clay® based upon the chosen pin.

Hello my dear crafty friends!  Irit is here today and I will show you how to make a fancy jewelry set using Dragon Egg Pinterest tutorial inspiration.

This is my own version of this technique. The original tutorial features foil over the polymer clay. I don't have any foil, or even a scalloped polymer clay cutting wheel. So I worked with metallic leafing and a scalloped clay cutter, but the result is very similar.

https://www.pinterest.com/pin/501588477234266218/

https://www.pinterest.com/pin/501588477234266214/
So here is my final project: a necklace, pair of earrings and a key chain/bag chain all together. And now here is my tutorial for you.

Materials:

Makin's Clay® - Black

Makin's®
Oval clay cutters 
Globecraft Enamel and embossing powder adhesive
Gold and silver metallic leafing
Jewelry findings and gold waxed string
Jewelry pliers

Instructions:

Roll half package of black clay with the clay roller to about 1/8" thick.


Add a thin layer of enamel powder adhesive over the rolled clay sheet. You can use any other adhesive that  keeps metallic leafing over the surface; I used whatever I had and it worked just perfectly. Add a random layer of silver leafing over  the adhesive and let it dry.


Add another layer of enamel adhesive and fill with a mix of copper, red gold, and gold leafing as shown.  Let the adhesive dry, but do not wait until the clay is dry.
Use the scallop clay cutter, or a scalloped clay cutting wheel,  and make a few scalloped strips from the metal covered clay piece.
Roll another piece of black clay and use the Makin's® round clay cutters and two sizes of oval clay cutters to make all pieces shown that will make all three jewelry projects.
Cover the ovals with any glossy glue and use all the scalloped pieces to cover both sides of the ovals.

Cut circles from the foiled sheet with the round clay cutters and cover the black clay circles on both sides.
Make holes in the beads and trinkets and let it dry overnight. 


Arrange the necklace using the largest oval piece, larger circles and smaller round beads.
Make the earrings with smaller ovals and small circles as shown. Now arrange the key chain with the last two beads.


Tuesday, December 13, 2016

Festive Cards

Design Team Member Irit Shalom recently shared these festive holiday cards.  Irit created her dimensional embellishments with Makin's Clay®.  She used the Makin's® Christmas Nature push  mold to make her poinsettias.


Contact us

Name

Email *

Message *