Pages - Menu

Search This Blog

Showing posts with label beads. Show all posts

Wednesday, July 10, 2019

Twisted, Gilded Tube Beads


·     Makin’s® Clay 2.1 oz. Brown ½ package
·     Makin’s Professional® Ultimate Extruder Set, or a clay extruder with small hexagon die and the Makin’s CLAYCORE® EXTRUDER ADAPTERS (1MM adapter was used)
·     A sharp tissue blade, or scissors
·     Metal leafing flakes and/or metal leafing flakes
·     Metal leafing adhesive
·     Metal leafing sealer
·     The Beadsmith® One Step Looper 2.5 mm size
·     20 guage dead soft brass wire
·     4 mm brass jump rings
·     6 mm Brass bead caps
·     Brass ear wires
·     Skewers, or very small double pointed knitting needles

·     Small piece of 220 grit wet dry sand paper

Step 1:  Roll a 1/2 package of brown clay into a cylinder.
Step 2:  Place the cylinder into the barrel of the Makin’s Professional® Ultimate Clay Extruder®.
Step 3:  Place the 1mmCLAYCORE® extruder adapter on the clay. Make sure it is centered. 


Step 4:  Place the smallest hexagon ULTIMATE CLAY EXTRUDER® DISC in the cap of the extruder. Then screw the cap on the barrel. 
Step 5:  Extrude the clay.  You’ll need to extrude at least 3 inches of clay for one pair of earrings.   It’s always good to extrude a little more than you’ll need.  
Step 6:  Place the extruded tube of clay on your work surface. Place your palms on opposite ends of the tube.  Roll one palm towards you, and the other palm away from you.  This puts a twist in the tube of clay.  Be careful to use very gentle pressure to avoid crushing the tube. 


Step 7:  Straighten the twisted tube of clay and allow it to dry overnight.  
Step 8:  Once the tube is thoroughly dry, cut it into 1 ½ pieces. I like to use a sharp tissue blade with a sawing motion. 
Step 9:  The tube can also be cut with scissors.


Step 10:  If the ends of the tubes are rough, or uneven, sand them with 220 grit sand paper. 
Step 11:  Place the tubes on skewers, or double pointed knitting needles.  Then, apply metal leafing adhesive.  Use a soft brush and make sure the entire bead is covered. Allow the adhesive to dry for 30 to 60 minutes. 
Step 12:  When the metal leafing adhesive has dried, roll the bead in metal leafing flakes. 
Step 13:  Roll the bead between your thumb and fingers to remove excess leafing.  


Step 14:  You may also roll the bead in a sheet of metal leaf.  
Step 15:  Remove the excess clay by rolling the bead between your thumb and fingers.  Work over a small container when removing excess sheet leafing, this will create multi-colored leafing flakes!
Step 16:  Apply two coats of metal leafing sealer.  Allow the bead to dry thoroughly between coats.  Allow the second coat to dry for several hours before working with the bead. 


Step 17:  Straighten and cut 4 inches of dead soft brass wire. 
Step 18:  Place the wire in the The Beadsmith® One Step Looper 2.5 mm size pliers.
Step 19:  When the pliers are closed, they automatically cut the wire and form a loop. 
Step 20:  Place a bead cap on the looped wire.


Step 21:  Place a tube on the wire.  
Step 22:  Place a second bead cap on the wire. 
Step 23:  Place the wire back in the The Beadsmith® One Step Looper 2.5 mm size pliers. Snug the second bead cap against the tool. 
Step 24:  Close the pliers to form the second loop.   


Step 25:  Repeat Step 17 through Step 24 to create a second link. 
Step 26:  Cut 4 pieces of brass necklace chain, 1.5 inches long. 
Step 27:  Open a 4 mm jump ring.
Step 28:  Slip the jump through the links on the chain then close the jump ring.


Step 29:  Open a second 4 mm jump ring.  Slip it through the first jump ring.  
Step 30:  Then place it through one of the loops on the link and close it. 
Step 31:  Open another 4 mm jump ring and place it through the other loop on the link, then place it through the ear wire and close it.  


Step 32:  Repeat Step 26 through Step 31 to create a second earring.  
Step 33:  Experiment with different colors of metal leafing to create many unique links!  


Monday, June 24, 2019

Monday, January 21, 2019

Falling Snow Necklace


Falling Snow Necklace by Cindi McGee
Materials:

Makin’s Professional® 
  • Cutting Mat
  • Professional Clay Tools 
Makin’s® Christmas Nature Push Mold
Jewelry wire
Clear/Silver glass bugle beads
Blue crystal beads 
Silver closure 
Swellegant® 
  • Silver Metal Paint 
  • Sky Sapphire Patina 
  • Sealant
Jewlery pliers
Paint brush

Instructions:

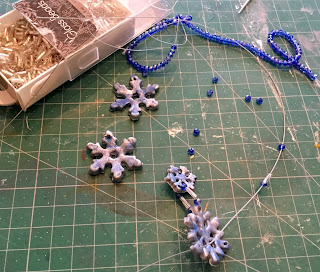
Use white Makin’s Clay® to make 1 small snowflake, 1 medium snowflake (your choice of the two patterns) and 2 additional medium snowflakes in the pattern you did not select for the first medium snowflake.  

Use clay tool to make small hole for jump ring near edge of smallest snowflake, near edge of two matching snowflakes, and on center snowflake make 3 holes, evenly spaced, around outside. 


Let dry 24 hours. 

Paint snowflakes, front and back, with silver metal paint.  Let dry.  Apply second coat.  Let dry. 

Apply third coat, and while paint is still wet, dab on sky sapphire patina.  

Let dry overnight. Apply sealant to front and back of each snowflake.  Let dry. 


*Note - I changed my overall design concept after the snowflakes had dried and were painted.  Another great feature of Makin's Clay® is that even after it has dried, it maintains it's flexibility and it was easy for me to push a needle tool through two of the snowflakes to the make additional holes I needed on the opposite side of the original two holes. 

Use jewelry wire with beads as accents to connect the smallest snowflake to the center snowflake.  I used a pattern of one blue, one silver bugle, one bugle on both the front and back of the pieces as a connector.

Repeat to connect two matching snowflakes to center snowflake, using the same blue/silver/blue pattern on the front and back sides.  

Measure and cut enough wire to have the necklace hang at desired length (cut a little extra for wrapping, etc.).  Cut in half.

Loop wire through remaining holes in two matching snowflakes, add a blue bead then push the opposite end of the wire through the blue bead, and wrap around wire above bead then trim.  Add bugle beads to remaining length of wire.  Repeat on opposite side.  Add closure.


Monday, August 20, 2018

Mokume Gane with Makin's Clay®

Mokume Gane with Makin's Clay® by Bea Grob
Lately, I have been experimenting with the Mokume Gane technique with Makin's Clay®.  Right away, yes it did work, but you have to adapt a little bit if you are coming from the oven bake clay. 

Materials:
Makin's Clay® - Vineyard Tones, Peach, Black 
Makin's Professional®
  • Ultimate Clay Machine®
  • Cutting Mat 

Makin's® Clay Cutters, square Set Nr.  36002  
A spray bottle with plain water
Piece of plastic wrapping or household wrap
Cording, earring wires, closures, findings, etc. as desired

Instructions:

For this project I used the set with the Vineyard colors, every color except the brown. You need colors that give some contrast also in value. So I did add the peach color as a light value and the black as dark value.

First, I ran every color through the Makin's Professional®Ultimate Clay Machine® on setting #1 and progressively increased ending on setting #8.

I started with peach and stacked the other colors on top. 

I added some metal leaf to second layer of peach.

The final sheet was black. 


This is what the whole stack of sheets looks like. Don't worry to much if they don't match perfectly. Even though I had roughly the same amount of clay, the squares didn't come out exactly the same.  

Next, I trimmed the edges a bit.  This is what the stack looks like from the side. 


Back to the Makin's Professional® Ultimate Clay Machine®... I ran all the stacked sheets first through the setting # 1 and then stepped up the #8 again. You get a long sheet like this.

The next step is to cut 4 equal squares and then stack them together again (and keept the cut offs, we need them later).


Next, I used a tool to make indentations, here I use the back end of a brush.  Experiment with any of the tools in the Makin's Professional® Professional Tool Kit®, they would also work well!

I ended up with a stack like this. 


The stack is still a little to wide for my taste, so I squeeze it into a log. I took my time and rotated the log quite a bit to squeeze from all sides.

When finished, you can see the distortion on the sides, which is good, so no worries.

Now it is time to make a jewelry form. I ran all the leftovers and cutoffs again through the clay machine to make a uniform color. When it all was mixed together I made sheet on the setting # 1 of the clay machine.

I cut the first piece with a flexible clay blade and stacked it on a second sheet again from the same sheet and made it double thick.


To smooth out the seam I used one of the Makin's® clay tools. Just add a tiny bit of water and smooth it out with the round part.


I cut the first piece with a flexible clay blade and stacked it on a second sheet again from the same sheet and made it double thick.


To smooth out the seam I used one of the Makin's® clay tools. Just add a tiny bit of water and smooth it out with the round part.


In the meantime the stack had a little bit of time to begin to dry. Usually, you want to put unused clay
 into a zip lock bag together with a damp paper towel to prevent drying out. But for cutting slices from the log it is easier if it has dried just a bit, but of course not completely. If it is to soft, then you have to let is sit another 10 minutes or so. It also depends a little bit on area you live in.


I started cutting off slices from my log. I used more a sawing motion then running quick through the log. You can't cut really thin, so I did run it through the clay machine again to get an elongated piece which I then use to cover up the jewelry pendant form.

I wrapped the pieces around the edges  of the pendant form and cut them flush on the backside.

To make a hole I  used use a piece of a straw on the first pendant.

For the second pendant I added a hole through the top of the pendant. I used a needle tool and with a drilling motion to run it through. 


I also made some beads, again I used the leftover as a base and then wrapped it with the slices. To get  even sized beads I use the Makin's® Clay Cutter, square Set Nr.  36002 to cut out squares from the sheets and then I rolled it into a core bead. 

Next, I sliced the cane again and formed them a bit over my knuckle. This makes it easier to wrap the core bead from the scraps.
The next day I was ready to turn my pieces into a completed jewelry set. 


Contact us

Name

Email *

Message *