 |
| Falling Snow Necklace by Cindi McGee |
Makin’s Clay® - White
Makin’s Professional®
- Cutting Mat
- Professional Clay Tools
Makin’s® Christmas Nature Push Mold
Jewelry wire
Clear/Silver glass bugle beads
Blue crystal beads
Silver closure
Clear/Silver glass bugle beads
Blue crystal beads
Silver closure
Swellegant®
- Silver Metal Paint
- Sky Sapphire Patina
- Sealant
Jewlery pliers
Paint brush
Instructions:
 Use white Makin’s Clay® to make 1 small snowflake, 1 medium snowflake (your choice of the two patterns) and 2 additional medium snowflakes in the pattern you did not select for the first medium snowflake.
Use clay tool to make small hole for jump ring near edge of smallest snowflake, near edge of two matching snowflakes, and on center snowflake make 3 holes, evenly spaced, around outside.


Let dry 24 hours.


Apply third coat, and while paint is still wet, dab on sky sapphire patina.
Let dry overnight. Apply sealant to front and back of each snowflake. Let dry.
 *Note - I changed my overall design concept after the snowflakes had dried and were painted. Another great feature of Makin's Clay® is that even after it has dried, it maintains it's flexibility and it was easy for me to push a needle tool through two of the snowflakes to the make additional holes I needed on the opposite side of the original two holes.
Use jewelry wire with beads as accents to connect the smallest snowflake to the center snowflake. I used a pattern of one blue, one silver bugle, one bugle on both the front and back of the pieces as a connector.
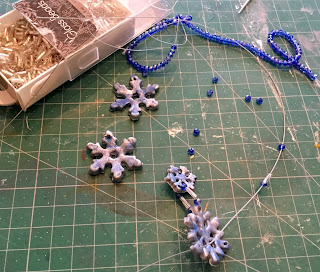 Repeat to connect two matching snowflakes to center snowflake, using the same blue/silver/blue pattern on the front and back sides.

Use jewelry wire with beads as accents to connect the smallest snowflake to the center snowflake. I used a pattern of one blue, one silver bugle, one bugle on both the front and back of the pieces as a connector.

Measure and cut enough wire to have the necklace hang at desired length (cut a little extra for wrapping, etc.). Cut in half.
Loop wire through remaining holes in two matching snowflakes, add a blue bead then push the opposite end of the wire through the blue bead, and wrap around wire above bead then trim. Add bugle beads to remaining length of wire. Repeat on opposite side. Add closure.


