Pages - Menu

Search This Blog

Showing posts with label mica powders. Show all posts

Friday, September 20, 2019

"Thankful" Autumn Cards


"Thankful" Autumn Cards by Bea Grob

Fall is around the corner, I did spot already some colorful leaves. That and because I need some cards anyway inspired me to make some “faux fall leaves.”  Embellishments from Makin's Clay®are easy to make and once the Makin's Clay® is dry it is acid free, so perfect for going onto cards, scrapbooks and what not.

Supplies

About 40 gr (1 ounce) of white Makin's Clay®
Makin's® Push Mold Leaves SKU 39001
Cutting Matt
Several colors of mica powders

Materials

I started with a rolled ball of clay approximately 1 cm diameter.  Push it into the mold.

Make sure that the backside is flat, by smushing excess clay away from the leave. Continue to make as many leaves as you would like. 

While the clay still is fresh, right after you have made the backside flat, pull the leaves carefully out from the mold. Sometimes it is helpful to bend the mold a bit which can be done, as the mold is flexible. Make a bunch of leaves and make sure that they don't dry. I sprayed mine with a little bit of water, while working on some more leaves. For the next step the Makin's Clay® still needs to be damp.


Grab several colors of mica powders you like. I have chosen greens, golds, copper, yellow. I also added a hot pink. I added them in different spots onto the leaves with a brush. Simply dip into the powders and then dabb it onto the leaves.

let them dry overnight.


The next day I grabbed some papers, ribbons and card bases to make two cards.

On some craft colored card stock I have printed on my computer the word thankful and then I cut it to size. I mostly always add some black outline with a permanent marker. 

For the card base and the mat I use some glue, but for the word and the leaves I use some foam tape to raise them up a bit.


Now you have some beautiful fall themed cards which would also work well for Thanksgiving day.

Tuesday, October 23, 2018

Autumn Leaves Headband

Autumn Leaves Headband by Cindi McGee
An outdated headband is given new life with autumn greenery enhanced with metallic powders.   Makin's Clay® is the perfect choice for these types of projects as it maintains it's flexibility after drying so there is less chance of breakage with regular wear. This headband was published as part of an article in the Fall 2018 issue of The Polymer Arts Magazine.  


Materials:

Makin’s® Leaves Push Mold 
Makin’s® Christmas Nature Push Mold
CreateAlong.com Mica Powders - Copper, Gold, Golden Green
Brown mica powder 
Oak leaf silicone mold 
Fine paintbrushes
Jewelry pliers
Copper wire 
Faux leather headband 
Beacon 527 Adhesive™ 

Instructions:

Use brown Makin’s Clay® to mold acorn from Makin’s® Christmas Nature push mold, multiple leaves from Makin’s® Leaves push mold, and oak leaf from silicone mold.  (Tip:  Makin's Clay® works wonderfully with our flexible Makin's® Push Molds, but also with a variety of other types of molds.  Additionally, our push molds also work well with all types of clay, resin, fondant, gum paste, etc.) 


While clay is still fresh, use gold, copper, golden green and brown mica powders to enhance molded elements.  

Let elements begin to dry, but not fully dry - I allowed mine to set about 30 minutes.  (Goal is to have the clay firm enough so the element will not be distorted when arranging and mounting ot head band.)

I placed the headband around a cooking pot to hold it in place and make it easier to mount the pieces.  Arrange and mount your elements using Beacon 527 Adhesive.  

Let dry 24 hours. 

Use copper wire to add decorative wire accents around the leaves and acorn.


Thursday, September 27, 2018

Quick & Easy Interchangeable Leaf Earrings


Interchangeable Autumn Leaf Earrings by Cindi McGee
Creating eye-catching autumn earrings couldn't be easier - just a few steps and you've got an interchangeable set!  

Materials:

Makin's Clay®  - Persimmon 
Makin's® Leaves Push Mold 
Makin's Professional® 
Cutting Mat
Professional Clay Tools®
CreateAlong.com Mica Powders - Copper, Gold, Golden Green 
Paintbrush 
Goldtone hoop earring wires 

Instructions:

Use Persimmon clay to make two larger sized leaves, two medium sized leaves, and two small leaves.  
Apply copper mica powder to two matching leaves, gold to another set, and the golden green to the third set of leaves. 
Use clay tool to make a small hole in the top center of each leaf.  Let dry 24 hours. 


That's it!  Simply add the leaves to the goldstone hoop earring wires as desired.  All 3, any 2, or one set at a time - it's your choice!


Wednesday, December 27, 2017

Raku Pottery Inspired Vase


Raku Pottery Inspired Vase by Bea Grob
Today I show you how you can mimic the Raku fired earthen clay by using black Makin's Clay® and some mica powders.  But let's start at the beginning.  

Materials:

Makin's Clay® - Black 
Makin's Profesional® Ultimate Clay Machine®
Makin's® Clay Roller 
Two part mold making compound 
Mica powders 
Glass bottle 
PVC glue 

Instructions:

Whenever I go for a walk, I tend to collect things, this time I found some beautiful deeply veined leaves which I turned into a mold with some two part silicone mold putty.

I first made two equal sized balls from each of the putty components and then mixed them until they had a uniform color.  I rolled them out to about 4 to 5 mm thickness and pressed the leave into the silicone.

It doesn't take long to cure the silicone, so after a half hour or so, I was ready to roll out the black Makin's Clay® using the Makin's Professional® Ultimate Clay Machine®  on the thickest setting, #1.   I pressed the mold onto the clay and applied light pressure with the clay roller. 

That's what it should look like, you want some nice veins in your Makin's Clay®.
I covered a recycled glass bottle with some PVA glue and let it dry completely.  This helps to give a little bit tooth to the smooth surface and the Makin's Clay® sticks better.

Next, I used some leave shaped cookie cutters to cut out leaves shapes with the structure in it. (Note: the cookie cutter has two sided, a smooth one and the jagged one you can see in the picture, I used the smooth one). Before I attached them to the glass, I used different colors of Mica powder to enhance them. 

I started at the top overlapping them slightly, making sure that the first one still could be lifted, so that
you can squeeze the last one underneath the first one. I worked my way down and at the end I  and cut off any overhang at the bottom.
  
Voilà! That's how you get your own version of Raku pottery.


Tuesday, July 25, 2017

Driftwood Doll Angel

Driftwood Doll Angel by Bea Grob

At the moment I'm very much into Dolls and Driftwood. So I'm introducing here my Driftwood Doll Angel. I'm pretty sure you can come up with something that pleases you. So why don't you give it a try?

Supplies:

Makin's Clay® Natural (I used approx. 120 gr)
Makin's® Clay Tools
Makin's Professional®
  • Ultimate Clay Machine®
  • Cutting Mat
Some old laces
Micapowders in different colors
Driftwood, or some other item to put a stick in
Wire from the hardware store about 20 Gauge
Some tulle for the wings

Instructions:

I began by drilling a hole for the stick.

Next, I used some clay to make first a ball about 1 inch size and I shaped the ball in form as you can see in the picture.


I connected all the parts together and let it dry overnight.

The next day, I rolled out the clay on the thickest setting of the clay machine. Thanks to the non-stick rollers, it works like a charm.


Next, I layed the lace on top of the clay and pressed it in by rolling with the roller several times. I wanted the fibre to be on the same height as the clay. Now comes the fun part, grab some Mica Powders in the colors you like and apply them with a stipple brush.

At the end, I go over it with some paper towel, to wipe off any excess.

Now you can lift your lace carefully from the clay to reveal the pattern.


I did a test wrap and decided I had to tear a bit. Then, I used some of the leftover to make two small balls which I added on the backside of the patterned clay before I wrap the whole “fabric” around.

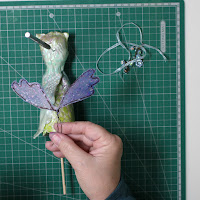
Now it it time to make some wings. I used wire and some tulle.

First, I drew a wing shape and then I cut 2 pieces of wire - one for each wing. I usually work on both wings at the same time. For me it's easier to give them somewhat the same form and size.
I start by bending a curve and check it on my drawing.

Using a dowel helped me shape the round forms and a plier to give me the sharp corners.


When I'm happy with the shape, I twist them together just twice, we don't want a bulk where they connect. I also make sure that they are as flat as possible for the next step.

To apply the tulle, I use some fabric stiffener, encasing the wire from both sides.

Don't leave it somewhere lying around on any surface, you have to put it upright to dry (ask me how I know, the first set I had to scrape it from the surface and had to start over again... lol)


Time to pierce the lady/dress. I made a hole to put in the wings.

To insert the wings I twisted them together and added a dab of glue to the end. Make sure that you make the hole long enough, but don't poke through.


I then sealed the Micapowder with a varnish, I used one that had some Mica in it, but a plain one would have worked too. Next, I also added some bling, from a piece of broken jewelry, just for fun.


Now have fun making your own sculpture, it's really easy with Makin's Clay®.

Contact us

Name

Email *

Message *