Pages - Menu

Search This Blog

Showing posts with label leaf. Show all posts

Saturday, September 28, 2019

Autumn Leaves Candle Holder


Autumn Leaf Candle Holder by Panarili
Thank you Bea Grob for the great idea to use wooden cubes!  

Tools and Materials:

Makin's Professional® Cutting Mat
Makin's® clay roller 
Leaves
Wooden cube
Tea light candle
Water colors
Paint brushes 

Remove the clay from the packaging.  Any clay you are not using put into a plastic bag with a zipper top, add a damp paper towel or a moist towelette to keep the clay fresh for later use. 
Roll out the clay about 2-3mm thick to cover the cube on all but one side.  Cut the rest of the clay. 


Place leaves on each of the 4 sides except for the bottom.  Press them well


Take watercolours in fall shades and paint each side in a different shade. You may also add some details if wanted, I did so with the berries for one of the leaves.  


Once dried a bit, take off the leaves and colour the leaves.  Let it dry well.


Leave it dry for at least 24 hours, then extract the cube = that was the most difficult part))) Colour the inside if wanted.  
Place the candle inside.  Most likely it will be too deep for it, so put some foil or something else in the cube.  Then place the candle.  Make as many as you wish and enjoy the fall days. 


Friday, September 20, 2019

"Thankful" Autumn Cards


"Thankful" Autumn Cards by Bea Grob

Fall is around the corner, I did spot already some colorful leaves. That and because I need some cards anyway inspired me to make some “faux fall leaves.”  Embellishments from Makin's Clay®are easy to make and once the Makin's Clay® is dry it is acid free, so perfect for going onto cards, scrapbooks and what not.

Supplies

About 40 gr (1 ounce) of white Makin's Clay®
Makin's® Push Mold Leaves SKU 39001
Cutting Matt
Several colors of mica powders

Materials

I started with a rolled ball of clay approximately 1 cm diameter.  Push it into the mold.

Make sure that the backside is flat, by smushing excess clay away from the leave. Continue to make as many leaves as you would like. 

While the clay still is fresh, right after you have made the backside flat, pull the leaves carefully out from the mold. Sometimes it is helpful to bend the mold a bit which can be done, as the mold is flexible. Make a bunch of leaves and make sure that they don't dry. I sprayed mine with a little bit of water, while working on some more leaves. For the next step the Makin's Clay® still needs to be damp.


Grab several colors of mica powders you like. I have chosen greens, golds, copper, yellow. I also added a hot pink. I added them in different spots onto the leaves with a brush. Simply dip into the powders and then dabb it onto the leaves.

let them dry overnight.


The next day I grabbed some papers, ribbons and card bases to make two cards.

On some craft colored card stock I have printed on my computer the word thankful and then I cut it to size. I mostly always add some black outline with a permanent marker. 

For the card base and the mat I use some glue, but for the word and the leaves I use some foam tape to raise them up a bit.


Now you have some beautiful fall themed cards which would also work well for Thanksgiving day.

Tuesday, October 16, 2018

Autumn Leaves Napkin Rings


Materials:

Makin’s Clay® White 120g
DecoArt acrylic paints: Golden Brown, black, Craftsmart paint - Hunter’s Green and Lush Foliage  Art-C Gold paste, or Inka Gold paste, Empty Toilet paper roll, packing tape 
Makin’s Professional® Ultimate Clay Machine®
Makin’s® Push Molds - 39001 Leaves 
Scissors, needle tool, paintbrush.
Americana DuraCoat Matte or Gloss Varnish
Cornstarch 

Directions:

Fig 1 – Open one half of a 120g package of white Makin’s Clay®, divide this into two sections and add a small puddle of Golden Brown paint to a section and Lush Foliage ( pale green ) paint to the other section, and mix thoroughly.  Then, take one third of each mixed color and mix them together, creating a third color. Place all the mixed clay in a plastic bag while you prepare the napkin support. I used clear packing tape to cover the toilet paper roll, which makes removing it from the napkin ring easier. Then I marked one inch sections and cut them with scissors.

Fig 2 – Condition the remaining white Makin’s Clay® and roll a narrow, 1 inch strip on the #1 setting of the Makin’s Professional® Ultimate Clay Machine® The strip should be as wide as the paper roll sections. Place the clay around the paper roll, blending the seam. You can trim the excess clay with scissors.  Add texture to the white strip if desired, not much of the base strip will show when you are done. Use a soft brush to add cornstarch to the Makin’s Leaves Push mold, and using one color at a time make leaves to add to the ring. My favorite way of using the push mold is to push a small amount of clay, letting it squish past the mold, then use scissors to trim the leaf to the size and shape I want.  I find the leaves are more realistic that way, as the edges can be trim with scissors on an angle to make them appear thinner.  So my aim is not to fill the mold, but to have just enough clay to get the impression from the mold. I used many different leaf shapes from the mold, and make at least four of each color for variety. 


Fig 3 – Make as many Napkin Rings as you like, you should have enough clay to make 6. Let them dry over night, then remove the cardboard ring, and allow them to dry for another 24 hours before antiquing them. To antique, I used Hunter’s green acrylic paint mixed with Black paint and painted the whole ring, including the inside. Then I used a slightly damp baby wipe to remove the paint from the high parts of the leaves, as well as the inner ring. Change the baby wipe when it gets too dirty to remove the paint, you need a clean edge for best results. Let them dry for a bit, then add gold highlights with Art-C Gold paste if desired for a bit of sparkle. I used the gold paste on the inside of the rings as well. The last image shows one ring with the gold added and the bottom ring without. Let this dry for an hour, and then seal your napkin rings with your favorite varnish. I used Americana DuraCoat Gloss.


These are fun, easy napkin rings to make, perfect for your Holiday table!

Friday, October 12, 2018

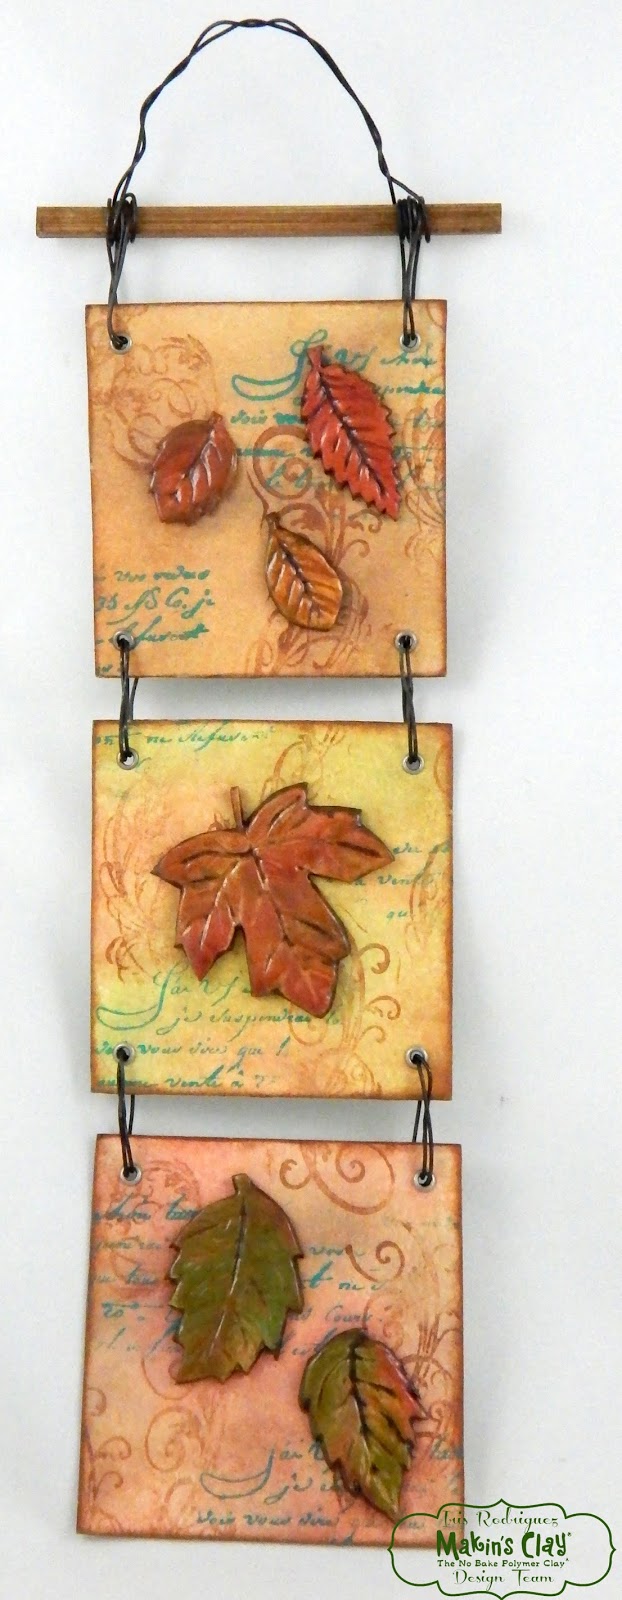
Fall Leaves Wall Hanging

Fall Leaves Wall Hanging
by Iris Rodriguez
Fall is my favorite time of the year. I enjoy the temperatures, the colors, and the fresh, crip air. In honor of my favorite season, I made this fall leaves wall hanging using the Makin's Clay® Leaves mold.   

Materials:


Makin's Clay®– White clay  
Makin's®– Leaves Push Mold  
Makin's Professional® Cutting Mat
Imagine Inks-VersaMagic – Dew Drop 4 pack Southwest; Brilliance Dew Drop- Moonlight White, Galaxy Gold
Watercolor paper – Cold Press, 300 GSM - 140 lbs
Chipboard
1/8 Inch Hand Punch, Circle
Eyelets for Scrapbooking
20 Gauge steel wire
Sculpey Satin Clay Sealer
Precision Knife
Brayer
Wooden round or square rod
Baby wipes
Heating tool 

Instructions:


Make the clay leaves by pushing the clay into the leaves mold.
Cut out excess clay with a precision knife. Let the clay cure for 24 hours. While the clay is drying, work on the substrate; watercolor paper squares.
Cut three squares to a desired size. Using sponge dauber or other small sponge color ink the squares with the VersaMagic Dew Drop Southwest 4-pack set inks.


After adding all the color inks, add a little sparkle by blending in Brilliance Galaxy Gold, then Moonlight White to all three squares. Ink the edges. 

Stamp images randomly on all squares. Continue to blend in the inks, if necessary.

Glue the squares to the chipboard by adding a layer of Medium Gel, then lay down the squares and burnish with fingers or pass a brayer over it. Although, the clay is lightweight, adding a little strength with the chipboard, will keep the watercolor paper from warping once the leaves are glued. Once the gel dries, cut the squares. 
Punch holes on the corners of the squares. Add eyelets and attach the squares by wrapping the wire at each connection point. Wrap around twice and secure the end by twisting the on the backside.
Attach a wooden rod by looping the wire on each end and across, leaving enough of a loop to hang.
Once the 24 hours have elapsed, the leaves will have cured. Add Raw Umber acrylic paint to the leaves and wipe off the raised areas, leaving paint in the crevices. Let it dry.
Use your fingers or Brushstix to color the leaves with VersaMagic Inks; Gingerbread, Red Brick, Turquoise Gem and Brilliance Galaxy Gold. Add the colors randomly. Do not blend the colors, it kind of dulls the colors. Heat set the ink with a heating tool. Ensure to seal the leaves with a satin clay sealer, which also adds vibrancy.
Glue the leaves to the squares.

Thursday, September 27, 2018

Quick & Easy Interchangeable Leaf Earrings


Interchangeable Autumn Leaf Earrings by Cindi McGee
Creating eye-catching autumn earrings couldn't be easier - just a few steps and you've got an interchangeable set!  

Materials:

Makin's Clay®  - Persimmon 
Makin's® Leaves Push Mold 
Makin's Professional® 
Cutting Mat
Professional Clay Tools®
CreateAlong.com Mica Powders - Copper, Gold, Golden Green 
Paintbrush 
Goldtone hoop earring wires 

Instructions:

Use Persimmon clay to make two larger sized leaves, two medium sized leaves, and two small leaves.  
Apply copper mica powder to two matching leaves, gold to another set, and the golden green to the third set of leaves. 
Use clay tool to make a small hole in the top center of each leaf.  Let dry 24 hours. 


That's it!  Simply add the leaves to the goldstone hoop earring wires as desired.  All 3, any 2, or one set at a time - it's your choice!


Wednesday, November 8, 2017

Autumn Leaf Pendant

Autumn Leaf Pendant by Patricia Krauchune
For my November Makin's Clay® project, I decided to showcase the flexibility of Makin's Clay®. This leaf is almost paper, thin yet flexible and strong. 

Materials:

Makin's Clay® - Black                DecoArt® Triple Thick Glaze™
2 Part Silicone Leaf Mold            Jacquard® Lumiere® Metallic Olive Green Paint  
Jump ring                                     Nail Art Foil 
1 Eyelet                                        Krazy® Glue
Weldbond Glue

Recommended Makin's® Tools: 

Makin's Professional®
  • Ultimate Clay Machine®
  • Cutting Mat

Instructions:

Roll out some Black Makin's Clay® to the #6 setting on the Ultimate Clay Machine®. Place the thin sheet of clay between the two part leaf mold: (pink) and press firmly. Remove clay from mold and allow to dry overnight. 


I punched a few random holes in the leaf and trimmed the edge with scissors. I hand tore one small section to give a more realistic look to the leaf. Next, punch a small hole at the top of the leaf and add a small eyelet. I added a few drops of Krazy® Glue to the back of the eyelet for reinforcement. 
 

Paint the leaf with Jacquard® Lumiere® Metallic Olive Green paint. Here's where the "magic" happens. Working on a small area at a time, brush a layer of Weldbond Glue then burnish the nail art foil over the glue and lift off. Keep repeating till you get the effect you like and coverage of the foil that pleases you. Let dry completely and then do the same to the back side of the leaf. 
 

After the leaf has dried overnight, seal both sides with DecoArt® Triple Thick Glaze™. Add either a chain or a leather cord and you are finished! 


I love the versatility of Makin's Clay® in this project. 

See you soon with another fun Makin's project! 

Contact us

Name

Email *

Message *