Pages - Menu

Search This Blog

Showing posts with label bird. Show all posts

Sunday, May 19, 2019

Love Birds Ornament

Love Birds Ornament by Leila Bidler

This is a perfect little gift to brighten someone's day, you could even make it make with your children!

For this project you will need:

Makin's Clay® Natural, approx. 60g or less
Makin's® Clay Roller
Makin's® Clay Cutter of your choice
Makin's® Clay Tool Set 
Gold leaf flakes
Metal leaf adhesive
Needle tool
Hand drill
Chalk pastels (I used raw sienna, burnt umber and dark red)
Soft paintbrush
Firm paintbrush
Twine
Gold/metallic sewing or embroidery thread (and needle)
Superglue

Instructions:

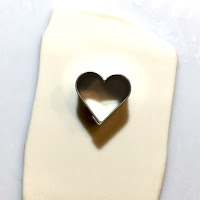
Roll out your Makin's Clay® natural and cut out a center shape. In my example I am using the small heart shaped cutter from the Makin's® Mini Geo 37004 set. 

After cutting out the center shape cut out the basic house form and two stripes for the roof. You can do that freehand, place it on the clay and cut out the shape using you Makin's® Clay Tools. Put one stripe for the roof near the house shape to see where to best trim them/how long to make them.


Take a soft paint brush and wet the "roof" with some water to be sure everything adheres permanently and then use the Rasp from your Makin's® Clay Tools Set to trace lines on the "roof" to mimic wood.

Now use Rasp and Chisel from your Makin's® Clay Tools Set to create alternating lines and dots on the surface. Follow the example below or invent your own fun pattern! Poke a hole also on the center top to be able to string it (you could also skip this and glue a magnet on the back if you with to make a magnet instead of an ornament to hang).

Now we need to color our tiny house, to do that grate off some chalk powder form your chalk pastels, we will first use raw siena and burnt umber on the house and then add also some red for the roof. Wet your paintbrush just slightly, pick up some of the light color and brush it onto the house vertically. Then add some of the darker brown. You want it to be almost "dry brushing" to imitate wood, not a uniform coverage of color. If you do not like what you see or add too much color, no problem at all, just wipe it off with a wet towel and paint over it again.


Now on to making the 2 tiny birds! Start by rolling a small ball of Makin's Clay® Natural with your hands, then shape it into a crop and pinch the rounded end into a tiny head shape: 


 Make a second little bird and with the help of your paintbrush and a drop of water adhere them to the house and with your needle tool give them eyes. 

To complete our ornament we now need a heart shaped bead. Roll a piece of Makin's Clay® Natural into a small egg shaped ball and then use your needle tool to indent the rounded top to form the heart shape. Using your needle tool also poke a hole from top to bottom so we will be able to string it.


Let your creations dry for 24 hours.

After they are completely dry use your soft paintbrush to apply your Metal Leaf adhesive on the birds and the heart shaped bead. Tip: put the bead on a skewer to hold it while applying the glue and the gilding flakes!

When the glue is fresh it is milky-whitish, let it dry for about 10-15 minutes and it will turn completely transparent and sticky. 

The easiest way to apply Gilding Flakes is to keep them in a jar with a lid and to just push in the creation, lift it up, but keep it above your jar and using a paintbrush with firm bristles brush off the excess, back into the jar to use again. 


Use a small hand drill to make the holes in your pattern large enough for needle and metallic floss, if needed.

Thread the metallic floss thru the holes and secure it on the back with small nods. To be sure the nods will hold you can also use a drop of superglue to secure them.


Now you can use some twine that you can pass thru the top hole and the heart shaped bead to hang your ornament.

Tuesday, November 13, 2018

Beaded Birdy Pendant


Design Team Member Patricia Krauchune recently made this beautiful beaded birdy pendant with Makin's Clay®!   We love how she filled in the punched bird area with microbreads for aded texture, depth and color.

Wednesday, July 25, 2018

Dove Wedding Favor Pencil Toppers

Dove Wedding Favor Pencil Toppers by Patricia Roberts-Thompson
Use Makin’s Clay® and the 3 piece Dove Cutter set (36012) to make some inexpensive and personalized Wedding Favors or Pencil Toppers for your special even.  Make them in your special colors!

Materials:   

Makin’s Clay® White 30g
Makin's® 
  • Floral Texture Sheet - Set 38051
  • Dove Clay Cutter Set 36012
  • Clay Roller 

Makin’s Professional® Ultimate Clay Machine®  
Paintbrush
20 gauge wire and 24 gauge wire
Cornstarch
Small heart cutter 
Americana DuraCoat Matte Varnish or Golden Matte varnish
White tacky glue
Art-C Paste - Silver and Turquoise
Card stock
Posca paint pen (black) pencils
Hb or retractable 

Directions: 

Roll the clay on the thickest setting (#1) of the Ultimate Clay Machine®, then cut two doves from your white clay. Coat one side of each, facing opposite directions, with the silver Art-C paste, or you may choose to paint the bird with acrylic paint after assembling the project. Cut a small heart for each side, and color them with the Turquoise Art-C Paste.  Cut an 8 inch piece of wire ( I used Copper ) make a loop on one end, add some white glue to the loop, and then press the wire lightly on the inside of one dove . Cover the clay with plastic while you prepare the banner.

Fold a piece of card stock in half so you can cut two sides at the same time, and cut a banner shape. You could use card stock in your colors, or touch up a plain color with the same Art-C Paste that you use for the heart. I used a black Posca Paint Pen to write the names of the Wedding couple on one side, and the date of the Wedding on the other side. Next, I cut a 1 ½ inch piece of 24 gauge wire, sandwiched it between the two pieces of cardstock with white glue and made a small curl in the end that will go in the dove’s beak. I slightly pinched the dove’s beak, and the tip of the wing, before assembling. The wire for the banner goes in the doves head, exiting the beak, use white glue to hold all the parts. Carefully line up the two sides of the dove, and then press it all together. You can arrange the banner better, when the dove has cured for 24 hours.  Don’t forget to paint the edges of the dove with the silver Art-C paste or paint of your choice. I added the eyes with a black Posca Paint Marker. Varnish the dove when dry if desired.


I wanted to try a textured version of the dove, so I doubled the clay that was rolled on the number 1 setting of the Ultimate Clay Machine®. I used the large texture mat from Makin’s® Floral Texture Sheet Set. Dust two mats with cornstarch, (I used Floral A and Floral B) and texture both sides at the same time. I used the Art-C paste in Turquoise to highlight the raised parts. This time I cut one dove, and carefully removed it from the cutter. Pinch the beak a bit and the wing, cut a small slit in belly edge, then insert a piece of wire that you’ve made a loop for ( dip it in some glue before inserting. )  Let this one dry for 24 hours. No banner this time, as my retractable pencil was personalized. 

When your dove has dried, take a pencil , hold the dove where you want it, and begin wrapping the wire around the pencil to hold it in place. For the retractable pencil, I began my wrap above the pocket clip, and worked the wire through the clip to secure it. 

These could be used as place markers for a dinner party, or indoor plant markers, have fun coming up with your own applications!

Friday, July 20, 2018

Funky Bird Mixed-Media Sculpture

Funky Bird Mixed-Media Sculpture by Bea Grob

Today, I show how I made a funky bird with some driftwood, foil, wire and Makin's Clay®.

Materials:

Makin's Clay® - Red 60g, plus approximately 20g scrap clay from other projects
Makin's Professional® 
  • Ultimate Clay Machine®
  • Cutting Mat

Makin's® Clay Roller
Decorative foils 
Wire
Driftwood
Seed beads 
Black rond head pins
Tacky glue 
Ruler
Cutter 
Dowel 

Instructions:


I started by forming a head with red clay. I inserted some wire for the neck to connect to the driftwood and 3 pieces at the top for later embellishment.

 I let it air dry on these flower foams. Anything you can stick in the wire will work.


Next, I mixed the leftovers with the remaining red and ran it through the Makin's Professional® Ultimate Clay Machine® beginning on setting #1 and ending on setting #5. But you can also roll them out with the clay roller to about 3 mm thickness.

I sprayed the surface of the clay sheet lightly with water and then placed my foil on top. With an old gift card or keycard I rubbed the surface and made sure that it is well adhered.


While the clay was still fresh,  I cut triangular shapes, like you would to make rolled paper beads.  I used the same technique to create the clay beads.

I simply rolled them onto a sort of a dowel. I recommend either plastic (like mine) or metal. If you use wood it may permanently adhere. I let them dry overnight together with the bird head.


The next day I started assembling the pieces clay pieces and used seed beads for embellishing. I drilled holes into the wood to attach the head and the tail wires. For the eyes, I used some black pins from the sewing department. I clipped them in length and then simply stuck them in the right spot. 


To glue everything together I used tacky glue. I have also mounted the bird on a piece of stone from the garden. I used a two part quick dry epoxy glue for that. 


Tuesday, April 25, 2017

Always Wear Your Invisible Crown Shadowbox Assemblage

Always Wear Your Invisible Crown Shadowbox Assemblage
by Iris Rodriguez

Hello Makers!


I like inspirational quotes. I’ve always thought of a quotes as tiny burst of wisdom wrapped in a phrase; that pack a big punch of sense. So that is why I got inspired to make a little assemblage piece with a quote.

Materials:

Small Shadowbox
Makin's Clay® Red, Brown, Blue, Natural, Yellow, Green, Black
Makin's® 
  • Florals Push Mold
  • Roller and Cutter Set

Makin's Professional® Cutting Mat
Cardstock Paper
Black Inkpad
Gold Mica Powder
Blue Mica Powder
White Gesso
Blue and White Acrylic Paint
Clear drying adhesive 
Paint brush

Making the Shadowbox

Use a small box, box lid or small shadowbox, I used a lid from a box, measuring 5” x 5”. Paint the box with white gesso and blue acrylic paint.


Making the Bird

To determine roughly how much clay you will need to make the bird, take a small chunk of clay, make a quick teardrop shape and measure it inside the box. Add or break off clay as desired. Then sculpt the bird. I used a picture for reference. The basic idea for sculpting a bird is as follows: 

1. Start out by making a teardrop shape
2. On the pointed part of the teardrop sculpt the tail
3. On the rounded end of the teardrop, shape the head by sculpting a mound upwards
4. On the head, sculpt the mouth, by simply making triangle shape
5. For the eye roll a tiny piece of black clay into a round shape and place on head


6. For the wing, make a teardrop, then flatten with the clay roller


Note:  Fresh clay sticks to fresh clay without additional adhesive.  If needed, moisten clay with a touch of water before adhering, or if preferred, use a clear drying adhesive. 

Making the Crown

To make the crown, roll out a small piece of yellow clay using the clay roller.

Measure the circumference of crown on the bird.

Cut the length and width to size.

Then with a sharp cutting tool, cut out the triangles or zig zag shapes.

To give the crown some bling, dust on some gold mica powder.


Making the Tree and Flowers

To make the tree, roll three different size log shapes of various sizes with brown clay. Always use odd numbers for branches.

Using the logs, measure them inside the box, until the tree shape and size is satisfactory. Then attach the logs (branches together), by blending together with a little water.

To make a bark texture, use the dull size of a cutting tool to make striations.

For the flowers, push the clay into the Floral Push Mold.  The molds are flexible, so you do not have to wait until the clay has dried to remove the elements.  Trim any excess clay from your molded shapes.

To make pink clay, blend Natural or White with Red.

Let all your pieces cure for at least 24 hours.


Putting it all Together

Print the quote on cardstock, or stamp it. The quote looked lonely at the bottom, so I decided to jazz it up with the baroque (swirl) shape from Makin's Clay® Florals Push Mold. I used part of the shape and cut out the rest. I also brushed on some blue Mica Powder.

Assemble and glue all the pieces together.


Contact us

Name

Email *

Message *