
Wednesday, September 30, 2015
Moon & Stars Pendant by Patricia Krauchune
Tuesday, September 29, 2015
Time Flies... by Pat Krauchune
 Design Team Member Pat Krauchune shared another awesome steampunk style creation recently here on her blog - she used her Makin's® gears texture sheet for the front of of this project!
Monday, September 28, 2015
Glow in the Dark Pumpkin Card by Amanda Phillips

Glow in the Dark Pumpkin Card
Designed by Amanda Phillips
Good Morning!!!
Amanda here and I am delighted to share with you my newest and silliest creation to date for your Makin's Clay® pleasure :)
It is Halloween all over the place and when I saw Madeline Arendt's die cut inspiration leaves, I ran to the studio and started rolling out clay into sheets quicker than frankie rolled out skin :)
My fun supplies are as follows.
Makins Clay® - Glow in the Dark, Terra Cotta, Brown, Black, Olive, Grape Leaf
- Ultimate Clay Machine™
- Push Mold - Florals
Die cutting machine, pumpkin dies
Beacon® Tacky Glue
A couple of pieces of fun paper
A standard 6 1/2 x 5 greeting card blank
7" ribbon of choice
1/2" punch, 1/4" punch (both of these are for eye detail)
Chalk ink in pinks, browns, oranges and dauber for rosy cheeks shading.
Instructions:
I must remind you that your sheets of clay should 100% be dried before using in your large dies (foam backed) so that your pieces don't get gummed into the crevice vortex.
Start rolling half of your 120g package of Terra Cotta clay into your machine starting with your largest setting (#1) and slowly working the clay to the eventual #3 setting. Do this repeatedly using 1/2 package of the Glow in the Dark (so it's big enough) and a 1/4 package of the other colors..same process. Let all rolled clay dry 24 hours. Die cut shapes.
 Use Floral push mold to create leaves from green clays.
 Now I could have made some groovy curlies with my Ultimate Clay Extruder™ but the scissors were handy and they worked great. But as I said..if perfection is on the menu..The Ultimate Clay Extruder™ seriously cannot be beat. We'll get into my unnatural obsession with that in another post ;)
Use circle punches to punch pieces for eyes.

Add shading to pumpkins with chalk inks.
Assemble your pumpkin and mount to your card with Beacon® Tacky Glue.
I want to thank you for coming by today and seeing all the fun projects that the Design Team and myself love sharing with you!
Sunday, September 27, 2015
Halloween Witch Card by Martha Lucia Gomez

Saturday, September 26, 2015
Making Faces with the Makin's® Professional™ Tool Kit by Carole Mohanan

Friday, September 25, 2015
Work Hard, Nap Hard Card by Cindi McGee
 Cindi McGee recently shared this masculine card project featuring a Makin's Clay® hammer embellishment! Makin's Clay® is perfect for creating accents for cards and scrapbook pages as it is lightweight and flexible. Our Tools push mold is perfect for masculine projects!
Bat Block by Pat Krauchune

Thursday, September 24, 2015
Ghosts Necklace by Irit Shalom

Ghosts Necklace
Designed by Irit Shalom
Hello my dear crafty friends and welcome to Makin's Clay® Halloween month! Let me first say that I don't celebrate this holiday, but I sure love it. I love the colors, the images and the overall feeling of those ghosts, bats and pumpkins, and I like them so much that I create a lot of projects using those images even without any tight connection to the main meaning of Halloween.
Materials:
Makin's Clay® - Black
- Ultimate Clay Extruder™ - Disc #7
- Clay Roller
- Texture Sheet Set C
- Halloween Cutter Set B
 Pearl Ex Powders
Liquid Resin/Glaze
Clear glitter
Magnetic closure
Jewelry glue
Instructions:
1. Using your Makin's® Ultimate Clay Extruder™ and the disk with 7 round holes (Disc #7) make 5 long round strips from black clay. For now let them all air dry a bit and move to the second step.
 2. With Clay Roller make a flat piece from black clay (about 1/8'' thick). Make the texture with Brick and Waves texture sheet from Texture Sheet Set C. Now make a pendant shape with Clay Cutter - I made it free hand. You sure can change the shape to more triangular or circular one if you like it more that way. Roll the top of your hand cut shape to the back before it's dry and try to leave a space inside the rolled back to insert your clay strings later. Now let it dry for a couple of hours and move to the next step.
3. Use Halloween B cutters set with another texture sheet from the very same set over the black clay sheet and cut some Halloween shapes. Cut a couple of ghosts from white clay. I wasn't sure if I want black or white shapes over my necklace, so I made these and those and as I finally used the white ghosts I used the left overs for another project. I only used one black bat on the top of the pendant later.
4. Roll all 5 round strings together and cover them with a mix of shiny pigments.

 pigments you own. Cover the ghost with a thin layer of liquid resin /glaze and add some clear glitter and let it dry. Add a simple magnetic closure to the back with good jewelry glue.
My tip: buy a cheap $1 store jewelry piece with magnetic closure (bracelets usually cost around $1) just to use their closure as at least here, in Israel, the closure only costs more than $1 for a piece.
Arrange your fancy scary necklace as seen and enjoy!
Wednesday, September 23, 2015
Halloween Charms by Lisa Haney
Design Team Member Lisa Haney recently shared these cute Halloween charms made with Makin's
 Clay® and our Halloween Cutter Set. Find out more here on her blog.
Tuesday, September 22, 2015
Candy Corn Bottle of "Boo-s" by Cindi McGee

Masked Beauty by Carole Monahan

Masked Beauty
Designed by Carole Monahan
Supplies:
Mask from dollar store
Covered in foil to use again
Makin's Clay® 2oz pack of white clay
Acrylic paint mine was gold iridescent
Gold glitter
Swarovski flat back crystals
Ribbon
Beacons tacky glue
Beacons Quick grip glue
Tools -
 Makin's Clay® Ultimate Clay Machine™
 Makin's Clay® Florals push mold
Here is a stunning Venetian Style Mask that comes together quickly with the help of the Makin’s® push molds.
1st roll out a sheet of clay large enough to cover your mask on the
second setting.

Then cover the mask with this sheet and carefully trim all the edges and openings
This is an easy step with the flexible Makin’s Clay®.
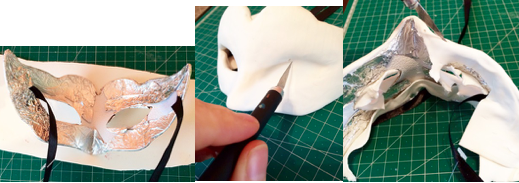
Then take your 1st layer of clay and adorn it with items your molded with your push mold.
Let the molded items dry for at least an hour before removing them from the mold so you don’t lose any details. TIP and TIDBITs Remember if the clay starts to dry it will not stick to itself as well so I just keep a damp paper towel nearby and touch the back of each molded piece to the back to adhere it. I trimmed some of the molded items and used them in different ways.

I added some icicle like horns on the sides for more of a Fairy look to them. Blend in your edges.

I diluted the Beacon® Tacky Glue with some water and covered the areas I wanted to glitter very lightly. The other areas I painted with an acrylic gold paint.
I also used Beacon® Quick Grip glue to attach the flat back Swarovski crystals.
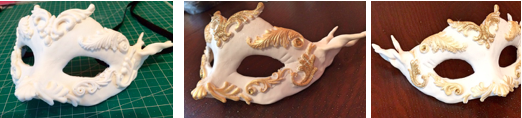
I plan on make MORE masks this was REALLY fun! Keep an eye on my pages to see what else I make for Halloween !
CuriousClayCreations.com
Monday, September 21, 2015
Autumn Leaves Card by Steph Ackerman

Sunday, September 20, 2015
Ghost Poop! by Patricia Krauchune

Saturday, September 19, 2015
Witch's Apothecary by Cindi McGee

Witch's Apothecary
Designed by Cindi McGee
I love Halloween! I love the silly, spooky fun, the costumes, and the creepy decorations. A friend had given me some of his mother's perfume bottles after she passed away, and I thought they'd be perfect to alter and transform to help decorate for Halloween! With the help of Makin's Clay®, and etchall® etching cream, those bottles, and a couple of empty medication bottles, came together to create this Witch's Apothecary complete with a bat display tray!
Materials:
Makin’s Clay® - Green, Olive, Black, White, Merlot, Neon Green
- Professional® Ultimate Clay Extruder™
- Texture Sheets Set D
- Cutting Mat
- Clay Tools
DecoArt® - Metallic Lustre™ - Gold Rush
- Americana Decor® Chalky Finish Paint - Relic, Carbon
Glass perfume bottles
etchall® Etching Cream
Black permanent marker
JudiKins™ Diamond Glaze™
Blumenthal Lansing™ spider button
Beacon® Tacky Glue, 3-in-1 Adhesive
Tim Holtz® Idea-ology® letters
Unfinished Wood Company™ wooden bat
Loew-Cornell™ Simply Art paint brush
Jute twine
Instructions:

Frog Eyes
Roll Green clay using clay roller until about 1/8” thick. Place bottle on side on rolled clay, use tool to cut around bottle. Repeat for reverse side.
Apply small amount of Beacon® 3-in-1 Adhesive over sides and apply clay.
Use fingers to gently transfer texture from cobblestone texture sheet to clay.
 Use fingers to gently blend and smooth textured clay. The finished result is just a touch of texturing, to more closely mimic frog skin.
Cut jute twin strips and use 3-in-1 to glue to sides of bottle.
Wrap jute twine around top of bottle using 3-in-1 to hold in place.
Mix small amount of neon green clay with green clay to create marbled green. Roll into ball and flatten to make disc about 1/2"across.

Use black permanentt marker to make pupil in eye.
Glue eye to center of bottle using 3-in-1.
Coat clay surfaces of bottle with JudiKins™ Diamond Glaze™.
 Grave Dirt
Remove lid from medicine bottle. Apply black clay directly to bottle with fingers for an uneven effect.
Impress plastic lettering into fresh clay to spell out “grave dirt”. Let dry 24 hours. (Thanks to my “Fairy Craftmother” for sending me these letters in a recent surprise box…. you know who you are…!)
Randomly apply “Relic” Chalky Finish paint to surface with paper towel - do not cover entire surface. While paint is still wet, rub to remove in some areas. Let dry.
Apply small amount of cocoa brown Americana® Multi-Surface Satin™ paint over surface and around letters with a paper towel. While wet, rub to remove most of paint and just leave a touch in grooves around letters,
etc. Let dry.

Trace top of bottle onto cork sheets. Cut enough cork circles to stack and create faux “stopper” for bottle. Use 3-in-1 to attach layers of cork and then attach to top of bottle.
Spider Legs

Remove lid from medicine bottle. Mix small amount of black clay with white clay to create grey. Cover bottle with clay with fingers for an uneven effect.
Impress spider button onto fresh clay to make spider image. Remove button.
Use clay tool to write “spider legs” in fresh clay.
 Cover lid of bottle with clay, create small clay “rock” and add to top of lid. Let dry 24 hours.
Use paper towel to apply small amount of Carbon Chalky Finish™ Paint to bottle. While wet, use paper towel tor remove some of the paint, allowing it to remain in the impressed areas and on some areas of the surface.
Snake Oil


Paint lid with Relic Chalky Finish paint. Let dry. (This bottle had a row of crystals on the bottle itself, I also painted those).
Mix equal parts Green and Olive clay together. Insert into Ultimate Clay Extruder™ and extrude using Disc #40 (oval) from Ultimate Extruder Discs Set B.
Wrap around bottle, coiling so head and top of body cover the crystals on the bottle. Use Tacky Glue to hold in place.
While clay is still fresh, use scales texture sheet to texture snake.
Create tongue with Merlot clay, add to snake. Let dry 24 hours.
Use fingers to gently add a touch of Gold Rush Metallic Lustre to snake.
Use permanent marker to add eyes to snake.
Dragon Tears

Use black permanent marker to write “DRAGON TEARS” on bottle.
 Apply etchall® cream. Let set 15 minutes, return cream to bottle and rinse to clean. Rub at the marker lettering tor remove it from the bottle. Let dry.
Use JudiKins™ Diamond Glaze™ to make teardrops on sides of bottle around writing. (Tip - Lay bottle on the side, and apply tears a few at a time to prevent running while drying.)

This bottle had a big gold plastic bow on the cover - which just would not work for the finished project. I used pliers to gently break away the plastic bow from the cover.
Mix equal parts Green and Olive clay.
Use fingers to apply clay to cover of bottle.
Use scale texture sheet to texture clay.
Using Disc #31, extude strip of green clay and wrap around stem/top of bottle. Use fingers to apply light coat of Gold Rush Metallic Lustre™ to cover and clay on rim of bottle.
Bat Tray

To create bat try to display your bottles, paint unfinished wooden bat with Carbon Chalky Finish™ paint and let dry.
Make 4 small balls of black Makin's Clay® about 3/4" across.
Use 3-in-1 adhesive to to mount balls to back of tray to create feet for tray to stand on.
Friday, September 18, 2015
A Night on the Town Spooky Witch Votive by Pat Krauchune

A NIGHT ON THE TOWN
Designed by Patricia Krauchune
I love Fall with all the leaves changing colors, the smell of the crisp air, pumpkin pie, and spooky things that go
bump in the night. Come fly with me and make this easy, peasy witchy project.
Supply List:


 Glue the cut out townscape to the plastic
container with the Loctite® Super Glue.
Next tint the inside of the plastic container
with the Butterscotch alcohol ink.
Glue the cut out townscape to the plastic
container with the Loctite® Super Glue.
Next tint the inside of the plastic container
with the Butterscotch alcohol ink.
 Using the Makin's Ultimate Clay Machine®,
roll out 60G of Glow in Dark clay on the #1
setting. Then cut two 2 1/2" circles from the
clay and stack one on top of the other. This
forms the moon.
Using the Makin's Ultimate Clay Machine®,
roll out 60G of Glow in Dark clay on the #1
setting. Then cut two 2 1/2" circles from the
clay and stack one on top of the other. This
forms the moon.
 This step is optional. I painted the bottom of
the container with Glow in the Dark paint to
reflect more light.
This step is optional. I painted the bottom of
the container with Glow in the Dark paint to
reflect more light.


Using the Beacon'sTM Tacky Glue attach the
witch to the moon circle.
Glue the mini clothespin to the back of the moon with Beacon's Quick GripTM.

Clip the moon to the back of the container and you are done! Just put your tea light inside and watch her fly!
FYI: I used a tea light that changes colors to make a very spooky effect!


- Makin’s Clay® in Black and Glow in Dark
- Makin's® Cutting Mat
- Sizzix® Tim Holtz Alterations Townscape Die & a die cutting machine
- Small plastic container
- Battery operated tea light
- 2 1/2" circle cutter
- Loctite® Super Glue
- Ranger Adirondack Alcohol Ink in Butterscotch
- Americana Glow in the Dark PaintTM
- Mini wooden clothespin
- Beacon's™ Quick Grip, Tacky Glue
- Recommended Makin’s® Tools:
- Makin's Professional® Ultimate Clay Machine®
Instructions:

Roll out 120G of black Makin's Clay® on the
#3 setting on the Makin's Professional®
Ultimate Clay COMPLETELY.
Machine®. Let the clay dry

Using the Tim Holtz Alterations Townscape
Die, run COMPLETELY dried clay through
a die cutting machine. See picture as to how
the cut out should look.
 Glue the cut out townscape to the plastic
container with the Loctite® Super Glue.
Next tint the inside of the plastic container
with the Butterscotch alcohol ink.
Glue the cut out townscape to the plastic
container with the Loctite® Super Glue.
Next tint the inside of the plastic container
with the Butterscotch alcohol ink.  Using the Makin's Ultimate Clay Machine®,
roll out 60G of Glow in Dark clay on the #1
setting. Then cut two 2 1/2" circles from the
clay and stack one on top of the other. This
forms the moon.
Using the Makin's Ultimate Clay Machine®,
roll out 60G of Glow in Dark clay on the #1
setting. Then cut two 2 1/2" circles from the
clay and stack one on top of the other. This
forms the moon.  This step is optional. I painted the bottom of
the container with Glow in the Dark paint to
reflect more light.
This step is optional. I painted the bottom of
the container with Glow in the Dark paint to
reflect more light. 
Roll out a small amount of black clay on the
#5 setting of the Ultimate Clay Machine®.
After the clay has dried completely, using the
pattern, cut out the witch on her bloom. You
can use either a craft knife or small scissors
to do this.


Using the Beacon'sTM Tacky Glue attach the
witch to the moon circle.
Glue the mini clothespin to the back of the moon with Beacon's Quick GripTM.
Clip the moon to the back of the container and you are done! Just put your tea light inside and watch her fly!
FYI: I used a tea light that changes colors to make a very spooky effect!


Subscribe to:
Posts (Atom)