Pages - Menu

Search This Blog

Showing posts with label Madeline Arendt. Show all posts

Sunday, February 21, 2016

Faux Leather Tags by Madeline Arendt


FAUX LEATHER TAGS
Designed by Madeline Arendt

This month we were asked to look through the Makin's Clay® Pinterest  board titled Tutorials and Techniques and choose one technique and create something using it.  The variety of techniques were many and all interesting enough to want to try with Makin's Clay®.

Materials:

Makin's Clay® - Brown, White
Makin's Clay® Cutting Mat
Makin's Clay® Tools - Roller, Cuttng Knife
Makin's® Clay Cutters - Flower, Scalloped Shapes
Makin's® Ultimate Clay Extruder™
Aluminum Foil
Rubber Stamps
Metal Embossing Tools
Acrylic Paint
Brush
Paper Towels

Instructions:

Roll out a portion of brown clay on the clay mat with the roller to approximately 1/8" thickness.

Crumble a piece of aluminum foil and smooth out; repeat again to form smaller creases into the foil.
Place the foil onto the clay and press with fingers or use the roller to impress the clay with texture.


Use a tag shape or cutter to form shapes.  Cut a whole with a small circle cutter or by placing a tag over the clay and cut with a cutting knife.

With rubber stamps, impress a design or names or letters into the clay.  Use tools or stamps to create
designed edges to the clay tags.


Create strings for the tags by passing clay through the extruder tool using the flat disc.

Allow all the clay pieces to dry 24 hours.

Choose paint color of choice or combine 2 or 3.  Thin the paints to create a wash and brush onto the dried clay pieces and wipe quickly with a paper towel.  If desired, continue to add more layers of color, wiping between coats.  Optional: Finish pieces with a matte coating.

The link to the website where the tutorial for creating a faux leather look is - polymer clay web -

Madeline Arendt DESIGNER, AUTHOR, INSTRUCTOR madelinejean@me.com http://madelinesthoughts.blogspot.com/

Tuesday, January 5, 2016

"Birch Bark & Roses" Bottles of Hope by Madeline Arendt


"Birch Bark & Roses" Bottles of Hope
Designed by Madeline Arendt 

In this post I will be sharing my version of what are called "Bottles of Hope" using Makin's Clay®, air dry polymer clay, instead of traditional oven bake polymer clay used to create these bottles.  These bottles were made while spending time with my children in the northwoods of Wisconsin. It has become a tradition to head up north after Christmas Day and celebrate the New Year together and enjoy all the beauty of the winter season along with a variety of  outdoor activities.

Note - Here is a bit more information about what Bottles of Hope are - Makin's Clay® is proud to have our designers supporting this worthy effort through the creation of Bottles of Hope featuring Makin's Clay®.  

Bottles of Hope are small glass bottles covered with polymer clay and given to cancer patients. They symbolize a wish and a hope for health.  This project was started in 1999 by a Rhode Island cancer survivor and has spread internationally. Bottles are made by artists, students, survivors, seniors and many more who volunteer their time and love.   Learn more about this worthwhile project, see a gallery of many creative bottles and more here on their website

Materials:


Makin's Clay® - WhiteGreens/Black
Makin's Clay® - Cutting Mat
Makin's Clay® Professional Clay Tool Kit
Makin's Clay® Roller
Makin's Clay® Clay Cutters - Hearts
Bottles
Paint - Brown, Bronze
Brush
Paper Towel
Ribbon (optional)
Thin Jute Cord
Flower Embellishments
Beacon™ Premium Tacky Glue

Instructions:
  •  Roll out about 1/2 of the white Makin's Clay® on the white (non-stick side) of the mat to about 1/8" thickness or less.  NOTE: If making more then one bottle remix cut clay with more of the white clay and repeat process.
  • Lay the bottle onto the clay and wrap it around the bottle.  Place the clay so that the ends meet on the surface of the bottle.
  • Trim the clay away from the top and bottom of the bottle with the cutting knife.  Cut and trim the overlapping clay evenly.

              
  • Using the roller, smooth the cut edges.  Finish by smoothing with your fingers.
  • Press texture into the clay before drying.  NOTE: I used found pieces of birch bark to press into the clay for texture. (Madeline - we think this is a really neat idea!!!) 
  • Mix green and black clay together in any proportion desired.  Roll the clay to form one or more bottle stoppers.  Allow them to dry 24 hours.  NOTE: Makin's Clay® will shrink slightly, so make the stoppers snug to fit the bottles.
  • Roll out the mixed green clay to about 1/16" thickness and use the heart clay cutters to cut shapes. Use a toothpick to create a hole it the larger hearts. Use the cutting knife to cut out letters to spell HOPE from the green mixed clay.  Allow all pieces to dry 24 hours.
  • Brush a thin coat of brown paint over the clay on the bottles and wipe off quickly.  Repeat the process if necessary.
  • Paint the green pieces of clay with the bronze paint.  Dry brush the bronze paint onto the clay on the bottles.
  • Glue the cut letters onto the front of the bottle.  Add a small heart if desired.
  • Thread jute in the holes of the hearts and tie onto the bottles.
  • Glue a flower embellishment or another desired embellishment to the top of the stopper.
NOTE: A soft decorative ribbon can be glued to the surface of the stopper before adding a top embellishment. 

For lots more ideas featuring Makin's Clay® visit the Pinterest Boards here for inspiration.


Saturday, December 5, 2015

"Kind Words" Tiled Memory Frame Kit by Madeline Arendt


It's been enjoyable and interesting working with Makin's Clay® products.  The Makin's® Memory Frame Kit™ was at first a challenge to create something a little different from its original purpose.  With the ease and versatility of the clay, along with the tools and other products available, ideas can be many.

Materials:

Makin's Clay® Memory Frame Kit
Makin's Clay® - Earth Tones
Makin's® Tools - Roller, Blade Knife
Makin's® Cutter Set - Squares
Makin's® Texture Plates - Brick, Connectors, Cobblestone, Sand, Abstract B, Scale,Woodgrain
Makin's® Cutting Mat
Beacon™ Premium Tacky Glue
Metallic Powders
Brush

Instructions:

NOTE:  Each color of clay from the Earth Tone assortment was rolled out first. Then each was pressed onto a different texture sheet before being cut using the three different sizes of the square cutters. Each color created 3 large squares, 5-6 medium squares, 6 small squares.  The process of rolling out the clay, adding texture and cutting may have to be repeated to make all the clay tiles needed.  The scraps left from each color was combined and extra clay square tiles were made.

Roll out the clay onto the white side of the mat to approximately 1/16" thickness.
Press the clay onto the texture sheet; remove.

Use square cutters and cut the clay into various sized squares.  (Refer to NOTE above).

Allow the textured, cut squares to dry 24 hours.

Trim or sand edges of squares if necessary.

Brush the squares lightly with metallic powders of choice


Arrange the smallest squares onto the outside front edge of the frame as desired.

Lightly sand the surface of the frame with fine grit sandpaper.  NOTE: I sanded away some of the black on the edges of the frame. Wipe the sanded area with a damp paper towel to remove any powder left from sanding.

Brush on a coat of the tacky glue onto the frame; coat the back side of each small square with glue also and press into place.  Continue with the remaining small clay squares.

Sand the four outer edges of the frame lightly and wipe with a damp paper towel before adding the remaining clay squares. 

Fold four of the largest squares in half, carefully crease them.  Glue them onto the frame at the four corners.

Arrange the medium size squares into the remaining area of the frame; five squares for the top and bottom, seven for each side.

Add photos to each side of the frame as shown in my project, or arrange as a shadowbox as shown on Makin's® packaging and insert a special momento or keepsake into the open space behind the plexiglass on one side.
Optional Ideas:  Sponge paint the frame before adding the clay squares.  Finish with a coat of water-based varnish.

Thursday, November 5, 2015

Ivory Borders Vase by Madeline Arendt


Ivory Borders Vase 
Designed by Madeline Arendt 

Here is an easy transformation of a clear glass container from a dollar store using Makin's Clay®.  Simply forming strips of clay and applying them to the glass creates a lovely container for plants, flowers, a candle or treats.

Materials:

Makin's Clay® - Natural
Makin's Push Mold - Borders
Makin's Clay Mat
Makin's Professional Ultimate Clay Extruder™ and Round Disc #4
Makin's Cutting Blade
Ann Butler's Earth Safe Finishes Iridescents - Sheer Gold Pearl
Beacon Adhesive 3-in-1Glue
Glass Container

Instructions:
  • Roll small portions of clay into a rope shape and press into the mold.  Repeat this step to make enough clay border strips that will cover the container.  NOTE: Either the same border design can be used for all pieces or choose two different designs to alternate on the glass


  • Allow the clay strips to dry well for 24 hours. 
  • Use the cutting blade tool to clean away any clay flash that shows on the edges of the strips.
  • Paint each of the pieces with the iridescent paint.  Let dry.
  • Glue the clay strips onto the glass container, making sure to line up the top of the strips evenly around the upper edge of the container.  Place and press each strip close together, side to side.  NOTE: If the container has any curves, press the strips into them to follow the contours.
  • Place clay into the Ultimate Clay Extruder™ with circle disc #4.  Extrude a length of clay to fit around the bottom edge of the container.  Allow piece to dry.  Paint, trim and glue around the bottom edge to finish.
SUGGESTION: The glass container used for this project was the same height as the length of the borders of the push mold.  If using a taller container, more clay pieces would have to be formed.  When applying them to the surface of the container a varied, random pattern could be used for a different look.  

Saturday, October 17, 2015

Autumn Themed Passport Book by Madeline Arendt

Design Team Member Madeline Arendt recently shared this fabulous Autumn themed passport book made with Makin's Clay® and Eileen Hull's Passport Book die from Sizzix®!

Monday, October 5, 2015

Autumn Napkin Rings by Madeline Arendt


Autumn Napkin Rings
Designed by Madeline Arendt

As the season of Autumn brings the changing colors and crisp winds, it also brings celebrations of various types.  Whether it is a small luncheon with friends, a fun party with kids or a celebration dinner with family it's nice to add special touches to a table setting.  I will share an idea for a napkin ring and place card using Makin's Clay®.

Materials:

Makin's Clay® - red, yellow, terra cotta, natural, brown, black, green, olive, grape leaf
                         - Texture sheets: Cobblestone, Weave
Silicone Putty (for mold)
Fabric
Paper
Perfect Pearls Powders
Chalkboard tape or paper
Buttons
Beacon® Premium Tacky Glue
Brush
Ruler
Scissors/Rotary Cutter

Instructions:

I created a mold of my own from a small artificial pumpkin, only forming one-half of the shape.  Using a mixture of red and yellow Makin's Clay®, I formed the pumpkin halves.  Mixing a small amount of brown and black clays, I formed the stems for the pumpkin shapes and pressed them into place.  For the leaves, green clays were mixed and rolled out into a sheet.  The sheet was die-cut using a small leaf die.  Veins were drawn into the clay using a stylus.  I brushed all the pieces with some metallic powders to add some dimension to the pieces.


To create the napkin ring I used a combination of paper, fabric and embossed sheets of Makin's Clay®.  NOTE: The fabric strips can be torn or cut with pinking shears for a decorative edge.  

Terra Cotta Clay was rolled out into a sheet and embossed with the brick texture plate; then left to dry according to directions.   Each material was cut approximately 6 1/2" in length.  The width of the paper and clay measures approximately 1 1/2"  and the fabric about 2 1/2".

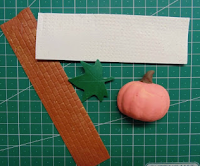
To form the rings, glue the paper strip to the wrong side of the fabric.  Form a ring and glue where the ends meet.  Finish the ring by gluing the strip of embossed clay to the top side of the fabric and around the ring till the meet.   Set aside for the glue to dry.  Glue the clay pumpkin half over the part where the embossed clay meets to hide the seam.  Glue the leaf onto the ring as desired.  Add a couple buttons to embellish.  NOTE: Refer to the first photo for placement.

To create the place card, again use a strip of textured clay.  NOTE: I used the natural Makin's Clay® and  rolled it out and used a different texture sheet to make it appear like burlap.  The clay strips are approximately 1" wide and 4 1/2" long.  Strips of the same fabric were torn to measure 1/2" to 3/4" wide.  Wrap a length of the fabric around the entire piece of clay and glue ends together on the back side.  Glue a pumpkin half onto the place card and finish with a leaf.  Die-cut a label from chalkboard tape or paper and stick or glue onto the place card.  Embellish with a couple small buttons.  NOTE: Refer to first photo for placement.

Monday, July 21, 2014

Journal with Makin's Clay®

Here is a wonderful project created by Madeline Arendt 


for complete instructions on how she created the journal with Makin's Clay® check out her blog here!

Contact us

Name

Email *

Message *