Autumn Napkin Rings
Designed by Madeline Arendt
As the season of Autumn brings the changing colors and crisp winds, it also brings celebrations of various types. Whether it is a small luncheon with friends, a fun party with kids or a celebration dinner with family it's nice to add special touches to a table setting. I will share an idea for a napkin ring and place card using Makin's Clay®.
Materials:
Makin's Clay® - red, yellow, terra cotta, natural, brown, black, green, olive, grape leaf
-
Texture sheets: Cobblestone, Weave
Silicone Putty (for mold)
Fabric
Paper
Perfect Pearls Powders
Chalkboard tape or paper
Buttons
Beacon® Premium Tacky Glue
Brush
Ruler
Scissors/Rotary Cutter
Instructions:
I created a mold of my own from a small artificial pumpkin, only forming one-half of the shape. Using a mixture of red and yellow Makin's Clay®, I formed the pumpkin halves. Mixing a small amount of brown and black clays, I formed the stems for the pumpkin shapes and pressed them into place. For the leaves, green clays were mixed and rolled out into a sheet. The sheet was die-cut using a small leaf die. Veins were drawn into the clay using a stylus. I brushed all the pieces with some metallic powders to add some dimension to the pieces.

To create the napkin ring I used a combination of paper, fabric and embossed sheets of Makin's Clay®.
NOTE: The fabric strips can be torn or cut with pinking shears for a decorative edge.
Terra Cotta Clay was rolled out into a sheet and embossed with the brick texture plate; then left to dry according to directions. Each material was cut approximately 6 1/2" in length. The width of the paper and clay measures approximately 1 1/2" and the fabric about 2 1/2".
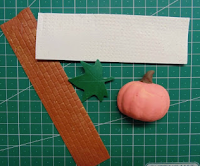
To form the rings, glue the paper strip to the wrong side of the fabric. Form a ring and glue where the ends meet. Finish the ring by gluing the strip of embossed clay to the top side of the fabric and around the ring till the meet. Set aside for the glue to dry. Glue the clay pumpkin half over the part where the embossed clay meets to hide the seam. Glue the leaf onto the ring as desired. Add a couple buttons to embellish.
NOTE: Refer to the first photo for placement.
To create the place card, again use a strip of textured clay.
NOTE: I used the natural Makin's Clay® and rolled it out and used a different texture sheet to make it appear like burlap. The clay strips are approximately 1" wide and 4 1/2" long. Strips of the same fabric were torn to measure 1/2" to 3/4" wide. Wrap a length of the fabric around the entire piece of clay and glue ends together on the back side. Glue a pumpkin half onto the place card and finish with a leaf. Die-cut a label from chalkboard tape or paper and stick or glue onto the place card. Embellish with a couple small buttons.
NOTE: Refer to first photo for placement.

 Design Team Member Candice Windham recently shared these fabulous fall table decor pieces perfect for your Thanksgiving table here on her blog. She used Makin's Clay® and our Christmas Nature push mold to create the great pine cone and acorns accents.


