Pages - Menu

Search This Blog

Showing posts with label canvas. Show all posts

Thursday, October 3, 2019

BOO! Halloween Wall Panel


BOO! Halloween Wall Panel by Steph Ackerman
​Hi everyone, Steph Ackerman here today and I've got a new Spooky project to share for Makin's Clay®.

​Supplies:

Makin's Clay® - Black, Brown, White, Earth Tones
Makin's ProfessionalⓇ Ultimate Clay MachineⓇ
Makin's ProfessionalⓇ Cutting Mat
Makin's Clay Cutters - Rectangles, Halloween Set
Beacon Adhesives - 3-in-1
​ Mod Podge clay mold
​ Memento Fireworks Shimmery Craft Sprays
​ Sizzix dies
​ Burlap Panel

Instructions:


​Start by spritzing the panel with assorted colors of Fireworks Inks.  I started with lighter colors then realized I wanted a darker effect so I added a darker blue and gray.

Begin by conditioning the white, black and brown clays.  Then place each individually in the clay machine at the highest setting.  Reduce the setting on each pass until you have the thickness you need for your project.


As I was creating a Halloween scene, I die cut a haunted house from the black clay.  To be sure the clay did not stick to my die, I place the clay between wax paper and then ran it through my die cut machine.  Although still damp, it die cut beautifully. 

Picking up the left over black clay, I mixed it with some white clay and again ran it through the clay machine until I had a mottled effect.  I then die cut the roof of the house and placed it atop the main image. 

As the clay was still damp/fresh, no glue was needed to adhere the pieces.


​ 

​Next, I die cut 2 trees using another Sizzix die.  Again, I placed the clay between wax paper so it would not stick to the die.                           
Once all my elements were ready, I started creating a spooky scene.  I began by adhering some torn strips of paper across the panel then put the trees in place.  Realizing I wanted fence posts, I used the left over black and white clay and die cut the fences.  I also had left over brown clay so I free hand cut a sign.  Using the small pumpkin cutter, I created several pumpkins, used a craft stick to create texture, then spritzed each with Fireworks Craft Sprays.  They were placed around the sign onto which I added letters spelling BOO.


​Using the ghost clay cutter, I created a number of ghosts that I adhered to the panel.  In the upper corner I created a moon and placed a ghost on top. 


The black cats are standing on the fence and the witch's hat is in the tree.  Yellow clay was added behind the house to simulate light in the windows then the house was adhered to the panel.  Using the remaining black and white clay panel, I used a rectangle cutter to create bricks for a walkway.


​Hoping you have a Happy Halloween!

​Thanks for stopping by.

​Steph

Tuesday, September 17, 2019

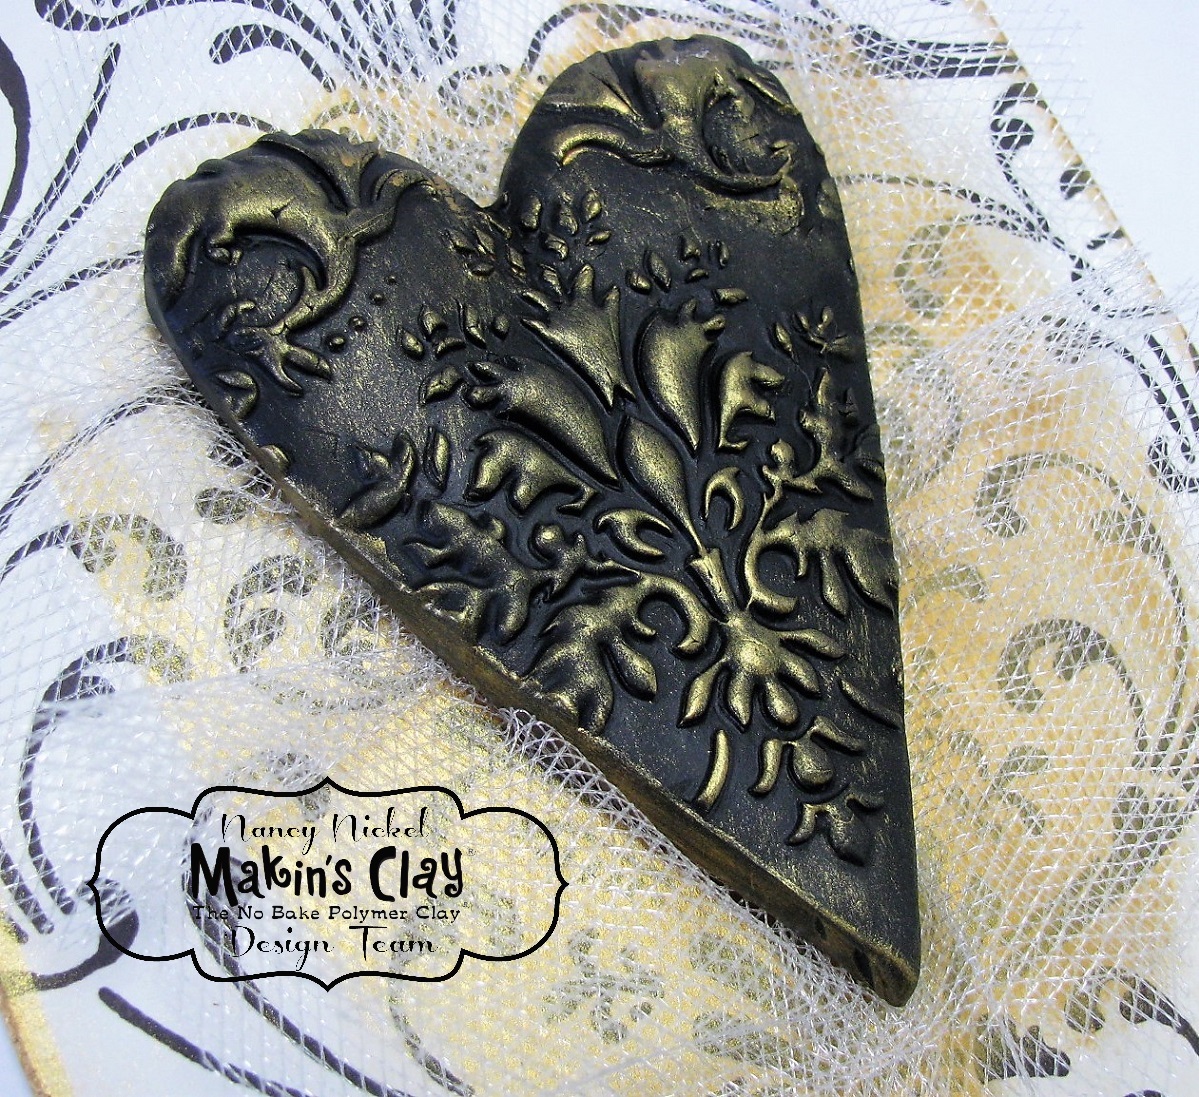
Clay Heart Canvas


Clay Heart Canvas by Nancy Nickel

Materials Used:
Makin’s Clay® - Black Clay
Makin’s Professional® - 
Cutting Mat
Heart Mold – Stamperia;
Canvas – 5 x 7;
Decorative Paper – 5 x 7;
Cosmic Shimmer Metallic Gilding Polish – Gold;
Scraps of Gold Shimmer Tulle;
Tim Holtz Quote Sticker;
Scrap of Black Chipboard
Instructions:
1.   Roll a good size piece of black clay into a smooth oval. Insert clay firmly into the heart mold. Pop heart out of mold, and allow to dry.

2.   When it’s dry, brush the surface of the heart with the gold gilding polish, using the foam applicator. 


3.   Adhere the paper to the front of the canvas.
4.   Swipe some gilding polish on the center of the canvas, as well as along all the outside edges. 
5.   Bunch up the shimmer tulle, and adhere to the center of the canvas.
6.   Adhere the pretty heart in place on the tuft of tulle. TrIm any excess tulle, so that it frames the heart nicely.


7.   Adhere the quote sticker to the scrap of black chipboard, and adhere in place under the heart.
8.   Pop the canvas in a frame, or display as it is!


Wednesday, June 26, 2019

Owl Canvas


Owl Canvas by Bea Grob
Don't forget to be Owl some....

Lately, I needed a little gift for somebody who collects owls. It was a good excuse to play a bit with Makin's Clay®. 

Supplies and Tools:

Makin's Professional® Cutting mat (small)
Makin's Professional® Ultimate Clay Machine®
Makin's® Cutter Sets Sun, Water Drop, Round
Craft paint in greens and a brown as patina
I also had a mini canvas and a tiny round cutter (you could use instead a larger straw or something similar) and a napkins. Whenever you use napkins, make sure that you have only the top layer to work with. 

I started by cutting some clay and then picked up any leftovers on the plastic, it is really easy and so there is nothing wasted, just press your ball of clay onto the parts that stuck to the wrapping plastic. And, as always, I put the non used clay right away into a zip lock bag with a moist towel.

I ran the clay straight away through the Makin's Professional® Ultimate Clay Machine®, no conditioning needed with Makin's Clay®. I made a sheet on the thickest setting.


First, I cut out the body of the owl. Create a template like mine, use a stencil, or a printed image to trace.

I put my owl, which I touched up a bit at the edges, onto a ceramic tile. Next, I rolled out another sheet, but this time on the setting #3. I sprayed the owl and the new sheet lightly with plain water.

Carefully place the napkin onto the clay as flat as possible, then tap it to make sure that there are no air gaps. 


Now it is time to grab the smallest cutter from the round set and start cutting some circles. Try to push the cutter down as straight as possible, this helps to make sure that the napkin doesn't tear in places where we don't want it.

I started at the bottom with adding the circles for the first row and then started from the top going down. I shifted the second and all the following row slightly downwards a notch each time.

I had to spray the napkins again, as it started to dry while I was carefully cutting and placing the circles.


For the eyes and the beak I chose more yellow parts on the napkin. Again, I used a round cutter, this time the middle size and the tiny one. I cut the beak with the knife.

For the eyebrows, I used the water drop cutter the biggest size. I needed them symmetrical so I grabbed an acrylic block and used it “the wrong way.”  Don't press it down with bare hands, it is pretty sharp. Now for the wings, I made a template and cut them out with the blade. 


While the owl is drying, it is time to paint our little canvas. I used two craft paints in green and applied it with a sponge. 

When the owl is dry, it is time to give some depth, first with the brown acrylic which I applied with a brush and then wiped of with a moistened towel.

We are not done yet, now we also need some highlights. I use a white posca pen, which is a marker filled with acrylic paint.


I glued my owl onto the canvas with some tacky glue (make sure that paint and owl are dry).

I also made, from the leftovers, some flowers with the sun cutter set.  I rolled out the clay to the setting #3 which is pretty thin, this means the clay is flexible and I can bend it around the canvas. I didn't use them all, but you can always use them as embellishments in another project.


Friday, May 3, 2019

"Be Afraid of Nothing" Mixed-Media Canvas

"Be Afraid of Nothing" Mixed-Media Canvas by Steph Ackerman
Hi everyone, Steph here today with a new mixed media project.

Supplies:

Makin's Clay® - white
Makin's® Roller and Cutter Set
Makin's ProfessionalⓇ Clay Mat
​ Plaid Coastal Paint
​ Prima Acrylic Paint, Art Stones, Molds
​ The Crafter's Workshop Stencils
Beacon Tacky Glue

Instructions:

​Using a 6" canvas and a small 3" frame, I painted them with black gesso.  Then I used molding paste with several stencils to add dimension.

While waiting for the canvas to dry, I created an assortment of different sizes and styles of wings.  Once the clay was placed in the molds, I used the Roller to force the clay further into the mold so it would pick up all of the details.


I used Plaid's Coastal Paint in Seal Gray to cover the raised portions of the wings.

Once the canvas and frame dried, I used a variety of Prima Metallique Paints to create the background.


​Spritzing the canvas with water allowed the paints to move and blend.  I used a paper towel to absorb excess water.
Using Beacon Tacky Glue, I glued the frame to the canvas.  I let it sit overnight to be sure I had a good seal.

I painted the wings yellow, then adhered the clay wings and keyhole to the frame.  Then I glued assorted sized art stones along the bottom.
I added more art stones to adorn the corners of the canvas then painted them a coordinating color.  I also added several small clay elements along the sides of the canvas.


​​Realizing I wanted to add a charm in the open space, I  threaded some beaded chain through the keyhole and added the charm.  I added a dab of glue to keep the charm in place.


The charm reads:  "I want to be improbable and afraid of nothing as if I had wings."  This is how I felt when creating this canvas.  I wasn't afraid to explore my creativity.

​ Thanks for stopping by.

Steph


Contact us

Name

Email *

Message *