Pages - Menu

Search This Blog

Showing posts with label bohemian. Show all posts

Saturday, July 27, 2019

Mandala Flower Jewelry Set

Mandala Flower Jewelry Set by Naomi Scarparo

I go through different fads of fashion, depending on how I feeling… as an artist, I sometimes express my creativeness through fashion jewellery… and at the moment I love the Boho look and feel of dresses... breezy, carefree, and natural look… I decided to make Boho-inspired earrings and pendant to match my carefree, black linen dress, using a Mandala flower silkscreen. 

Materials:

Makin's Clay® Roller or Clay Machine 
Makin’s Professional® Cutting Mat 
Makin's Clay® Texture Sheet - Set A - Sand
Makin's Clay® Clay Tool Set - Chisel
Makin's Clay® Texture Sheet - Set A - Sand
CreateAlong.com Zensation Silkscreen
White acrylic paint
Gold acrylic (I used Cadence Metallic Peridot Gold) 
Gold Flake Foil
Soft small tip paint brush and a stiff small paint brush
Gold sparkled hotfix gem approx. 0.3cm
2 circle cutters, one approx. 3cm and 4cm 
(to cut Mandala shapes - the smaller earring size and larger pendant size one)
Jewellery findings - Jump rings, Earring hooks,

Instructions:

Roll out your Makin's Clay® black to the thickest setting on your clay machine, then sprinkle a small number of gold flakes, and roll/mix through the clay, roll through your clay machine again on the 2nd thickest setting. 


Select what mandala you would like to use. I used the small flower style and the same patterned larger pendant size mandala. Place the silkscreen with the orange/shiny side down, smooth it down gently with your fingertips or roller.

Put a line of paint along the edge. Pull the paint across the mandala with a squeegee or an old credit card. Remove the silkscreen by slowly lifting up from one side.

Rinse the silkscreen off and lightly pat dry it to use again. Using the same technique to one more small flower mandala to match the other one. 


Handy tip - Do not let the paint dry on your silkscreen. Keep a container of water nearby to place your silkscreen in. Gently rinse your silkscreen with water, using soap if necessary. Gently rub the pain off with a soft sponge if required.

Allow the paint to touch dry - but don’t leave it too long as the clay will start to cure. Once touch dry, use your circle clay cutters to cut around the flower mandala. Smooth edges lightly with your fingertips if necessary. 


Lay the Mandala onto the Makin's Clay® Texture Sheet - Set A - Sand and lightly press them into the texture sheet to give the back of the pieces some texture. 

While placed on the texture sheet, add the gems in the centre of the mandala and use the tip of a ballpoint pen (without the tip/pen down), securing it into place. After cured/dry they can be removed and place a dab of glue to secure them further into place.

With a small tip brush and the Cadence Metallic Peridot Gold, paint in some of the areas of the mandala.


Using the pointed size of the Makin's Clay® - Chisel, place holes in the 2 small mandala where the jump rings will be placed.  Using a micro circle cutter, cut a hole for the cord on the larger pendant mandala

Allow to dry for 24 hours. Handy tip - Place a clay tile on top to ensure the mandala dry place.


Once dry, Apply some white glue on the backs of the earrings and pendant, then add a touch of gold flakes, press them to attach to the glue. With a stiff paintbrush, brush off the excess to the desired amount.

Coat the pendant and earrings with your favourite polymer clay varnish, back and front.  
Once dry, attach jewelery findings. 


Perfect to wear for a Night out on the town or makes a lovely gift for a Boho Chic...

Saturday, December 29, 2018

Mosaic Boxes Boho Style


Today, I'm here with some cool Mosaic Boxes in Boho Style. I had this cardboard boxes since a while and thought it is time to pretty them up.

Materials:

Makin's Clay® - Black
Makin's® Clay Tool Set
Makin's Professional® - Ultimate Clay Machine®
Makin's Professional® - Cutting Mat
Makin's® - Square Cutters
Tissue Blade
Metalic Paint Lumiere by Jacquard
Sponge Dabber
Stamps
Bling
UV Resin and lamp

Instructions:

I started with painting the box in gold and let it dry completely.

Next, I started rolling out about half of a 60 g package Makin's Clay® - black. This is of course also depending on the size of your box and how many mosaic tiles you need. I used the Ultimate Clay Machine® on the setting one which is the thickest setting.


Then I sprayed some water on the rubber stamp and the clay and did dab it back slightly, I only want it a little bit wet but no big puddles of water.

Now it is time to make some impressions. I uses the roller from the Makin's® Clay Tool Set and rolls over from one end to the other and making sure to give a good pressure. I don't recommand to go back and forth, but rather one heavy roll. You risk to have double impressions when you go back and forth.

You should get something like this.
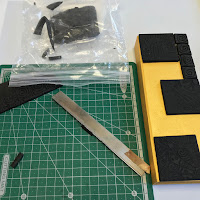
To cut the large mosaic tiles I use the tissue blade.

A wet wipe is handy to smooth out the edges.


The leftovers you can simply smoosh together and run again through the Ultimate Clay Machine®.

Here you can see the second patch, which gonna be the smaller tiles and I going use the Makin's®  - Square Cutters.

A little trick here for you. I use an acrylic block on top of the cutter. This way I get more pressure to have a clean cut and it doesn't hurt my hands.

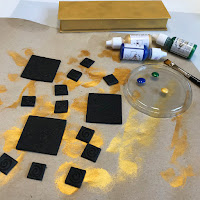
To test how many small tiles I need I placed the big ones the way I wanted them onto the in the meantime dry box.

After having so much fun with the first box I decided to make another batch, this time with rather smaller tiles, there are so many variation how you can make them...

                                                                                                                                                     I let the tiles dry overnight and now it it is time to paint them. I do use the Metallic paint for some extra sparkle.

As a first step I apply a color with a brush to make sure that I get into the crevices.

While the paint is still somewhat wet I take again a wet wipe and wipe off some of the paint on the surface, leaving color mostly in the crevices.

 Next I add other colors on top, sometimes it is a back and forth applying color taking away until you are happy with the result.


They looking quite good already, but I want to go a step further, so I go for some UV Resin next.

I usually start by applying along the edges and then add a blop in the middle and start spreading around. I also do at least 2 layers which I cure in between.


Now that they are cured, I glue them to the box with some tacky glue.


Wednesday, March 21, 2018

Bohemian Style Pendants


Cindi McGee recently shared  these colorful clay pendants she created with the help of the Makin's Professional® Ultimate Clay Machine®, Makin's Professional® Ultimate Clay Extruder®, and Makin's® Water Drop Clay Cutters.  


Monday, February 12, 2018

Bohemian Pendants


Cindi McGee recently shared these colorful Bohemian style polymer clay pendants.  Cindi used theMakin's Professional® Ultimate Clay Machine® and Makin's Professional® Ultimate Clay Extruder® when creating these pendants.

Contact us

Name

Email *

Message *