Pages - Menu

Search This Blog

Showing posts with label quilled clay. Show all posts

Saturday, March 11, 2017

Quilled Clay 4 Leaf Clover Earrings

Quilled Clay 4 Leaf Clover Earrings by Cindi McGee

’Tis the season for wearing GREEN!   St. Patrick’s Day is fast approaching and these “lucky four leaf clover” earrings will be a cute accent to any green outfit.  March is Youth Art Month and this technique is easy and could be recreated in any size by any age.  The effect is similar to paper quilling. 

Materials: 

Makin’s Clay® - Green 60g
Makin’s Professional® 
  • Ultimate Clay Machine®
  • Cutting Mat
  • Professional Clay Tools 
Ruler 
Gold earring wires, large jump rings, eye pins, accent beads 
Jewelry pliers 


Instructions:

Roll green clay in Ultimate Clay Machine® on setting #1, then #2, and end on #3.  

Use guidelines on cutting mat to measure over one half of square on cutting mat (dot in center), place ruler on rolled clay and use cutting wheel to cut strips from clay. 


Begin coiling strips of clay tightly, on oppostie ends of first strip.  End about 1/2” from center of strip, then fold in half to create stem and bottom leaves of shamrock.  

Roll two additional coils the same size as the bottom leaves.


Roll a small ball of clay and flatten slightly, place 3 sections of shamrock onto clay and press gently to adhere.  


Let dry 24 hours. 


Add large jump ring to each clover, then add gold accent bead to eye pin and attach to earring wires. 


Tuesday, February 9, 2016

Quilling/Soutache with Makin's Clay® by Kim Hale


Quilling/Soutache with Makin's Clay®
Designed by Kim Hale 

This month, the Design Team was challenged to choose a technique from our Tutorials & Techniques Pinterest Board and try it with Makin's Clay®.  This project was inspired by this pin.  I must say this was a bit fun making all the curls and finding ways to use them! Once my brain started with the curl theme it kept saying “now try this”. You may find yourself making lots of designs.  The process reminded me very much of Soutache.
Materials:

Makin's Clay® in assorted colors  - projects shown feature Red, White and Plum Wine 
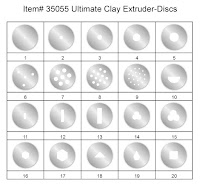
Makin's® Ultimate Clay Extruder™- Disc #11 
Makin's® Ultimate Clay Machine™
Makin's® Hearts Clay Cutter Set 
Makin's® Cutting Mat 
Viva Decor Inka Gold 


Instructions:

Place Red clay into Ultimate Clay Extruder™ and extrude several strands using Disc #11.   Repeat with Plum Wine clay.   If strips begin to curl, realign to straighten.  Tip:  Place a damp paper towel over extruded clay strips to keep them fresh and slow drying while working.


For the heart shaped pendant, I used the largest heart clay cutter as a template and curved the red clay around the outside.  While drying, I created smaller curls for inside the hear, and the bail. I moistened the curled pieces a bit and mounted them inside the heart. I used small curls for earrings. 

For the freeform pendants, I created my designs by gathering strips of extruded clay and attaching them at one end, then created my coils.  I rolled white clay with the Ultimate Clay Machine™ to a setting #2, placed the coiled pendants onto the rolled clay and cut around them to create a contrasting base and add strength to the finished pieces.  I also added some rolled white clay pieces to give the effect of pearls to the design.  
On two of the designs I used Viva Décor “Inka Gold” on to add a little bling. 

I hope you are inspired to get out your extruder and start making swirls. 
   
Kim Hale
Counselor, Artist, Teacher

Change your thoughts, change your life!

Sunday, February 7, 2016

Quilled Clay Heart Pins by Carole Monahan

Design Team Member Carole Monahan recently shared these colorful quilled clay pins with instructions here on her Pinterest board.    Carole used Makin's Clay® and the Ultimate Clay Extruder™ to create her hearts.

Contact us

Name

Email *

Message *