Pages - Menu

Search This Blog

Showing posts with label mermaid. Show all posts

Tuesday, September 3, 2019

Mermaid Altered Bottle

Mermaid Altered Bottle by Steph Ackerman

Hi everyone, Steph here today with another altered bottle.  I must say I have been having so much fun incorporating Makin's Clay® products on my bottles.  Makin's Clay® is a fantastic medium to use on glass.
Makin'sⓇ Texture Sheets
Burlap
Prima Metallique Paints and Art Stones
​Fireworks! Shimmery Craft Spray Inks
Ranger Metal Embellishment

Instructions:

​Originally, I placed white clay around the bottle, then used the texture sheets randomly around the bottle for texture.  Then I painted assorted colors of acrylic paint.


But then I realized I wanted to go in a different direction and painted white gesso over the entire piece.  The gesso covered the paint, but still allowed the texture to show.


Once dry, I painted the entire bottle with Prima Mermaid Tears for a pretty light blue effect.  Next, I wrapped burlap partially around the bottle and glued mesh on top.  Art Stones in a variety of sizes were glued next on the mesh and allowed to dry.

Using the sea shell mold, I created an assortment of shells.  I must say this is one of my favorite molds and I use it quite often. 


​For color, I inked the shells, then spritzed them with several colors of Fireworks! Shimmery Craft Sprays before adhering them about the mesh.   I spritzed the bottle with several colors of Fireworks! Shimmery Craft Spray Inks, heat setting each layer so the colors would stay true.


​ Finally, I added chain to a metal charm and placed in amongst the sea shells.


​ I added more color as I felt necessary to finish my Mermaid Bottle.

​ What do you think?

​ Thanks for stopping by.

Steph

Sunday, April 28, 2019

Enchanted Under the Sea Mermaid "Fairy" Door


Design Team Member Naomi Scarparo recently shared how she created this amazing "under the sea" themed fairy door!  Naomi used Makin's® Wood Grain Texture Sheet and the Makin's® Seashells Push Mold as part of her fabulous design! 

Tuesday, July 18, 2017

Seashell Magic

Sea Shell Magic by Sherri Welser 
I love the ocean and collecting sea shells so when I found out Makin's Clay® had a push mold that was sea shells and a starfish,  I just had to create something with it!

Materials:

Makin's Clay® - White, Earth Tones 
Makin's® 
  • Push Mold - Sea Shells
  • Clay Tools - Roller
Makin's Professional® Cutting Mat
Mermaid rubber stamp 
Mason jar
Rust paste paint
Raw umber paint
Weld Bond Adhesive
Gold Glitter Glue
Needle tool or craft knife
Optional:  Metal "Believe" charm

Instructions:

Start by adding several of the Earth Tone clay shades together to incorporate the colors for a more realistic appearance.  (But don't over mix.) 

Take small amounts of the clay and use the push mold to make shells.  Make one 1" ball to sit on top of the lid and support the starfish.

Trim any excess clay around the molded images with a needle tool or craft knife (or with scissors when the clay is fresh or after it has dried). 

Optional:  mount a metal "Believe" charm to the center of the starfish.


Roll out white clay to about 1/4".  Roll enough to fit the mermaid stamp, with some extra on all sides. 

Stamp to make an impression (un-inked). 

Gently pull away the excess clay from around the mermaid image.

Let dry 24 hours. 


Apply rust paste paint to all elements.  Let dry.


Use the raw umber paint to apply a thin coat to the clay pieces and then rub off the excess with a paper towel.  This will add depth and highlight the details of the shells and the stamped image.  Let dry.

Add some touches of gold glitter glue for a little added sparkle.

Use Weld Bond Adhesive to mount then clay ball to the center of the lid, then mount the starfish on top.  

Mount the remaining shells around the starfish on the lid.


Glue the mermaid to the front of the jar.  


Wednesday, June 14, 2017

Mermaid Tail Pendant

 
Mermaid Tail Pendant by Patricia Roberts-Thompson


Materials:       40 grams Makin’s Clay® Black 32010
                        Makin’s® Texture Sheets  “Scale” 38004 Set D
                        1 ½” x 2 ½” football shaped cutter
                        1 ½” round cutter
                        ½” round cutter
                        8mm jumprings ( 2 )  5mm jumprings ( 3 )
                        PearlEx powders, I used Flamingo Pink, Super Copper, Misty Lavender, Aztec Gold,
                         and Blue Russet   
                        1.5mm rattail, seedbeads, and jewelry findings to finish

                        Cornstarch, and Acrylic varnish


Making the Pendant

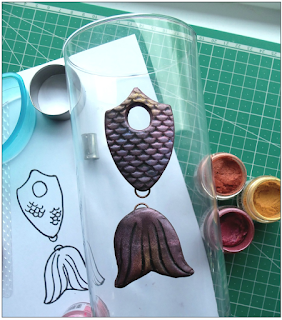
Roll the black Makin’s Clay® on the thickest setting (setting #1) of the Ultimate Clay Machine®. Dust the Scales texture sheet with cornstarch and put it on the clay with the writing face up so you can read it. That will give a scale pattern that will accept more color. Use the football shaped cutter, or your knife to freehand the shape, and cut two pieces. Moisten the back of one piece and lay it on the back of the other piece with the texture on the outside. Add the 10mm jump ring to the bottom tip before closing.


Use the 1 ½” round cutter to cut two scoops into the top of the mermaid tail, and then using the ½” round cutter, make a hole approx 1/8” from the top.

Using the 1 ½” cutter, cut two circles for the tail fin, and use your craft blade to cut it into a fin shape.
Moisten one piece and press it to the second piece, placing another 10mm jumpring at the top of the tail fin. Press some lines into the tail, then apply PearlEx powders to both sides of each part of the Mermaid Tail.

You could choose to apply acrylic paints instead of the PearlEx powders, or even add paints to the powders if desired.

I placed the two pieces on a curved glass vase so it would dry with a slight curve. After a few hours it will hold its shape, and you can let it dry off the glass. When fully dry (approximately 24 hours) apply a varnish to protect the pendant.


To assemble: 

Open the three 5mm jump rings and use them to connect the two pieces of the pendant.  The small rings will allow lots of movement sideways, but prevent the bottom part from flipping over.

I used two pieces of rattail, each 23 inches long, and folded them in half. Attach them to the top part of the Mermaid’s tail with a Lark’s Head Knot. I added a big- holed bead, and then knotted the Rattail to keep it in place. I glued a spring coil end, and then added a lobster claw to one side and a jumpring to the other side. 

All done! Enjoy your cute Mermaid Tail pendant!

Mermaid tails, in a variety of colors


Contact us

Name

Email *

Message *