
Materials:
Makin’s Clay® - Clay
Makin’s Professional® - Cutting Mat - Small
Makin’s®- Push Mold – Borders;
White Cardstock;
Scrap of Red Cardstock;
Decorative Paper (I used Making Memories – English Garden Collection);
Your Next Die – Thanks.
Makin’s Professional® - Cutting Mat - Small
Makin’s®- Push Mold – Borders;
White Cardstock;
Scrap of Red Cardstock;
Decorative Paper (I used Making Memories – English Garden Collection);
Your Next Die – Thanks.
Instructions:
1. Roll green clay into a skinny little piece.
2. Lay skinny piece over ivy portion of border mold. Push into mold using ball of fingers.
3. Turn mold over and ensure that all the little corners have been filled. On the back, make sure that all the edges are pushed in smooth.
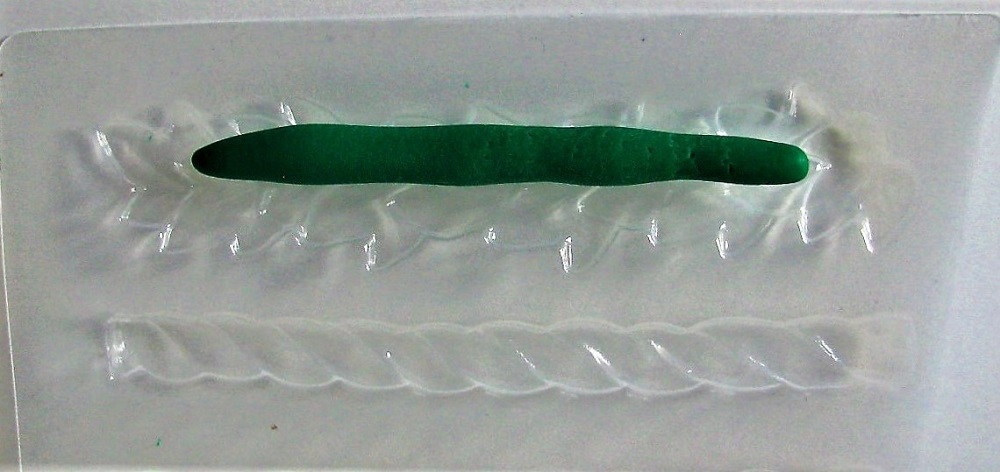


4. Pop the clay piece out of the mold and allow to dry flat. Alternatively, allow piece to dry in mold, and then pop out when dry. Create two of these leaf borders.

5. Cut A2 tent-fold card out of white cardstock.
6. Adhere a 4 ¼” x 5 ½” piece of decorative paper to the card front.
7. Cut a 4 ¼” x 1 ¾” piece of white cardstock. Adhere in place on card front 1” from bottom edge.
8. Adhere clay pieces along top and bottom edge of white cardstock strip.
9. Die-cut “Thanks” from red cardstock. Adhere to white cardstock strip, centering between clay border pieces.


Clay borders are such a fun addition to a handmade card! They add some lovely dimension and make it special! 😊
No comments:
Post a Comment