Pages - Menu

Search This Blog

Showing posts with label gravestone. Show all posts

Monday, October 7, 2019

Halloween in a Bottle - Glow in the Dark!


Halloween in a Bottle by Leila Bidler 

For this project you will need:

Makin's Clay® Glow in the dark
Makin's Clay® White
Makin's Clay® Black
(The quantity of clay depends on the dimensions of your jar!)
Makin's Professional® Ultimate Clay Machine®
Makin's Professional® Cutting Mat
Makin's® Basic Tool Set
Glass vial or jar with cork top (any dimension you like)
Clay texture sponge
Black embossing powder
Acrylic Paint black
Small paintbrush
Small deco pebbles
Colored dry deco moss
2 eye pins 
Small jewelry pliers

Instructions:

- In this tutorial we will use the awesome Makin's Clay® GLOW IN THE DARK to create a little ghost scene in a jar - the perfect decoration for Halloween!

- Take some black Makin's Clay® and roll it thru the widest setting of your Makin's Professional® Ultimate Clay Machine®. Turn it 90° and run it thru the second setting. Now run it thru the first setting again with a texture sponge to get a nice deep textured base for our little Halloween / Graveyard scene.


- Using the jar itself or the top, whatever is more comfortable to you, cut out a disc of this textured sheet of clay, since during drying it will shrink a little bit it will fit perfectly on the bottom of your jar once it is dry.

- Mix some white clay with a tiny amount of black clay you can always add more to make it darker and add some black embossing powder to give it the look of granite.


- Roll out the clay on the thickest setting or your clay machine and cut off a long stripe, then fold it in half, now you have a piece of clay that is twice the thickest setting of your clay machine. Using the tools from your Clay Basic Tool Set cut out the shape of a basic headstone.


- Using a paintbrush or the tip of your finger moisten the base of the headstone with some water and wrap the stripe around it so the headstone can stand up by itself (photo 007)

- Make some markings in the stone, draw a cross, some symbols or the classic "R.I.P." on the headstone and put it aside for now.


- Let's make a Glow in the dark skull now! Take your Glow in the Dark Makin's Clay® and make a small ball, pinch the bottom part to form an egg shape.

- Using the small tip of your tool poke two roundish holes for the eye sockets and two small ones for the nose.

- Cut off the bottom sides to make a sharp jaw line and draw one horizontal and 5 vertical lines for the teeth.


-Put a drop of water on the black base and add the headstone and the tiny skull so they will stick while it all dries.


- Now we need a little ghost! Using the Glow in the Dark Makin's Clay® form an egg shape and pinch the sides to form two "arms."

- Insert an eye pin on the top of the head and carefully close the hole around it. It will get permanently stuck once your clay dries.


- Let everything dry for a day.

- When everything is dry use some black acrylic paint on the headstone, the skull and paint a little face on the ghost:


- Take the second eye pin and insert it in the bottom center of the jar lid. Since it is cork you just need to push a little, no need to drill holes or use glue.


- Suspend your little ghost from that eye pin, if he hangs too low, just push the eye pin further into the cork lid - the fun part is that using two joined eye pins the ghost will move if you just touch the jar.

- Now put the base with the headstone and the skull on the bottom of your jar, use some white clay to glue it in and sprinkle some small decor stones and colored dried moss all over. Decor moss comes in all colors, I used light green and orange, it is a very soft material that you can easily pick a part with your fingers or cut with a pair of scissors. 


Want to see the ghost in motion?  


Expose to a light source then turn off the lights and enjoy!


Wednesday, October 18, 2017

Halloween Wine Glass Charms

Halloween Wine Glass Charms by Patricia Roberts-Thompson

Planning a Halloween Party? Why not whip up some spooky fun Wine Charms with Makin’s Clay®

Materials:             

Makin’s Clay® in assorted colors, white, black, yellow, red and green
Makin's Professional® Ultimate Clay Machine® 
Makin’s® Clay Roller
Craft blade
Toothpick
Acrylic paint, metallic paints and pastes ( optional )
18 gauge wire 1.0 mm copper , hammer, DuraClear varnish or sealer
Form to bend wire. I used a 14mm socket ( ¾” dia ) you could use a large lipstick lid

or I found the 3rd largest circle on the Makin’s Clay® Mixing Ruler worked well.

Directions:

Cut six (3 ½”) pieces of 18 gauge copper wire. Find the center of the wire and start bending it around your form. I used a 14mm socket that had a diameter of ¾”. Use round nose pliers to make a curl at the end of the wire, curling to the outside. Place the wire on a solid surface ( I used a steel bench block ) and use a hammer to flatten the wire. I squeezed the curled ends together, almost touching, and held it in place while hammering. You don’t need to hammer too hard, lots of lighter strokes works fine. Don’t cross the wires, as that weakens them when hammering. When the ends are done, move on to the round front. If you do the front first, the ends will distort, so it works better to do the curl first. Hammering strengthens the wire. Roll the clay on the thickest setting of the Ultimate Clay Machine®. For each charm, you will cut 2 pieces of clay, one for the front, and one for the back.


Each one will have the wire sandwiched between the two layers of clay. Insert the wire approx, ¼” into the top of the wine charm. If the clay is not fresh, moisten the two layers first for better adherence. A wet towel can be used to clean any dirt from the clay. Seal the charms with varnish when complete.


Fig 1: The Bat – Cut 2 pieces of black clay, rolled at 2mm thickness. Moisten the back piece with water, and place the hammered wire approximately ¼” from the top. Apply the top piece, and smooth all of the edges. Use a toothpick to make lines on the wings and body. Set aside to dry for 24 hours. When dry, paint lines with white paint, and use black metallic paint if desired on the body

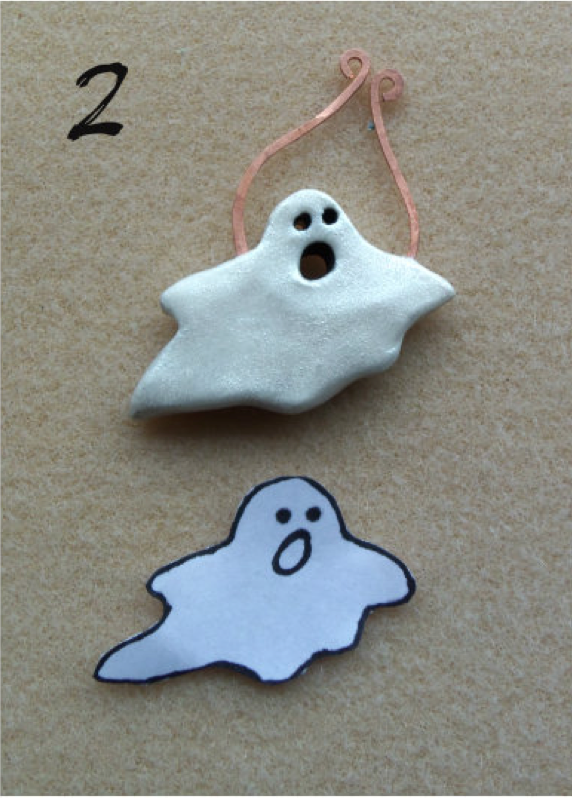
Fig 2: The Ghost. Cut 2 pieces of white clay, assemble as in Fig 1. I used a small cutter to cut the mouth, and poked two holes for eyes. The handle of a paint brush can help shape the mouth. When dry, I painted the inside of the mouth and eyes with black acrylic paint, and white metallic paint for the body.

Fig 3: The Skull. I cut the front from white clay, the back from black clay. I used a small cutter for the eyes, then used a toothpick to refine the shape.  Do the same for the nose. Use a toothpick to draw the mouth and teeth. Assemble as usual, taking care that the wire doesn’t show in the eye holes. Let dry, then add black paint to the mouth and inside the eyes and nose. Wipe off excess paint with a baby wipe. I painted the skull with metallic white paint.

Fig 4: The Gravestone. Mix a little black into some white clay to make a light gray. Cut 2 pieces and assemble with the wire. Use a toothpick to write RIP across the front, and some lines on the bottom. Let dry and antique with black paint. Use metallic black paint sparingly, if desired.

Fig 5: The Spider Web. Cut 2 pieces of white clay. On one of them, draw the 5 spokes of the web, and the connecting strands. Assemble the wire and back piece.  I made the spider freehand from black clay, but then found it got lost when I antiqued the web, so I painted him green. You may choose to do him in another color. Place the spider on the web. When the clay is dry, antique the web with black paint, and remove excess with a baby wipe. Paint the spider if desired. I used a bit of metallic white on the web, and metallic green for the spider.

Fig 6: The Pumpkin. Mix a small amount of red clay, into yellow clay to make orange, and cut 2 pieces. Assemble the wire and backing, then use a toothpick to scribe the lines and features of the pumpkin. I indented the eyes, nose and mouth for a more 3 dimensional look. Take a small amount of green clay and make a stem and leaf for the top of the pumpkin. Let dry for 24 hours, then antique with black paint, and highlight with orange metallic paint.

Seal all of the charms with DuraClear varnish when dry, or your favorite sealer.


HAPPY HALLOWEEN!


Contact us

Name

Email *

Message *