 |
| Halloween Wine Glass Charms by Patricia Roberts-Thompson |
Planning a Halloween Party? Why not whip
up some spooky fun Wine Charms with Makin’s Clay®
Materials:
Makin’s Clay® in assorted colors, white, black, yellow,
red and green
Makin's Professional® Ultimate
Clay Machine®
Makin’s® Clay Roller
Craft blade
Toothpick
Acrylic
paint, metallic paints and pastes ( optional )
18
gauge wire 1.0 mm copper , hammer, DuraClear varnish or sealer
Form
to bend wire. I used a 14mm socket ( ¾” dia ) you could use a large lipstick lid
or
I found the 3rd largest circle on the Makin’s Clay® Mixing Ruler
worked well.
Directions:
Cut six (3 ½”)
pieces of 18 gauge copper wire. Find the center of the wire and start bending
it around your form. I used a 14mm socket that had a diameter of ¾”. Use round
nose pliers to make a curl at the end of the wire, curling to the outside.
Place the wire on a solid surface ( I used a steel bench block ) and use a
hammer to flatten the wire. I squeezed the curled ends together, almost
touching, and held it in place while hammering. You don’t need to hammer too
hard, lots of lighter strokes works fine. Don’t cross the wires, as that
weakens them when hammering. When the ends are done, move on to the round
front. If you do the front first, the ends will distort, so it works better to
do the curl first. Hammering strengthens the wire. Roll the clay on the thickest
setting of the Ultimate Clay Machine®. For each charm, you will cut 2 pieces of
clay, one for the front, and one for the back.


Each one will have the wire sandwiched
between the two layers of clay. Insert the wire approx, ¼” into the top of the
wine charm. If the clay is not fresh, moisten the two layers first for better
adherence. A wet towel can be used to clean any dirt from the clay. Seal the
charms with varnish when complete.

Fig 1: The Bat – Cut 2 pieces of black
clay, rolled at 2mm thickness. Moisten the back piece with water, and place the
hammered wire approximately ¼” from the top. Apply the top piece, and smooth
all of the edges. Use a toothpick to make lines on the wings and body. Set
aside to dry for 24 hours. When dry, paint lines with white paint, and use
black metallic paint if desired on the body
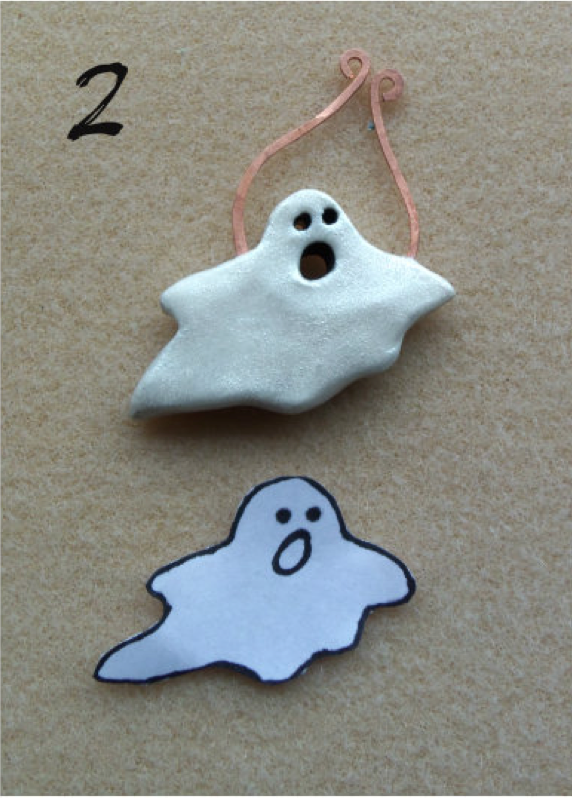
Fig 2: The Ghost. Cut 2 pieces of white clay, assemble
as in Fig 1. I used a small cutter to cut the mouth, and poked two holes for
eyes. The handle of a paint brush can help shape the mouth. When dry, I painted
the inside of the mouth and eyes with black acrylic paint, and white metallic
paint for the body.
Fig 3: The Skull. I cut the front from
white clay, the back from black clay. I used a small cutter for the eyes, then
used a toothpick to refine the shape. Do
the same for the nose. Use a toothpick to draw the mouth and teeth. Assemble as
usual, taking care that the wire doesn’t show in the eye holes. Let dry, then
add black paint to the mouth and inside the eyes and nose. Wipe off excess
paint with a baby wipe. I painted the skull with metallic white paint.
Fig 4: The Gravestone. Mix a little
black into some white clay to make a light gray. Cut 2 pieces and assemble with
the wire. Use a toothpick to write RIP across the front, and some lines on the
bottom. Let dry and antique with black paint. Use metallic black paint sparingly,
if desired.
Fig 5: The Spider Web. Cut 2 pieces of
white clay. On one of them, draw the 5 spokes of the web, and the connecting
strands. Assemble the wire and back piece.
I made the spider freehand from black clay, but then found it got lost
when I antiqued the web, so I painted him green. You may choose to do him in
another color. Place the spider on the web. When the clay is dry, antique the
web with black paint, and remove excess with a baby wipe. Paint the spider if
desired. I used a bit of metallic white on the web, and metallic green for the
spider.
Fig 6: The Pumpkin. Mix a small amount
of red clay, into yellow clay to make orange, and cut 2 pieces. Assemble the
wire and backing, then use a toothpick to scribe the lines and features of the
pumpkin. I indented the eyes, nose and mouth for a more 3 dimensional look.
Take a small amount of green clay and make a stem and leaf for the top of the
pumpkin. Let dry for 24 hours, then antique with black paint, and highlight
with orange metallic paint.
Seal all of the charms with DuraClear varnish
when dry, or your favorite sealer.


HAPPY HALLOWEEN!
No comments:
Post a Comment