Pages - Menu
Search This Blog
Showing posts with label ClayCore Adaptors. Show all posts
Tuesday, September 12, 2017
The "Heart" of Kindness
Design Team Member Patricia Krauchune's kind heart strikes again - this time she creates this unique anatomical steampunk heart for a friend who recently underwent heart surgery. Pat used the Makin's Professional® Ultimate Clay Extruder® and ClayCore® Adaptors to create the arteries for the heart. We are sure Howard is going to be pleased with it!
Saturday, May 27, 2017
Chevron Necklace
![]() |
| Chevron Necklace by Carole Monahan |
So have you ALWAYS wondered what to do with the
MAKIN'S PROFESSIONAL® CLAYCORE® EXTRUDER ADAPTERS?????
Well here is a cute fast idea.
Materials
Makin’s Clay® 2 oz Black
2 - 2 inch flat head pins - gold
8 gold beads
16 gauge wire 10-12 inches
Gold chain and findings
Viva Inka Gold
Tools
Makin's Professional®
- ClayCore® Extruder Adaptors - 2mm
- Ultimate Clay Extruder™ - Disc #20 - Square
Needle nose pliers
Round nose pliers
Wire cutter preferably flush cut
Craft blade
Instructions:
Roll the black clay into a tube and insert into the extruder. Place the clay
core adapter on top of the clay in the barrel, prong facing up.
Then add the disc of your choice. I used disc #20
Square.
Extrude the clay make sure you keep is nice and
straight while it is coming out.
I extruded about six 4 inch lengths at a time. Tip: Place a
really straight piece of wire into each piece to help ensure you don't lose the hole while drying.
Leave some straight
twist others gently. Take each end and twist in opposite directions. Let the
pieces dry completely about 24 hours.
After the pieces have dried now trim the ends note
the 1 end is cut at an angle and the outside edge is flat.
Insert the 16 gauge wire into the cut pieces as shown in second picture.
Make cure the cuts line up .

After they have lined up, you can cut the wire to leave just enough to put an eye loop in the outside ends (there are many videos online that show you how to make an eye loop.) I like to recess the loop into the clay, this way nothing can snag a sweater.
After each chevron has been trimmed and set with the
16 gauge wire it is time to highlight the shape.
Less is more here……. Use a small amount of Inka gold
to wipe along the edges of the twisted piece then the flat sides of the square.
Now take the long flat head pins and gold beads to
join everything together.
Bend and close the flat head pins with eye loops to
add the chain.
Finish with findings of your choice.
You can see what other curious creations I have made
here.
Friday, September 9, 2016
Blended & Rolled Bead Bracelet with Makin's Clay®
![]() |
| Blended & Rolled Bead Bracelet Designed by Lisa Haney
Rolled paper beads are a popular way of creating unique beads for jewelry, or even home decor pieces like baskets. Often seen made with magazine pages, or printed scrapbook papers, Lisa's version takes it to the next level with multi-toned, layered beads made with Makin's Clay®.
|
Supplies:
Makin’s Clay®
- White
- Black
Recommended
Makin’s® Tools
- Roller & Cutters Set
Other Materials:
Corn Starch
Oil Paints
Paint Brush
Paper
Ruler
Scissors
Stretch Elastic – 1mm
Method
Create a sheet of white clay by running it through
the Ultimate Clay Machine® on the largest
setting (#1).
Cut the sheet into two 1 ½” x 3” pieces using the roller
cutter from the Roller & Cutters
Set.
![]() |
| Roll white clay |
![]() |
| Cut rectangles |
Paint one color of oil paint making a triangle shape
across the top of one of the pieces and another color across the bottom.
Place the other piece over the top of the painted
piece. Run the whole thing through the
clay machine on the largest setting. The longest edge should go into the clay
machine first.
![]() |
| Add the paint |
![]() |
| Place second rectangle over first |
Fold the bottom of the piece up to the top always lining
up the sides and run through the clay machine.
Repeat until the sheet is completely blended. Be careful to never turn the sheet so that
only one color is touching the rollers (usually it is the longest edge that
goes into the clay machine first.) There
should always be two colors touching the rollers like in the picture, red on
one side and yellow on the other. This
is similar to the Skinner Blend.
If the clay gets sticky, rub it with a little corn starch. (This is corn starch is a small sock.)
![]() |
| Roll through clay machine |
![]() |
| Corn starch helps with stickiness |
Once the sheet is blended, move the setting of the clay
machine up one setting at a time until the clay has been run through the #5 setting.
![]() |
| The blended clay |
Create a sheet of black clay by running it
through the clay machine starting with the largest setting (#1). Move the setting of the clay machine up one
setting at a time until the clay has been run through the #5 setting.
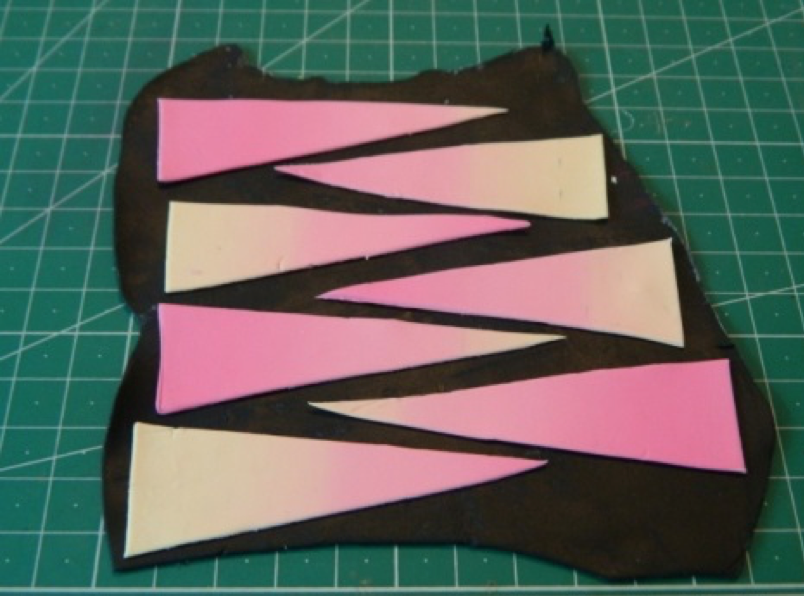
Cut out a long triangle template to use so all of the
beads will be the same size. This
template is about ¾” by 2 ½”.
Cut around the template using the roller cutter from the Roller & Cutters Set. Cut out as many pieces as needed from the
shaded sheet.
![]() |
| Use template to cut triangles |
Lay the pieces on the black sheet and cut out.
![]() |
| Place blended triangles over black clay |
![]() |
| Cut black triangles slightly larger |
If the back of the strip seems dry, gently rub a slightly
moist paper towel on it. Starting with
the wider end of the strip, roll the bead up on the stylus from the Clay Mixing Ruler™. Slide the bead off
and let dry 24 hours. Repeat with the rest of the
beads.
![]() |
| Roll on stylus |
![]() |
| Finished beads |
Extrude a tube of black clay using the #3 extruder disc,
the Ultimate Clay Extruder® and the 2mm ClayCore®
Extruder Adapter. Let the tube dry 24 hours.
After the tube of black clay has dried, cut a length
large enough to go around your wrist.
String on however many beads you want.
Insert the 1mm stretchy elastic all the way through the black rope and tie it in a knot. Cut the tails of the elastic.
![]() |
| The ClayCore adaptor makes a hole in your tube |
![]() |
| String your beads |
![]() |
| Tie stretch cord closed |
Now you have a nice bracelet to enjoy!
![]() |
| Finished bracelet ready to wear! |
Labels:
air dry clay,
beads,
bracelet,
ClayCore Adaptors,
fashion,
jewelry,
Lisa Haney,
Makin's Clay®,
no bake clay,
rolled beads,
rolled paper beads,
Skinner Blend,
Ultimate Clay Extruder
Subscribe to:
Posts (Atom)