Today, I will show you how to make these very simple textured pieces that could function as pendants, or brooches. Small rhinestones add a touch of sparkle, and one cannot have too much sparkle!
Materials:
60g White Makin’s Clay® (Mix paint into some white clay for the backing if desired.)
Makin's Professional®
- Ultimate Clay Machine®
- Cutting Mat
Makin's® Clay Roller
2 ¼” cutter
¼” Kemper cutter or a straw to cut small round dots
Clay blade, scissors, brushes, medium ball tool, needle tool
Gorilla Superglue
Baby Wipes
PVA white Glue
DuraClear Matte or Gloss varnish
Acrylic paints – Craftsmart Plum, Ocean Breeze.
Inca Gold Metallic Paste, Gold and Cobalt Blue (Metallic paints can be substituted for the Inca Gold)
1mm rhinestones – glass or acrylic, plastic straw
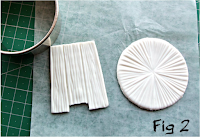
Roll white Makin's Clay® on the thickest setting ( #1 ) of the Ultimate Clay Machine® I used a 2 ¼” cutter to cut a circle, and the wooden boards were cut freehand. Note, that the Board pendant is cut slightly wider on the bottom. The height of the board pendant is around 2”. Use the back of your clay blade to press two lines indicating three boards. Using a needle tool, or the Sculpey Etch and Pearl tool, scribe lines along the length of the boards. These lines can be slightly wavy. The circle was scribed, first by dividing the circle into quarters, then filling in the sections with straight lines. Don’t worry if the center point moves, precision is not important here, but keep the lines straight. The circle will be slightly distorted after pressing the lines, so use the cutter again and re-cut the circle.
I wanted my pendants to have a curved shape, so I placed the circle on a glass bowl, and the board on a curved metal surface. Both pieces could have gone on the glass bowl. I painted the board with Plum Craftsmart Acrylic paint and the circle with Ocean Breeze Craftsmart Acrylic paint. I used a wet wipe to remove some of the paint from the high spots of the pendants. When dry, highlight the ridges with metallic paints, or Inca Gold pastes. I used Inca Gold, gold on the purple boards, and Inca Gold, Cobalt Blue on the circle.
Run some white clay on the #3 setting of the Ultimate Clay Machine® , then using a ¼ inch cutter, cut several round dots from the clay. Place a dot in your palm and using a medium sized ball tool press the tool into the center, forming a small cup. Add a bit of white glue to the bottom of the cup and place it where you like on the pendant. Add a lot of cups or as little as you like. I used 6 cups on the boards and 9 on the circle. Add a small dot of glue in the center of each cup and add a small rhinestone. Allow the clay to cure for 24 hours, and then remove it from the glass support. Varnish the front with your favourite varnish, I liked the matte look, so I used DuraClear Matte Varnish, you may like the gloss instead!
 You could choose to glue on a bail, but I wanted to have a hidden bail, so I cut a small piece of a plastic straw, and used Gorilla Superglue to fix it on the back. When that was dry, I added a bit of white glue and a thin layer of clay ( #3 thickness ) over the back and trimmed it with scissors so that the clay doesn’t show from the front. Cut two small slits to expose the ends of the straw, and press the clay around the straw to shape. I added a bit of the acrylic paint to the white clay to match the pendants. Let this dry again for 24 hours, then varnish the back with your favourite sealer. Then string your pendants. I used wire necklaces for mine.
Easy, fun project, I hope you enjoy making one!


No comments:
Post a Comment