 |
| Decorative Bowls by Iris Rodriguez |
Hello Makers!
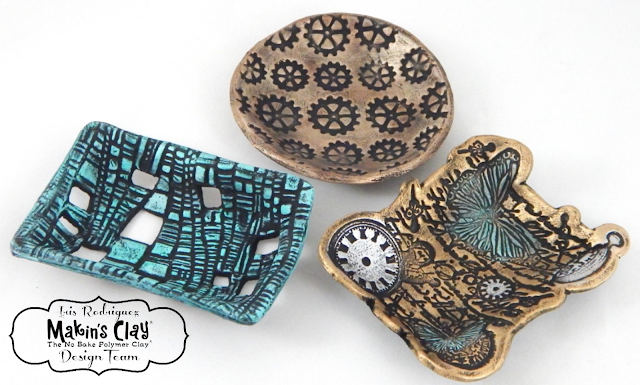
Today, I bring you three easy to make decorative bowls for
your home or to give as gifts for any occasion. The bowls can also hold small,
non-edible objects, such as rings. The bowls’ surface was designed with texture
rubber stamps and a Makin’s® texture sheet. I made a round Steampunk Bowl
with a gear surface design. The other two are more of a rectangle shaped bowls.
One is a blue/green patina with holes, the other is butterfly and cursive
lettering bowl. So let’s find out how to make these cute bowls.
Makin's®Texture Sheet Set F - Eyelag Screws, Gears, Hex Bolts, Sprockets
Makin's
Professional® Cutting Mat
Texture Rubber Stamps (desired design)
Black Gesso
Gilders Paste; Silver, Foundry Bronze, Bronze, German Silver, Patina
Bowls (any artifact that can be used drape the clay over, to give it shape)
Texture Rubber Stamps (desired design)
Black Gesso
Gilders Paste; Silver, Foundry Bronze, Bronze, German Silver, Patina
Bowls (any artifact that can be used drape the clay over, to give it shape)
Instructions:
The three bowls are made by
taking impressions from the texture sheet and rubber stamp onto the clay. They were all made by using the same
technique.
For all three bowls roll
Makin's Clay® to approximately 1/8" thickness.
The Steampunk Bowl
For the Steampunk Bowl I used a small round glass bowl to shape
the clay.
Place the clay on top of the desired texture sheet, or place
the texture sheet over the clay. Both sides of the texture sheets will
work - one will create a raised design, the other an inset design. Use
the clay roller to roll the clay and transfer the design. To get an even
look, turn the texture sheet 90 degree and roll again. I rolled sheets of
the two sets of gears and screws for this project.
If you have issues with
the fresh clay sticking to the texture sheets, a light dusting of corn starch
will eliminate the sticking. Or, I used a very small amount of olive oil
on a paper towel - any corn starch or oil which transfers to the clay can be
easily removed with a soft damp cloth.
Place the clay inside the bowl, measure desired proportions, then
cut excess clay. This can be done inside the bowl or on a flat surface.
Smooth out the edges against the bowl.
Leave the clay inside the bowl and let it cure for 24 hours. The
clay will take the shape of the bowl.
Once the clay has cured, then paint it with black gesso,
even if the clay is black. The gesso gives a distressed look and allows the
metallic wax to better adhere.
Add Gilders Paste with fingers or cotton cloth. For this bowl I used Foundry Bronze, German Silver and Silver.
Rectangle
Patina Bowl
For the rectangle bowls, I used small bowl used for soy
sauce, but I use it for beads and clay shaping.
For this bowl I used Christi Friesen’s Strata Texture Stamp.
It has wonky squares and have cut out some of the squares.
Place stamp over the clay and roll the stamp using the roller.
Drape the clay over bowl, shape the clay a little; Makin’s Clay® will retain the shape. This is to get an idea of the location of edges, so that holes can be cut strategically.
Remove clay from the bowl and cut the holes. The holes can be cut while the clay is the bowl, but it’s easier to cut in a flat surface. After cutting out the holes, ensure to smooth out the edges with your finger or clay shaping tool.
Place the clay back on the bowl and shape the clay.
Turn the bowl and clay upside down and cut the excess clay off.
Smooth out the edges against the bowl.
Leave clay in the bowl and let it cure for 24 hours.
Paint the bowl with black gesso and add Gilders Paste Patina
wax with finger or cotton cloth.
Butterfly
and Cursive Lettering Rectangle Bowl
For
this bowl I used the same soy sauce bowl to shape the clay.
Place the stamp over the clay and press firmly against the clay.
Place the stamp over the clay and press firmly against the clay.
Drape over bowl.
Smooth out the edges against the bowl.
Leave clay in the bowl and let it cure for 24 hours.
Paint the bowl with black gesso and add Gilders Paste with finger or cotton cloth. For this bowl I used Bronze, Silver and Patina.


No comments:
Post a Comment