 |
| Mixed-Media Art Dolls by Bea Grob |
Create your own wonderful, whimsical charakter an make your
own studio spirit or alter ego.
Use Makin's Clay® as the basis for this project and
combine with beads, paints, fibre and more.
Supply List
Makin's Clay® - about 2
oz in the desired color
Makin's®
- Texture Sheet Set H
- Clay Tools
Makin's Professional®
- Ultimate Clay Machine®
- Cutting Mat
Assortement of beads for the arms and fibres for the
skirt, beadcap for the head, metal parts or soda can die cuts for wings.
20 gauge wire , I used black steel wire from the home
improvement store
2 square chopsticks
E6000 for permanent
bond and some
Hot glue for immediate hold
Tape
Decorator foil
Pan Pastels
Craft knife
Face mold
Scissors, pliers, drill
Instructions:
 I started with some black and rolled it out
on the the second thickest setting of the Ultimate Clay Machine®. The height of
the body is roughly 4 inches, so I made sure that I could fit it in two times on
the rolled out clay.
I added the foil and burnished it with the help of an
old plastic card and then ripped foil off. (Sidenote: not all foils work equally well, if you are missing spots, just reapply it and try again. Sometimes I even
heat it up carefully with a heat gun and try again.)
Next, I used a texture make an impression. As you can see I don't mind the spots where there is no foil. It just adds to the character.
I actually removed more of the foil with some
clear tape, by pressing the tape onto the foil and then pulling back to reveal the
clay underneath. Again sometimes you have to repeat that step.
I applied Pan Pastels to the areas where there is no foil.
I do use both the matt ones and the shiny ones, simply by rubbing it on with my
fingers. When I'm done I wipe loose
powder from the foil with a baby wipe.
 Now it is time to cut out the two
parts with a craft knife. I like to work on the Makin's Professional® Cutting Mat which has
conveniently two sides. A self-healing side and a rolling (non-stick) side.
I made a face for my doll with a flexible face mold. I
made sure that I didn't fill it at first
hand, as I wanted to add the wire and then add a bit more on top. The wire was
approx. 15 inch and then folded together. I also pressed in the beadcap, to
give me a guide when I'm gluing everything together.
Next, I had to prepare the legs, I used 2 chopsticks. It
is much easier if they are square at the top. The round ones don't work so
well. I taped them together with painter's tape and then drilled a hole
through both at the same time. Depending on the length of the chopsticks you
have to shorten them also.
In the meantime the body and the head are beginning to cure/dry.
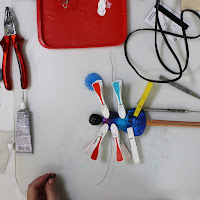
About 1 inch from the
head, make a bend in the wire on both sides.
Take the doll's head and thread the wire as shown in the
picture.
I wrapped the arm wires around the chopsticks and reinforced the neck with an additional piece of wire. I start from the
chopsticks and wrap around as tidy or messy I like.
I pressed the wire together on the places that are going to be covered by the body with a heavy plier.
 I also punched 5 holes on each side, and made a hole at
the back side for the wings. I glued everything together using E6000, but
also a little bit of hot glue for immediate bond.
For the head I used the beadcap and some other
embellishments from my stash. For the wings I used some die cuts from an
empty soda can. I used a brad, but I did also glue it with E 6000.
For the skirt you can use all kind of fancy yarns, ribbons
or fabric strips as long as you can thread them through your holes. I cut
mine about 11 inches long and then folded it together and thread them through the
holes.
The final step is to add beads for the arms. I tried several version, what will you come up with?
Bea recently taught this creative workshop at Artworks and it looks like her students had a great time. We think they created some amazing dolls too!


No comments:
Post a Comment