 |
| Dots & Connectors Jewelry Set by Patricia Roberts-Thompson |
Materials:
Makin’s Clay® White - 40 oz
Makin’s® Texture Sheets 38008 - Set H - Connectors
Makin's Professional® Ultimate Clay Machine®
22mm ( ½” approx ) round cutter, clay blade
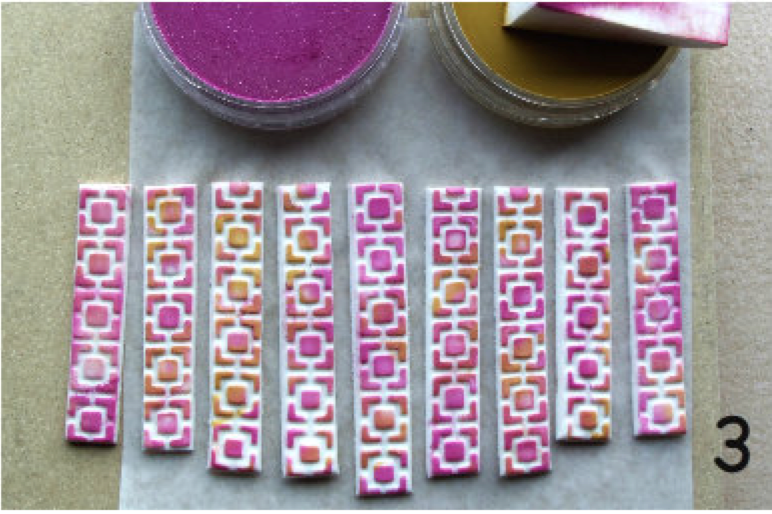
Pan Pastels 270.3 Yellow Ochre Shade, 430.3
Magenta Shade - makeup sponge to apply
pastels or acrylic paints Choose two colours that work well together
Ball stylus 1mm head, Barbeque skewer or
metal knitting needle, I used an 8mm one
Cornstarch and soft brush to apply, baby
wipes
Duracoat Americana Matte Varnish
Wire Choker and earring findings
 Making
the beads. Roll out fresh clay on the thickest
setting of the clay machine (setting #1). Use a small cutter to cut a
circle that you will roll into a ball. Cover the clay with a baby wipe, to keep
it soft and easy to roll. Dip your skewer or knitting needle in cornstarch and
make a hole in the bead. As you make the hole, keep twisting the needle, and
add more cornstarch if necessary. The cornstarch will keep the needle from
sticking to much. Leave the bead on the needle, and use the ball stylus (
dotting tool ) to place small divots all around the bead. You don’t have to
press too hard. Use the makeup sponge to apply your choice of color to the
bead. You could choose to paint them with acrylic paints later, when dried.
Lightly twist the bead off the needle and set aside. Wipe your hands and the
needle with another baby wipe, and then repeat the procedure for a total of 10
beads. I like to make extra. For the earrings, I used a toothpick to make a
smaller hole.
Making
the beads. Roll out fresh clay on the thickest
setting of the clay machine (setting #1). Use a small cutter to cut a
circle that you will roll into a ball. Cover the clay with a baby wipe, to keep
it soft and easy to roll. Dip your skewer or knitting needle in cornstarch and
make a hole in the bead. As you make the hole, keep twisting the needle, and
add more cornstarch if necessary. The cornstarch will keep the needle from
sticking to much. Leave the bead on the needle, and use the ball stylus (
dotting tool ) to place small divots all around the bead. You don’t have to
press too hard. Use the makeup sponge to apply your choice of color to the
bead. You could choose to paint them with acrylic paints later, when dried.
Lightly twist the bead off the needle and set aside. Wipe your hands and the
needle with another baby wipe, and then repeat the procedure for a total of 10
beads. I like to make extra. For the earrings, I used a toothpick to make a
smaller hole.
Necklace : Step 1 – roll remaining clay on the thickest setting ( 4mm ) , dust the Connectors
Texture Sheet with cornstarch and place it on the clay with the writing facing
the clay. You will feel the raised squares. Press the clay into the sheet, and
then remove the clay. I used the makeup sponge with Ochre Pan Pastel, lightly over the surface. Then I used the Magenta pastel to
predominately cover the clay. I cut the strips, the longest being 6
squares long, the next one 5 ½ squares (cut 4) and lastly 5 squares (cut 4) for
a total of 9 tiles.


 To
form the tube beads, moisten the back of one tile (near the top), and place one
end on your needle or skewer that has been dusted with cornstarch, and gently
push it around the needle until it meets in the back. Take it off the needle,
and use the tip of the needle to press the edges where it meets the back.
Neaten up the hole, and allow it to dry. Do the same with all of them. I used
some of the scraps to make the earrings.You can clean the backs of the tube
beads with a wet baby wipe after they dry. When everything is completely dry,
seal the beads with DuraCoat Americana Matte Varnish, or your favorite sealer.
To
assemble, undo the barrel clasp on a wire choker, and slide on the beads,
starting with a round bead, then the tube bead, and alternate until the end. I
used 9 tube beads, and 10 round beads. You may like it with 7 tube beads and 8
round beads.
To
assemble the earrings, I used a 10mm jumpring in each of the short tiles, added
a 6mm jumpring to connect the two pieces- one facing front, the other with the
back facing. On an eyepin, I used a 6mm rondelle , my bead, and another 6mm
rondelle, then made a wrapped loop. Open the eyepin and connect the front
facing tile to it. Add earring findings and you’re done!


No comments:
Post a Comment