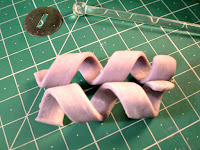
SPIRAL EARRINGS
Designed by
Andrijana Katavić
Hello everyone!
I really love to
make various things with Makin’s Clay®, because it has a tremendously broad range of
applications. Also, it is very flexible and can be bent,
molded and shaped easily, which made making of these
Spiral earrings very simple and
easy. Check the instructions to see what I mean.
MAKIN’S® MATERIALS LIST
Makin’s Clay® White 60g
Makin’s Professional® Ultimate Clay Extruder™ (disc 12)
Makin’s Clay® Mixing Ruler™
Makin’s® Roller & Cutters Tool Set
Makin’s® Roller & Cutters Tool Set
Makin’s Professional®
Cutting Mat
OTHER
NECESSITIES
Sharp scissors
Dark purple metallic acrylic paint
X-Acto knife
Pliers
4 jump rings (2 for each earring)
2
french hook earwires
Medium bag with a sealable closure
Piercer or a piece of wire
INSTRUCTIONS:
STEP
1.
Place Makin’s Professional® Cutting Mat on your working table. Unpack White Makin's Clay® and using the Mixing Ruler measure 2 piece of
clay in G hole.
STEP 2.
Add a small amount of
purple metallic acrylic paint
(about the size of grains of peas) on one piece of clay, and place it in a plastic bag with
a sealable closure. Knead well. When clay and color are well mixed, remove from
bag and made a log. Repeat whole process for other piece.

NOTE:
During drying, the color will
fade a bit, so if you want Spiral
earrings in more intense color add more acrylic paint. I wanted my earrings to
be the color as close to the shade of lavender, so I added small amount of paint.
STEP 3.
 Unscrew the handle
of Ultimate Clay Extruder™ to make
enough space inside tube for the clay log. Unscrew end cap, and insert disc 12 in it. Place
one log in the Extruder, and screw back end cap with disc.
STEP 4.
Extrude clay by twisting handle of the
Extruder. Clean Extruder (click HERE to learn how to do this) and repeat whole process for other log.
NOTE:
It is important that one edge on both
extruded stripes is rounded, so it is necessary to process each piece
of clay separately.
STEP 5.
Place the
stripe of clay on the Cutting Mat
to measure it. Put part of
clay stipe that came out first
from Extruder (that one with rounded edge) on the zero (0), and
then cut it with sharp scissors to a length of 10 centimeters. Measure and cut other stripe as well.
STEP 6.
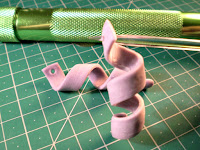
 Wrap one stripe
of clay around the handle of the
X-Acto knife. Carefully remove
clay from the handle. Wrap the
other stripe, but in the opposite
direction. Remove carefully.
NOTE: It is important to wrap stripes in the opposite direction, so that earrings
later can stand properly.
With spiky (pointy) modeling tool which is included in
Mixing Ruler set poke holes on the part
of clay stripe that you've cut with scissors. Pass the piercer or a
piece of wire through the holes, hang somewhere (in a glass for example), and leave clay to dry for
about 12 hours.
STEP 8.
Use pliers to hang
jump rings and hooks on dry clay, and your finished.
earrings
are
P. S. If you want to see other
pieces that I made visit my blog http://www.studioartesania.com/2017/12/15-diy-projects-makins-polymer-clay.html


2 comments:
Very pretty earrings!
Great earrings!
Post a Comment