 |
| Peek a Boo Earrings by Bea Grob |
Recently, I was playing again with Makin's Clay®. These layered earrings, with a sort of a peek a boo effect with the shiny foil underneath.
Tools and Materials:
Makin's Clay® - White
Makin's Professional® Ultimate Clay Machine®
Makin's Professional® Cutting mat (small)
Kemper tool smallest round cutter
Sculpey® hollow bead maker and graduated cutters
Transfer foil in the pattern and color you like
20 Gauge wire dead soft and wire tools for the earring hooks.
Instructions:
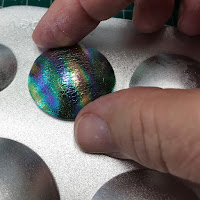
I started with some white clay, which I have run through the Makin's Professional® Ultimate Clay Machine® setting Nr. 2. My next step was to add the foil and burnish it down with the help of an old gift card.
Next, I picked it up at a corner (the foil is bigger then the clay) and ripped it off like a band aid.
Next, I picked it up at a corner (the foil is bigger then the clay) and ripped it off like a band aid.
Not all foils work equal, but this one I was lucky and it did work right from the beginning. If not, just reapply the foil after lightly moistening the clay and burnishing again.
Depending on the size of the earrings you want pick the right size of cutter to go with the hollow bead maker and cut out two circles.
Place them accordingly onto the bead maker and form them a little around the bend.
Now, press the next size cutter into the clay, but leave it there until you have cut out tiny holes. I used the Kemper tools, straws may work too.
Remove the cutter and lift the clay carefully with the help of a thin blade, try not to distort the round shape.
Place it over the foiled piece and again shape it accordingly.
I grabbed the cutter again to help shaping.
Make two discs the same size and let them dry completely. I let mine dry for about 36 hours.
I cut two pieces of 20 gauge wire about 5 inch long. I filed the end that goes through the ear.
Then I shaped it the way I wanted it to be and made some spirals at the end, which I then bended perpendicular.
To make them more stable and also give some structure, I hammered them flat.
Next, I filled the dry domes with some clay in the backside, filling the indentation completely. I pushed the earring wire into the clay.
Of course, I want to have a nice back side to the earrings, so I cut circles of clay and placed on them on top.
So we have the back, but I wanted to add a little texture too. I also smoothed out the edges afterwards a seen on the right earring.


1 comment:
Very cool, nice effect!
Post a Comment