 |
| Rose Hairpin by Cynthia Gougian |
Materials List:
· Makin’s Clay® 60g Yellow, 60g Olive Green
· Toothpicks
· A 1-inch circle cutter
· ½ inch circle cutter
· A ball tool (a spoon may be used in place of the ball tool)
· Fondant shaping foam (a piece of craft foam, or the back of a computer mouse pad may be used in place of the shaping foam)
· An acrylic clay roller
· 2 sets of 2 playing cards glued together, or the Makin's Professional® Ultimate Clay Machine®
· 2 sets of 9 playing cards glued together, or the Makin's Professional® Ultimate Clay Machine®
· Acrylic craft paint in orange, red, and light green
· A stencil brush, or stiff paint brush
· Quick drying Tacky Glue
· Water
· Soft artists brush
· A calyx cutter
· Small and large leaf cutters
· Leaf veining mats
· Hair pin
· An artist’s palette
· A piece of styrofoam
· Small sanding stick or emery file
· Scissors
Instructions:
Step 1: To create the center bud, break off an inch of yellow clay and roll it into a ball.
Step 2: Use your plans to form the ball into a cone.
Step 3: Dip a toothpick into quick drying tacky glue, then insert the toothpick into the bud.
Step 4: The size of the circle cutter used to create the petals will determine the size of the bud. The bud should be the same l length, or slightly shorter, than the circle cutter.


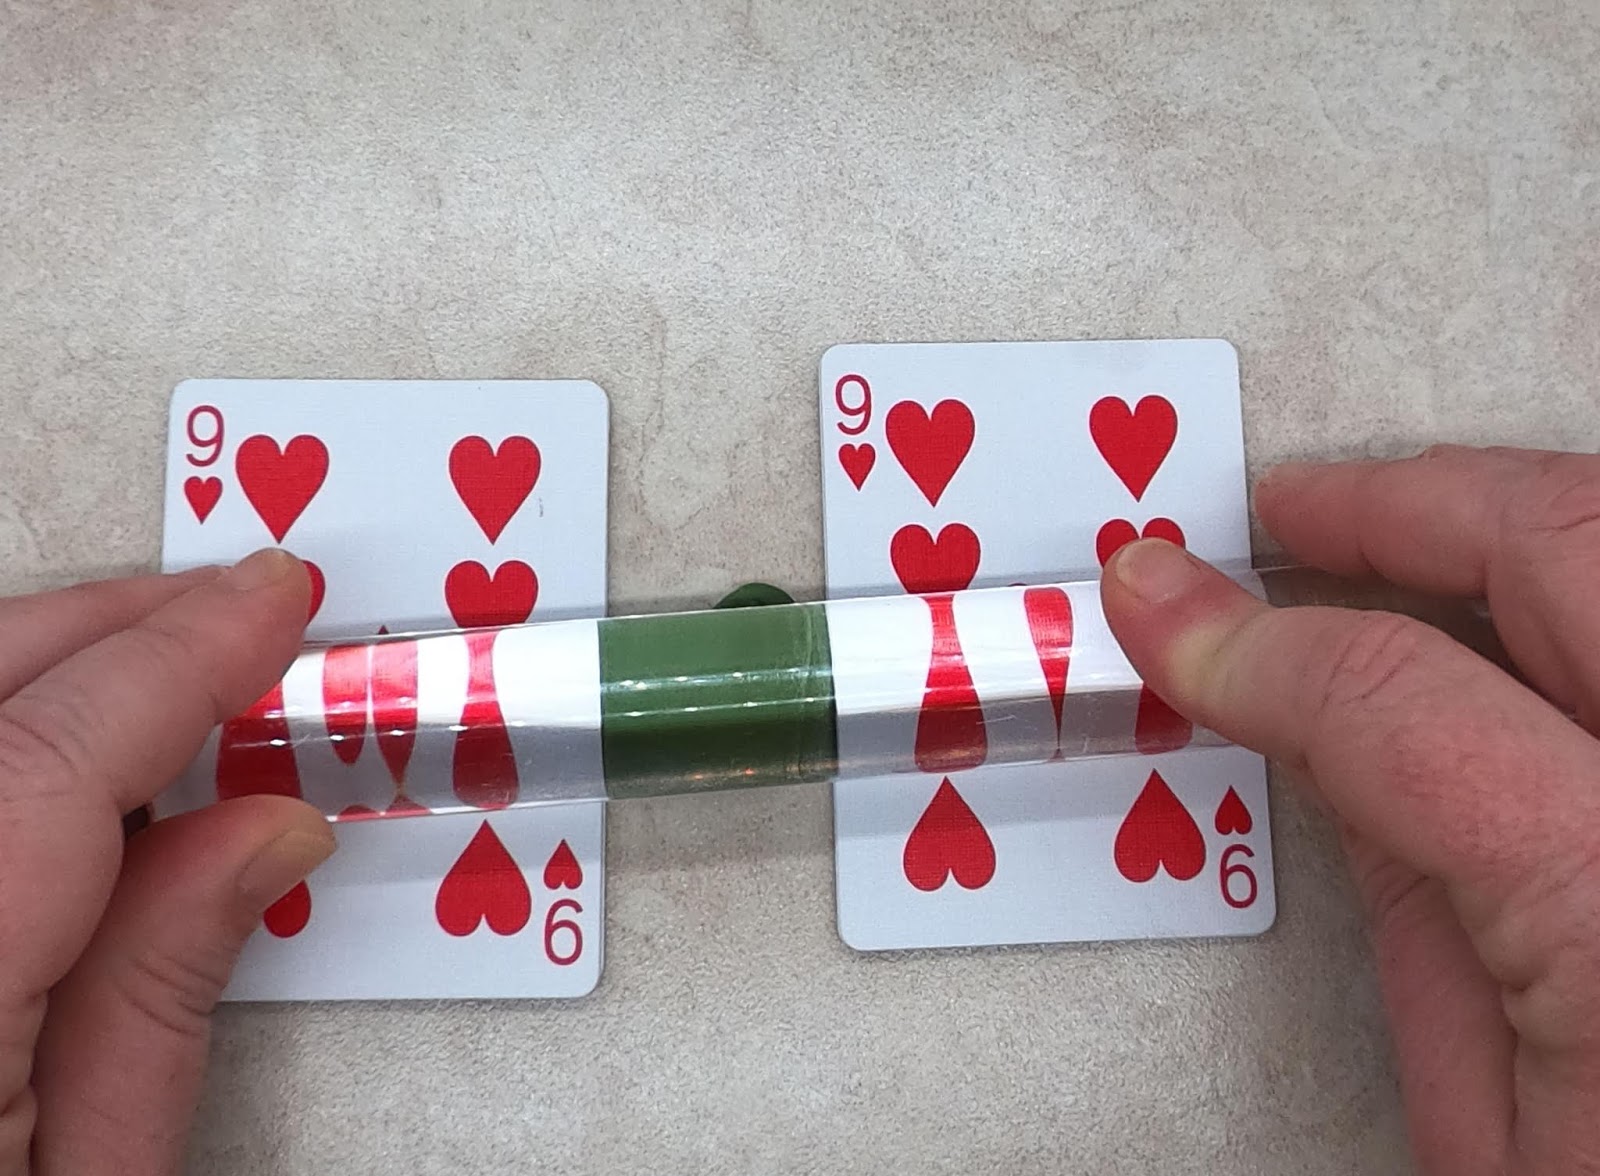
Step 5: For the best results, the clay for the petals should be rolled out thinly. If you are using the Makin's Professional® Ultimate Clay Machine®, roll the clay out at setting 7. I used playing cards as a guide. I placed 2 playing cards glued together on either side of my clay. Then I rolled the yellow clay with my acrylic roller until the thickness of the clay matched the thickness of the playing cards.
Step 6: Cut 2 circles with the 1-inch circle cutter. These will be the first 2 petals.
Step 7: Because the clay is rolled thinly, it’s best to roll out small amounts of clay at a time. And, it’s best to cut only one, or two petals at a time. Keep extra rolled out clay in a plastic bag with a wet paper towel. Spray the clay with water if it begins to dry out.
Step 8: Place the petal on the fondant shaping foam. Use a ball tool to thin the edges of the petal. The ball tool should be half on, half off the edge of the petal. Roll firmly around the entire petal. If you don’t have fondant shaping foam, you can use craft foam, or even the back of a computer mouse pad. If you don’t have a ball tool, you can press the tip of a spoon into the edges of the petals to thin them.


Step 9: Roll down the center of the petal, creating a slight cupping.
Step 10: Brush the bud with water.
Step 11: Place the first petal on the bud. Leave the left side of the petal unattached. (If you are left handed, it may be easier to leave the right side unattached).
Step 12: Place the second petal, slightly under the left side of the first petal.


Step 13: Wrap both petals around the bud and press with your fingers to adhere them. You may have to brush on more water to attach them firmly. Set the bud aside to dry overnight. I stuck the toothpick into a piece of Styrofoam to allow the bud to dry.
Step 14: Follow steps 5-9 to make 16 more petals. Allow them to dry overnight. Placing them in an artist’s palette works well.
Step 15: When all the petals are dry, use a fine sanding stick to remove any rough edges on the petals. You may also use the fine side of an emery nail file.
Step 16: Dip a stencil brush, or stiff paint brush into orange craft paint. Then wipe most of the paint off on a paper towel. It’s important that most of the paint is wiped off.


Step 17: Lightly brush the outside of each petal. Leave some yellow showing through at the center. This is called dry brushing. Dry brush both sides of the petals.
Step 18: When the orange paint is completely dry, dry brush each petal with red paint. Concentrate on the very edges of the petal.
Step 19: Dry brush the center of the bud. You can dry brush with both orange and red, or just the red.
Step 20: Apply glue to 4 petals. Apply the glue ¾ up the petals.


Step 21: Apply the 1stpetal of the first row. Leave left edge unattached.
Step 22: Slip the second petal under the first. Leave the left edge of the second petal unattached.
Step 23: Place the next to petals in the same way. Leave the left edge unattached, so you can slip the next petal underneath.
Step 24: When all four petals are placed, press them with your fingers to adhere.


Step 25: For the second row of petals, apply glue ½ up 5 petals.
Step 28: When all 5 petals have been added, press lightly to adhere.


Step 29: For the third and final row, apply glue to the bottom ¼ of 7 petals.
Step 30: Apply the first petal where two petals overlap on the 2nd row, leaving the left edge unattached. Then place the next 6 petals as before, leaving the left edge unattached, so you can slip the next petal underneath.
Step 31: When all 7 petals have been added, press lightly to adhere
Step 32: Roll Makin’s ® Olive clay 2 cards thick. If you are using the Makin's Professional® Ultimate Clay Machine®, roll the clay out at setting 7. Use a calyx cutter to cut out the calyx.


Step 33: Use a ball tool, or a spoon to lightly cup the calyx. Roll the tool from the outer edge of the calyx into the center.
Step 34: Apply glue to the center of the calyx.
Step 35: Push the toothpick through the center of the calyx to the base of the rose. Allow the calyx to dry for several hours.
Step 36: Roll olive clay 2 cards thick. If you are using the Makin's Professional® Ultimate Clay Machine®, roll the clay out at setting 7. Use a ½ inch circle cutter to cut a circle from the clay.


Step 38: Carefully push the circle onto the underside of the hairpin. Allow the glue and clay to dry for several hours.
Step 39: Use scissors to trim the toothpick to 1/8 inch.
Step 40: Roll Makin’s ® Olive clay 9 cards thick. If you are using the Makin's Professional® Ultimate Clay Machine®, roll the clay out at setting 1.


Step 41: Cut ½ inch circle.
Step 42: Apply glue to the circle.
Step 43: Place the circle onto the top of the hairpin. Don’t let it dry!
Step 44: Apply glue to toothpick and calyx.


Step 45: Press the toothpick into raw clay on the top of the hairpin. Allow the glue and clay to dry.
Step 46: Roll Makin’s ® Olive clay 2 cards thick. If you are using the Makin's Professional® Ultimate Clay Machine®, roll the clay out at setting 7. Use leaf shaped cutters to cut several different sized leaves from the clay.
Step 47: Roll the edges of the leaves with a ball tool, or spoon.
Step 48: Texture the leaves with a leaf texturing mat.


Step 49: Apply glue to the bottom of the leaves.
Step 50: Apply leaves to the base of the rose. Allow them to dry overnight.
Step 51: Dry brush leaves with the light green craft paint.


5 comments:
Fabulous rose, so delicate.
Wonderful tutorial, thanks for posting this!
Wow! Beautiful project. Outstanding, detailed tutorial and nice stepout images.
Great tutorial for a beautiful flower!
I love the finished rose. Thank you for another great tutorial
Post a Comment