 |
| Textured Earrings & Bracelet Set by Bea Grob |
Today Bea Grob is sharing her technique for creating this lovely jewelry set - and a great tip on reconstituting clay!
Supplies
Makin's Clay® 60g, I used green - but any color would work well
Makin's®
- Clay Roller
- Texture Set C, I used the Weave sheet
- Clay Cutter Set - Round 3 pc
Makin's Professional® Ultimate Clay
Machine®
Metallic foils, I have used copper, but again go with what you like.
Mica powder in teal
Plastic packaging tape
About 10 inch Deadsoft Jewelry Wire Gauge 20
Matching Beads and Beadcaps and about 9 inch elastic for the
bracelet.
4 Minibowls from Ikea, if you don't have them you could also
use a lightbulb instead, just pop the disk on the bulb to dry.
Instructions:
I started by reconstituting some older Makin's Clay® which had started to harden. I simply cut it
in pieces and put it in a Ziplock bag sprayed water inside the bag. I let
it sit overnight and the next morning I started smushing and rolling, the whole
bag. You now can work again with the clay. This is a wonderful way to use clay that has not fully cured yet is no longer soft and pliable. You
have to experiment a bit, maybe you need to do it again, or if it was to much
water let it dry out again.


The next day I rolled out a long strip in the Makin's
Professional® Ultimate Clay Machine® beginning on setting #1 and ending on #2.
Next, I placed some metallic foil and rubbed to transfer it to the clay.


I pulled the foil quickly from the clay (kind like a bandaid). For this
technique I didn't care if every bit was covered by the foil.
I placed the texture sheet over the foil covered clay. The texture sheets can be used on both sides, one will impress the texture, the other will leave a raised texture. To make sure you
are using the side you want, the best thing would be to test on some scrap clay.

Now comes the fun part, lift up some of the
metallic foil with plastic tape. Press the Plastic tape lightly on the foil and
lift up. You can repeat this step until you are happy with the result.

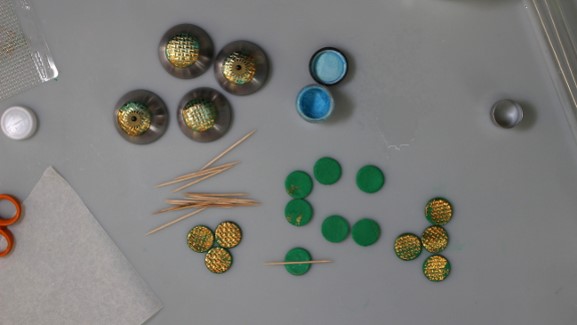
With the round 30 mm clay cutter, I cut out 4 circles, and with the 20mm I cut out 7 circles ( Didn't
need them all, but better safe then sorry...)

Next I applied some Mica powder on all circles: I use my
fingers, but you can also use a soft brush.

Next, I added to two of the earring circles a gear with a brad. I simply pierced a hole and then inserted the brad with the gear in between. You have to be a little careful when bending the prongs as the clay is not dry yet.
I wanted the earrings a little bit domed, so I pressed them on the minibowls to give them the desired shape. You can also use a light bulb to achieve the same effect.

I mixed together all the leftover clay and ran it again
through the Makin's Professional® Ultimate Clay Machine® to setting #2.

I cut 7 additional circles with the 20mm round clay cutter. I wanted to back them with a toothpick in between.
This way I can them easily string them when they are dry.
Let all the clay elements dry for 24 hours.

The next morning I sanded the earring pieces on the
backs. This way they match better when gluing them. It's hard to see on the
picture, but the righthand disc is sanded and sort of flat and not so shiny at
the rim, compared to the left one.

From the jewelry wire I made a loop which goes all inside
the discs and then glued the two discs together.

While the glue in the earrings was drying, I strung the
bracelet on some elastic thread together
with some matching beads and small bead caps.

As soon as the glue dried I finished the earrings by
adding the same beads and bead caps before turning the wire into a spiral and
attaching the premade earring loops.

And voilà now I have a new set of jewelry!
No comments:
Post a Comment