Flower Dangle Woven Necklace
Designed by Carole Monahan
Materials List:
Makin’s Clay® - 2 oz. White
- 2 oz Plum Wine
- Clay Roller
- Texture Sheet Set
- Flower Cutter Set
1 lobster claw clasp
1 inch basic chain
2 jump rings
2 end caps
4 inches 16 gauge wire (I used stainless steel)
Mica powder 2 colors
Vintage silk sari cloth strips
I used 4 Strands of 120 inches each to make a 20 inch necklace
PYM- Preserve Your Memories Sealant spray
Beacon® Tacky Glue
Small hole punch I used kemper cutters here
Kumihimo Braid disc
Crochet hook
Instructions:
Roll out the colors one at a time about 1mm thick.
Place the texture sheet over the clay and press the sheet in with your finger tips.
(since the sheet is clear is it really easy to see when you have a uniform impression)
I used a different texture on each color for added interest.
Then lightly use your finger to apply mica powder to the raised accents.
Then take the flower clay cutters and cut out different size flowers in order to alternate and layer them. Use a small hole punch for the center hole.
Let all pieces air dry and when fully cured cover with several light coatings of PYM
Sealant spray. I like this sealant since it does not add any sheen or shine to the piece.
Before I started this project I used my Kumihimo Braid disk and 4 Stands of 120 inches each of Vintage Silk Sari cloth to weave the base of this necklace.
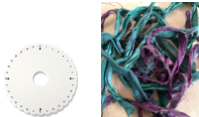
Here is a picture of a Kumihimo Braiding Disc.
These are the Silk Sari cloth Strips I used. I got mine on Etsy.
These discs are very inexpensive and it is very easy to learn this basic weave.
There are great videos on YouTube that show you how to do this step by step.
I call this my active form of meditation since when you get into the rhythm of this it very soothing.
You are in “the Zone".
My friend Debbie always has this in her bag so whenever she has to wait somewhere like the doctor or on the train she has one handy.
Here is a close up of the weave.
Next we need to string the flowers onto the necklace.

I selected several strands of contrasting colors and cut them roughly to
the length I wanted them to hang.
I then used a crochet hook to open parts of the weave to put the single ribbon with the flowers on it through.
I tied each flower with a double knot in the back of the flower to secure them. Make sure all the flowers are facing the correct way BEFORE you knot them or cursing will ensue! Yup that happened!
Then take the 2 inch wire stick it through the end of the weave and twist it around to secure it.
Then place the end cap on I used Beacon Tacky Glue to secure the endcaps. Both ends please.
Then make a basic loop with the twisted wires and cut off where you need it.
Again there are some great how to videos on YouTube that show in detail how to finish a Kumihimo necklace.
Add the basic chain and the jump rings and the Lobster claw clasp to finish the necklace.
Wear it with pride !
Remember……. Be boundless be creative !
There are NO mistakes; only learning and growing!
You can see more of my designs on these pages


1 comment:
Very sweet!
Post a Comment