 |
| Pumpkin Tassels by Patricia Roberts-Thompson |
How about making some fun home decor tassels for Halloween with Makin’s Clay®?
Materials:
Makin’s Clay® White 60g, small amount of Olive and Black clay
Makin’s Professional® Ultimate Clay Machine®
20 gauge Copper wire
Copper chain, endcaps and beads
Wet wipes
Jump rings
Yarn for the tassel, premade tassel
White Glue
DecoArt acrylic paints: Pumpkin, Golden Brown, black,
Scissors, needle tool, paintbrush.
Knitting needles, ball tool
Americana DuraCoat Matte Varnish or Golden Matte varnish
Cornstarch
Instructions:
Add some Pumpkin orange paint to 60 grams of white Makin’s Clay®. I also added a bit of a yellow brown to tone down the colour to a more earthy hue. Alternately you could use Persimmon found in the Makin’s Clay® Earth Tones 32045. Divide the clay into three balls approximately 1 and ½ inches in diameter. Wrap two of the balls of clay in plastic as you proceed with the first tassel.
Yarn Pumpkin Tassel:
I had some nice flat acrylic yarn to use for my tassel; embroidery floss works great as well! I wrapped the yarn around a 4x6 index card about 30 times. I used a 6 inch piece of 20 gauge copper wire, curved one end, and slipped it between the yarns at the top, while still on the card, and made a wrapped loop. Cut a 8” piece of yarn, slip the tassel off of the card, and use the piece of yarn to tie around the top. Trim the bottom of the tassel with scissors.
Roll the clay into a ball, then using a very large knitting needle or the handle of a large paintbrush, make a hole through the clay large enough for the tassel to fit. It helps to coat the needle or brush with cornstarch as you make the hole. This will prevent sticking. While the clay is on the needle holder, use a smaller needle tool to make indentations all around. In the first photo, you will see the cornstarch I used as I made my indents. Let the ball of clay dry for 24 hours before proceeding to the next step. Clean off the cornstarch when dry. The next day I cut a 24 inch piece of yarn, to which I tied a scrap piece of wire on one end. Put the other end through the hole, coat the hole with white glue, then wrap the yarn by inserting the wired end through and around. Keep wrapping until you’ve gone all the way around, and then cut off your ends. Insert the tassel from the bottom. Next, I made a cap for the tassel with a small bit of Olive Makin’s Clay®. I rolled the clay into a ½” ball, flattened it out into a disk and then pinched and fluted the ends making it a wavy disk. Poke a hole in the center, place it on the pumpkin with the copper wire centered in the hole. I used a flower shaped endcap and a copper ball on top of the clay cap. Let this dry for another 24 hours before finishing a wrapped loop on top. Add a string or chain loop to hang the tassel from.
Jack-o-Lantern Tassel:
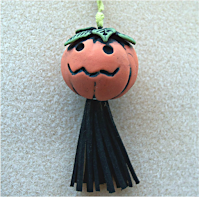
Make a 1 and ½” ball of clay. Make a face with a small knitting needle on one side. I used a ball tool to make the eyes, and inserted small balls of black clay, bit since it will be antiqued later, you could omit this step. For the mouth, I did a simple zigzag. Use a needle tool to poke a hole right through the pumpkin, then use a brush handle or large knitting needle to enlarge the hole on the bottom. Be sure to use cornstarch to prevent sticking. This hole needs to be large enough to insert your tassel. Again, make lines around the pumpkin, avoiding the face area. Make four or five small leaves with Olive Makin’s Clay® for the cap, texture them with a needle tool, and place them all around the top of the pumpkin, keeping the hole in the center clear. Let the pumpkin dry for 24 hours, and then antique it with black paint. Use a wet wipe to remove the excess paint. I tied a loop of yarn on the premade tassel, and inserted it from the bottom. A piece of wire catching the top of the yarn loop aids in this process. Add a bit of glue in the hole at the bottom to hold the tassel in place.
Ball Chain Pumpkin Tassel:
Make a 1 and ½” ball of clay, poke a small hole through the center and make indentations with a small knitting needle all around the circumference of the pumpkin. Cut pieces of ball chain and place in the grooves, adding a bit of white glue to help hold them in place. If you don’t have ball chain, regular chain that you use for the tassel will work! Let the pumpkin cure for 24 hours, then antique it with black paint. Use wet-wipes to remove excess paint. This tassel was made with 2 inch sections of copper chain. Hint; place the chain on a long headpin to help you cut each piece to the same length. 12 to 15 pieces of chain will give a full looking tassel. Open a 10mm jump ring and place as many pieces as you like, then close the jump ring. Cut a 6 inch piece of 20 gauge copper wire and make a small loop on one end. Then thread on a copper bead, a small copper endcap, the clay pumpkin and lastly a larger copper endcap and bead, and make a wrapped loop at the top. Open the jump ring and place it on the bottom loop, and add a piece of chain for the top loop. I used 5mm jump rings to close the top loop chain.
Happy Halloween!


No comments:
Post a Comment