
I’m still eXploring what you can do with the
Makin's Professional® Ultimate Clay Extruder® and ClayCore adaptor!
So X marks the spot
for this bold necklace.
Materials:
Makin's Clay® - Black, 3 oz. 2 oz. scrap clay for the core.
3 long eye pins
6 disc beads
6 oval jump rings
2 kinds of chain in desired length
Inka Gold metallic paste in silver
Tools:
Makin's Professional®
- Ultimate Clay Machine®
- Ultimate Clay Extruder®
- ClayCore Adaptor® - 2mm
- Ultimate Clay Extruder® Disc Set A - "X" Disc
- Multi-Hole disc #8
Makin's® Clay Cutters - Oval
Needle nose pliers
Let's get started!

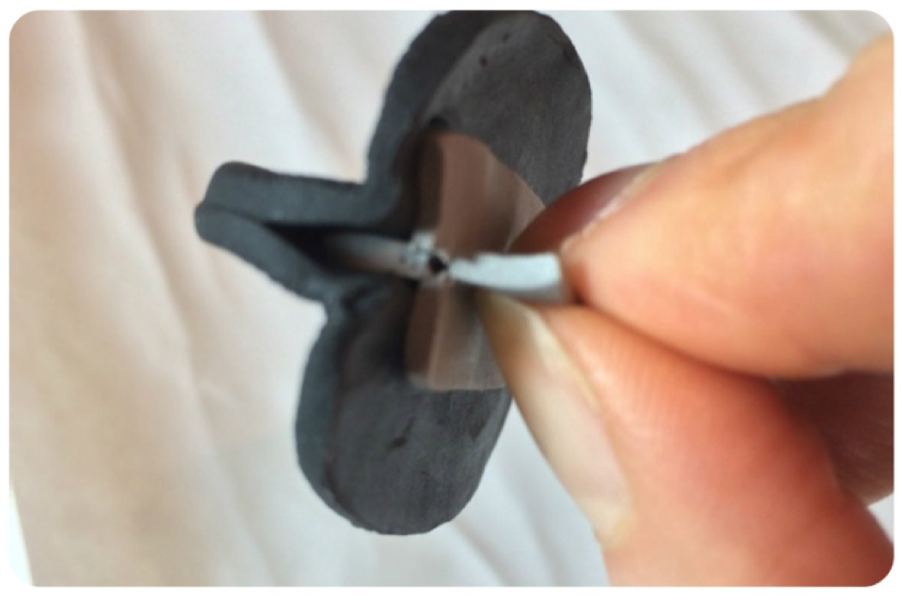
Load scrap clay into
extruder. insert the ClayCore adapter 1st then the X disc over it.
Extrude small amounts at a
time and insert a 1mm wire or eye pin in them to dry so the hole will not
close.


I folded card stock (fan
style) to lay the pieces out to dry so they hold the shape.
Let dry overnight.

Roll black clay to setting #2 and cut 4 ovals per bead in
the 3 sizes that the ovals come in.
Make sure that they are
just a tiny bit longer then the cores.(That is why I used a
different color so you could see them) Fold each oval in half and apply to the
core.
You can add a tiny bit of
glue to the core or the ends and edges of the raw clay will stick together.

 I used black clay extruded with this multi hole disc to cover the seams
where the ovals meet.
I used black clay extruded with this multi hole disc to cover the seams
where the ovals meet.
Let the extruded edge dry at least 2-3 hours. Then
use the metallic paste to highlight the extruded edge.


 Now it is time to assemble the necklace. Get a long
eyepin place the disc bead onto the eyepin then insert into extruded bead
repeat the disc bead BEFORE making the other eyepin closure! (yup I forgot MORE
THAN once! )
Now it is time to assemble the necklace. Get a long
eyepin place the disc bead onto the eyepin then insert into extruded bead
repeat the disc bead BEFORE making the other eyepin closure! (yup I forgot MORE
THAN once! )
After the extruded beads have their eyepins put an
oval jump ring on both ends to attach your chain.
This is a long necklace so
I did not use a clasp.
I can see so many
variations on this basic style!
If you want to see what
other Curious Creations I make you can check out my
No comments:
Post a Comment