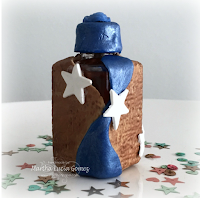
STAR SHINE BOTTLE OF HOPE
Designed by Martha Lucia Gomez
www.stampartpapel.com
Hello dear friends, today I am sharing my version of the Bottle of Hope. I made this thinking of a special friend that is passing through a hard battle but I am sure she will beat it!
Bottles of Hope are small glass bottles covered with polymer clay and given to cancer patients. They symbolize a wish and a hope for health. This project was started in 1999 by a Rhode Island cancer survivor and has spread internationally. Bottles are made by artists, students, survivors, seniors and many more who volunteer their time and love. Learn more about this worthwhile project, see a gallery of many creative bottles and more here on their website.
Note - Here is a bit more information about what Bottles of Hope are - Makin's Clay® is proud to have our designers supporting this worthy effort through the creation of Bottles of Hope featuring Makin's Clay®.
Bottles of Hope are small glass bottles covered with polymer clay and given to cancer patients. They symbolize a wish and a hope for health. This project was started in 1999 by a Rhode Island cancer survivor and has spread internationally. Bottles are made by artists, students, survivors, seniors and many more who volunteer their time and love. Learn more about this worthwhile project, see a gallery of many creative bottles and more here on their website.
Materials:
- Earth Tones, Blue and White
- Professional Cutting Mat
- Ultimate Clay Machine™
- Texture Sheet Set A - Sand
- Christmas Decor Push Mold
- Water Drop cutter set
- Professional® Clay Tool Set
Earth Safe Finishes - Ann Butler Iridescents paints
Beacon™ Tacky Glue
Glass Bottle
Instructions:
Clean your bottle and let it dry well.
 Open the Light Adobe clay from the Earth Tones Package of Makin's Clay® and smooth with your hands. Create a thin layer of clay using the Ultimate Clay Machine™. I started at #1 and rolled until #5. (If hand rolling, roll until a little thicker than a sheet of card stock). With this layer you will cover all of the bottle's surface.
Spray the bottle with a little water and cover it with the layer of clay. I decided to keep a free part of glass in one of the corners to cover it later with another color and design. Smooth the clay with your hands.
Take the texture sheet and press it around the bottle to create the design on the bottle.
Using blue clay rolled to a #5, create two water drops with the cutters. Add these water drops on the corner where
you want to cover the unions of the first layer. Make some embellishments to add to the bottle. I used White clay to made the star that comes on the Christmas Decor Push Mold and blue clay to create a little flower to be added on top of the cap.
 To enhanced the texture and colors, start to paint with Earth Safe Finishes - Ann Butler Iridescents paints. I used Sheer Silver for blue part, Sheer Bronze for earth tone and Sheer Pearl for the stars.
After the bottle was painted, I mounted the stars with Beacon™ Tacky Glue and let it dry for 24 hours. Then I created the cap. For this I used a thin layer of blue clay that I cut in a circle form to cover all the cap, I painted it with sheer silver iridescents and I decorated on top with a little blue flower.
Here some photos with other angles of the bottle.
I hope you enjoyed this tutorial of my version of the Bottle of Hope. To see more of my projects visit my blog here. I wish all the fighters don't lose their battle and always keep their hope!


1 comment:
Nice bottle of hope!
Post a Comment