 Easter is almost here and that means chocolate bunnies are hopping up everywhere! Stock up and use them to create "forever bunnies!" Making faux chocolate bunnies is easy with Makin's Clay® These permanent treats are perfect for decorating Easter baskets, or adding to any Easter decor projects. Find out how to make them here
Tuesday, March 31, 2015
Faux Chocolate Bunnies with Makin's Clay®!
Easter is almost here and that means chocolate bunnies are hopping up everywhere! Stock up and use them to create "forever bunnies!" Making faux chocolate bunnies is easy with Makin's Clay® These permanent treats are perfect for decorating Easter baskets, or adding to any Easter decor projects. Find out how to make them hereGems of the Sea Bracelet by Cindi Bisson

Monday, March 30, 2015
Caning with the Makin's® Ultimate Clay Extruder™ by Carole Monahan
 Design Team Member Carole Monahan recently shared project on Facebook which she used our Ultimate Clay Extruder™ to create - our extruder is perfect with ALL types of clay and we love it when artists share their work made with not only our clay, but with our tools using other clay too - versatility is a wonderful thing!

Sunday, March 29, 2015
Easter Centerpiece DIY Video Featuring Makin's Clay®
 Makin's Clay® is a sponsor of the When Creativity Knocks All-Star Designers Spring Series! This week's video featured a fun Easter Centerpiece by Designer Carmen Flores Tanis which featured Makin's Clay® accents.
Get Twisted! "Barbed Wire" bracelet by Carole Monahan
We love this clever twisted "barbed wire" bracelet by Design Team Member Carole Monahan!


Saturday, March 28, 2015
Makin's Clay® Flowers by Nur Saydam

Friday, March 27, 2015
Customized Scooter by Judi Weers
Artist Judi Weers has been accessorizing her scooters for years with Makin's Clay® and we love to see what she does each and every time! We are sharing her latest creation with you today! Find more information about Judi here -

Judi Weers, aka: Dr. Metal Clay™
Metal Clay, Fused Glass and Polymer Clay
Art Clay Senior Instructor and PMC Certified
Honorary Ambassador for Art Across the Oceans
Certified Tourism Ambassador
Wednesday, March 25, 2015
Vintage Lady Canvas by Amanda Phillips

Today we are sharing another lovely piece submitted by Design Team Member Amanda Phillips - this lovely vintage lady canvas piece includes Makin's Clay® flower accents. We love Amanda's style and can't wait to see what she and our other Design Team members share through the coming year!
Tuesday, March 24, 2015
Diamonds & Roses by Suzann Sladcik Wilson

Diamonds & Roses - Suzann Sladcik Wilson designed this glamorous bracelet with Makin's Clay® and Connie Crystal - find her instructions on her blog here
Monday, March 23, 2015
You Can't Fix Stupid Card by Cindi Bisson

You Can't Fix Stupid!
Designed By Cindi Bisson
Makin’s Clay® is perfect for making embellishments for cards and scrapbook layouts. It’s lightweight, flexible, and acid-free. It can be custom colored by mixing clay with clay, or you can add acrylic paint to change the color. You can also paint the pieces afterwards with a wide variety of mediums with great results!
Whenever I am working with the clay and I have small amounts left over, I use one of Makin’s® push molds and make pieces for future projects. I’ve got a big bag of different shapes and it’s my ‘go-to’ when I’m looking for a unique embellishment for any project.
These tool charms are the perfect accent for this humorous greeting card.
Materials:
Makin’s Clay® - White
- Tools push mold
DecoArt® - Dazzling Metallics paint - Shimmering Silver
- Crafter’s Acrylic - Raw Umber
KellyCraft™ - Jimbo Lojik™ Set
- Get-it-Straight™ Laser Square
- Multi-Mat™
Westcott® - Titanium Bonded Non-Stick scissors
- Trim-Air Trimmer
Aleene’s Fast Grab Tacky Glue
Clearsnap® Crafter’s Ink - Night
We R Memory Keepers™ Crop-A-Dile tool
Grey card stock, tool patterned paper, white crackle wood patterned paper
Silver eyelets
Instructions:

Open white Makin’s Clay® and use Tools push mold to make assorted tools. Store unused clay in a zip-lock bag with a damp paper towel. When using the push mold, you can either just push the clay into the space and then trim around the image after, or I prefer to gently manipulate the clay into the image space and not have to trim when the piece is finished. Let clay embellishments dry 24 hours.

4” x 9" and fold in half to form card. Cut 3 3/4” x 4” piece of tool patterned paper.

Use Get-it-Straight™ Laser Square to align patterned paper centered and mount on card front.
 Ink “You Can’t Fix Stupid” verse with Night Crafter’s Ink and
Trim around verse, cut grey card stock mat for verse and use Crop-A-Dile to add silver eyelet to each side

Use Laser Square to align verse and mount to center top of
card front with foam tape.
 Paint clay tools with silver and brown paint. Let dry.
Mount tools to center of card beneath verse.
Sunday, March 22, 2015
New Extruder Disc Sets!
We have new Extruder Disc Sets available for the Makin's® Professional® Ultimate Clay Extruder!
http://www.makinsclay.com/products/discs.php?c=us

Saturday, March 21, 2015
Steampunk Peep Bunny by Patricia Krauchune

Wednesday, March 18, 2015
All-Star Designers Winter Series: Memo Board DIY Video Featuring Makin's Clay®

 Designer Debra Quatermain shared this fun customized memo board with Makin's Clay® pushpins
 on this recent episode of When Creativity Knocks All-Star Designers Winter Series. View the episode here
Tuesday, March 17, 2015

Mixed-Media Canvas by Amanda Phillips

Design Team Member Amanda Phillips created this amazing canvas piece as part of her Design Team Application - we love her unique use of Makin's Clay® and wanted to share it with our readers!
Golden Clay Necklace by Scott Pfeiffer

Monday, March 16, 2015
St. Patrick's Day 4 Leaf Clover Earrings by Lisa Haney

Four Leaf Clover Earrings
Designed by Lisa Haney
Yesterday we shared Design Team Member Lisa Haney's clever shamrock pin and today we are sharing a fun set of earrings to match!
Skill Level – Easy
Supplies:
120g Green Clay
Recommended Makin’s® Tools
Roller
Clay Mixing Ruler™ - Pointed Mixing Wand
Geo Cutter Set – Heart
Other Materials:
Green Glitter
Beacon® Quick Grip Glue
Earring wires, jewelry pliers
Method:

1. Roll green clay to 2mm thickness with Makin's® roller. Cut out four petals using the (Tip: If the clay sticks inside the cutter, use the stylus end of the mixing wand to push it out).
heart-shaped cutter. 
2. To shape a petal, lay the pointy end of the mixing wand down the center, press gently, and pinch the bottom of the petal. Do this to all the petals.
 3. Form the petals into a clover making sure all of the petals touch firmly in the center. Wet clay will stick to wet clay with no additional adhesive needed. (Tip: If the clay has begun to dry out, paint a tiny amount of water down the sides of the petal. Keeping open clay not in use in a ziplock bag with a damp paper towel or baby wipe will help keep it fresh and prevent drying.)
4. Add glitter to the center of the clover for some sparkle. (Tip: Apply a small amount of adhesive then sprinkle on glitter.)
- 5. Using the sharp end of the mixing wand, poke a hole in the top of one of the petals for the jump ring.

6. Repeat steps 1-5 to make second clover.
Sunday, March 15, 2015
St. Patrick's Day Four Leaf Clover Pin by Lisa Haney
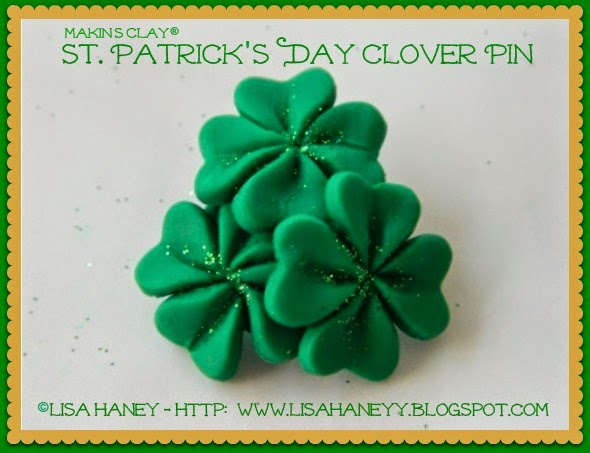
Four Leaf Clover Pin
Designed by Lisa Haney
This adorable pin is perfect for St. Patrick's Day - but also for bringing a little luck into your wardrobe any day of the year!
Skill Level – Easy
Supplies:
120g Green Clay
Recommended Makin’s® Tools
Roller
Clay Mixing Ruler™ - Pointed Mixing Wand
Geo Cutter Set – Heart
Other Materials:
Green Glitter
Beacon® Quick Grip Glue
Pin Back
Method:
1. Roll green clay to 2mm thickness with Makin's® roller. Cut out four petals using the (Tip: If the clay sticks inside the cutter, use the stylus end of the mixing wand to push it out).
heart-shaped cutter.
2. To shape a petal, lay the pointy end of the mixing wand down the center, press gently, and pinch the bottom of the petal. Do this to all the petals.
3. Form the petals into a clover making sure all of the petals touch firmly in the center. Wet clay will stick to wet clay with no additional adhesive needed. (Tip: If the clay has begun to dry out, paint a tiny amount of water down the sides of the petal. Keeping open clay not in use in a ziplock bag with a damp paper towel or baby wipe will help keep it fresh and prevent drying.)
4. Add glitter to the center of the clover for some sparkle. (Tip: Apply a small amount of adhesive then sprinkle on glitter.)
5. Repeat steps 1-4 two more times for two more clovers.
- 6. Flatten a 3/4" ball of the green clay for the base. Apply a thin layer of glue to the flattened ball and the backs of the clovers. Attach the clovers to the flattened ball.

 7. Let the piece dry 24 hours, the glue on the pin back.
 Off to the Races with a Carrot Car!

Friday, March 13, 2015
Makin's Clay® Flower Lollipops by Step Ackerman

Design Team member Steph Ackerman shared these adorable Flower Lollipop Party Favors made with Makin's Clay® with us on her Design Team application and we had to share this clever idea! These would make adorable party favors and could be customized to any theme. With our huge assortment of clay cutter shapes and push molds there are so many options!
Thursday, March 12, 2015
Birthday Banner with Makin's Clay® Sequin Accents - DIY WCK Video
 In this episode of the When Creativity Knocks All-Star Designer Winter Series, Judi Watanabe from JudiKins shares a fun birthday card that doubles as a party banner - complete with jumbo faux "sequin" accents made with Makin's Clay®! View the DIY video below -
Wednesday, March 11, 2015
Makin's Clay® Around the World
 We love it when artists share their projects created with Makin's Clay® - this week an artist from Turkey shared this design and we wanted to share with all of our readers too! Nur Saydam shared this project from her Facebook page.
Tuesday, March 10, 2015
Makin's Clay® Book Marks

 Today we are sharing how easy it is to make book marks with Makin's Clay®. These are great projects for crafters of all ages. They are also an affordable project to use as a fundraiser activity as 14 book marks can be made from a single 120g package of Makin's Clay®. One high school Prom Committee was challenged with finding a location outside the school to hold their Prom. They created Makin's Clay® book marks in school colors and sold them for $1 each to raise money for a venue and beverages for their High School Prom. They were successful in raising enough money to sponsor the event!


From here, the sky is the limit! There are many ways to decorate your book marks - such as adding texture by placing a Makin's® Texture Sheet over the clay and pressing lightly to transfer the texture (this can be done before or after your book mark is cut from rolled clay).

Add rubber stamped accents - rubber stamps are a great way to add texture to stamps when used uninked, or color when you stamp with a permanent ink pad like Clearsnap® ColorBox® inks.

Make a hole to add the ribbon or fibers to your book mark. Holes can be made when clay is wet with a straw or other tool, or after with a hole punch as Makin's Clay® remains flexible and can be cut with craft punches or die cutting machines after drying.
Subscribe to:
Posts (Atom)