
Makin’s Clay® Bird’s Nest Shadowbox
Designed by Candice Windham for Makin’s Clay®
It’s funny how you fall in love with something the minute you see it, and that’s what happened when my BFF Linda Gordon Bradshaw gave me this little pedestal shadowbox. She said, “I knew you could make something good with this.”
I’ve found that the longer I think about something, the more pleased I am with the outcome. It’s been sitting on my worktable for about three months, because I knew I wanted it to be something special, so I used three of my favorite things: birds, flowers and Makin’s® No-Bake Polymer Clay.
Here’s how I did it:
Supplies:
Makin’s Clay® - one each white, brown, black 120g packages, and one pack of the Earth Tones
- Ultimate Clay Extruder™ and Disks
- Clay Mixing Ruler™
- Clay Roller
- Cutting Mat
Patterned Paper (Colorbok)
Pedestal Shadowbox (Hobby Lobby)
Acrylic Paint, Quinacridone Magenta, Metallic Gold, Jenkins Green, Teal
Bird Embellishment (Wendi Vecchi)
Large Glue Dot
Beacon® Quick Grip Adhesive
Brown paper shred
Thin hemp cording, 24”
Computer and printer
Plastic gloves
Double-stick tape (Scor-Tape)
 Instructions:
Measure the inside of the shadowbox and cut the printed paper to fit. On your computer, set the quotation to fit the paper size.
 To make sure the quotations prints straight on the printed paper, draw two lines on the computer printout slightly above and to the right of the measurement, and print it out.
 To make sure the quotations prints straight on the printed paper, draw two lines on the computer printout slightly above and to the right of the measurement, and print it out.
Line up the printed paper just below and to the left of the printed rules.
 Tape only along the top line.
 Place the paper back in the computer and print again. Your quotation will be perfectly aligned on your printed paper.
Custom Coloring Clay
 Divide the white clay into six sections, measuring with the largest section on the Clay Mixing Ruler™. Place all the pieces in a plastic bag with a sealable closure to keep it fresh. You will only need four balls of white clay for this project, so keep the remainder sealed for future use.

Remove one white ball from the bag. Knead 1/8 teaspoon of Metallic Gold paint and a drop of Quinacridone Magenta into the clay to crate a peach shade. Be sure to wear plastic gloves and place the ball back in a plastic bag.

Remove a second piece of white clay and mix in ½ teaspoon of
Metallic Gold acrylic paint. Be sure to wear plastic gloves and
place the ball back in a plastic bag.
Metallic Gold acrylic paint. Be sure to wear plastic gloves and
place the ball back in a plastic bag.
Remove a third ball of white and mix in ¼ teaspoon of Metallic Gold acrylic paint and about 1/8 teaspoon of Quinacridone Magenta acrylic paint. Be sure to wear plastic gloves and place the ball back in a plastic bag.
Mix half of the fourth ball with ½ teaspoon of Jenkins Green acrylic paint. Mix he other half with Teal acrylic paint. Be sure to wear plastic gloves and place the balls back in a plastic bag.
 Roses
Roses
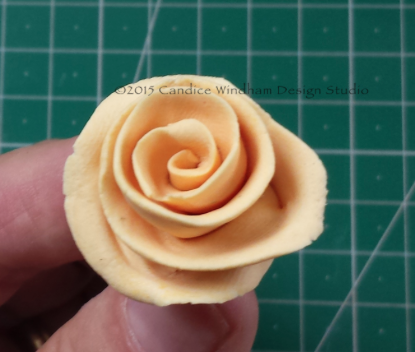
Roll each of the balls into a long rope and flatten each onto the Cutting Mat with the Clay Roller.
 Pinch the top edge of each roll.
 Begin at one end and roll the strip. Push the edges out to make the petals and pinch the bottom to
 keep the roll together.


For the rose buds, just make small flowers with fewer layers. Press a pinch of the Jenkin’s Green mixed color into a small oval and wrap it around one side of the bud.
For the color blended rose, roll out two equal pieces of acrylic-mixed yellow and dark pink clay. Place them on the Makin’s Measuring Mat so that the edges are touching and use the Makin’s Clay Roller to flatten the pieces.

Use the ball tool included with the Clay Mixing Ruler™ to drag
the pink into the yellow clay.
the pink into the yellow clay.

Roll again with the Clay Roller and then roll into a flower as above.
Nest
Measure one piece each of black and brown in the largest circle on the Clay Mixing Ruler™.
Roll the two balls together into a log and place it in the Ultimate Clay Extruder™ with the seven-hole disk in place.


Eggs

Note: I made three, but only had enough room for two

At this point, I felt that the nest needed some lighter colors so I mixed the beige and tan clays from the Earth Tones pack and extruded using the same disk. I then placed this extrusion on top of the dark brown extrusion.
Vine
 Using the green clay from the Earth Tones pack and the small circle disk with the Ultimate Clay Extruder™, extrude a vine as long as you wish. Wrap the hemp cord around the vine and secure the ends with a drop of Quick Grip Adhesive.
 Note: To make it easier to handle, I made my cord in two sections, one about 6” long and one about 18” long. The short piece is behind the nest and the longer pieces goues across the bottom, loops and goes up the left side.
Note: Remember, Makin’s Clay® stays flexible in thinner pieces, so this vine will be useful for future projects if you don’t use it all for this one.
Set all pieces aside to dry.
Assembly

Attach shredded paper in the right corner of the shadowbox with Quick Grip Adhesive and place the nest on top. Place more shredded paper in the nest, and then attach the eggs with Quick Grip adhesive. Place the short section of vine in place behind the nest.

 Place a glue dot to the back of the bird embellishment and attach it to the shadowbox just above the nest.
Place shredded paper along the inside base of the shadowbox. Attach the longer piece of vine under the nest. Make a small loop and
 then attach it along the left side and over the top of the quotation. Attach two rosebuds at the vine top and arrange the remaining roses and buds along the inside base of the box.

I’m not sure what I will do with this box, but for the time being, I’m going to enjoy it and remember Henry Van Dyke’s advice. Maybe I’ll make it a gift to my BFF!
2 comments:
Really neat Candice!
This is a stunning project and has given me some ideas. Thanks for the inspiration.
Post a Comment