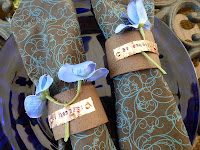
This project was originally shared on my personal blog as part of a blog hop challenge featuring Makin's Clay® in 2012. I thought I'd share it again here as another option for Ann's clever idea of using the paper towel rolls! The brown tone of the clay, along with the texture provided from the texture sheet results in what I think looks a bit like leather. By sticking with a simple color palette, these adaptable rings will coordinate with almost any color or pattern of napkin, for any theme or holiday. The metal stamped embellishment serves as a holder for silk flowers, dried flowers, colorful autumn leaves, long stems of grasses, or any other embellishment you’d like to tuck behind it to customize your rings for the occasion. The verses stamped on each are basic enough that they too are versatile.

Materials:
Makin’s Clay® - Earth Tones multi pack (If creating 4 rings of the same colors, 2 multi-packages of clay will be needed)
Makin’s Professional® Ultimate Clay Machine® Makin’s Clay® Texture Sheet - Set A "Sand"
ImpressArt® Metal Stamps - Lowercase Newsprint
ImpressArt® brass stamping hammer, steel stamping plate, & Stamp Straight Tape™
Copper sheet
Westcott Craft Titanium Bonded Non-Stick Scissors
Sharpie marker, soft cloth
Small copper brads
Brown flat fiber trim
Elmer’s Craft Bond Adhesive
Small hole punch, tapestry needle (optional)
Instructions:
 Begin by cutting a paper towel roll into desired number of 1 1/2” rings, then cut through each ring to create napkin ring.
Remove clay from box, remove from outer sealed plastic wrapping. Cut individual wrapped piece of tan clay in half and remove inner wrapping from one half. Makin’s Clay® is ready to use right from the package - no conditioning is needed.
Use Ultimate Clay Machine® to roll on #3 setting. This will create a piece large enough to cover your chipboard ring. Repeat with 2nd half.


Place a light coat of Craft Bond adhesive onto inside of chipboard ring. Place clay onto ring, using fingers to gently ensure entire surface is covered with clay. Remove any access clay extending off of chipboard. Repeat on second ring.
Place texture sheet over clay on ring. Press into clay to transfer texture.

Cut individual wrapped piece of dark brown clay in half and remove inner wrapping from one half.
Use Ultimate Clay Machine to roll on #3 setting. This will create a piece large enough to cover your chipboard ring. Repeat with 2nd half.
Place a light coat of Craft Bond adhesive onto outside of chipboard ring. Place clay onto ring, using fingers to gently ensure entire surface is covered with clay, extending slightly over edges onto back. Repeat on second ring.
Place texture sheet over clay on ring. Press into clay to transfer texture.


 Reform rings, supporting sides as needed, and let dry overnight.
Measure and cut flat brown fiber trim to fit along inside edges of ring where two colors of clay meet. Mount to cover edge.
To create metal plates, cut two pieces of copper sheet approximately 2” long by 1/2” wide.
 Use ImpressArt® Stamp Straight Tape™ on bottom of first piece to
  hold in place on steel stamping block. Use lowercase Newsprint metal stamps and brass stamping hammer to stamp “be thankful” on first piece, and “be grateful” on second piece.
Distress edges of each piece by lightly tapping with stamping hammer.
Color each stamped verse with Sharpie marker. Gently rub marker from copper sheet with soft cloth.
 Ink will remain in stamped areas to highlight text.
Punch small hole in each end of each metal plate.
 Determine placement on clay napkin rings. Do not mount flush to ring, bring ends in a about 1/8” to allow metal plate to bend outward to accommodate embellishment inserted behind.
Use tapestry needle, or small point of scissors, to gently push holes through clay and chipboard where needed.
Mount plates to rings using copper brads.
To add embellishment, slip behind stamped metal plate.
- Enjoy using these faux leather, adaptable napkin rings at a special dinner soon! - Cindi

No comments:
Post a Comment