Pages - Menu

Search This Blog

Showing posts with label die cut clay. Show all posts

Thursday, November 3, 2016

FALL Decorative Jars

"FALL" Decorative Jars by Steph Ackerman
Hi everyone, Steph Ackerman here today with a fall project that was so much fun to create. 

Supplies:

Makin's® Clay -
Makin's®
Makin's Professional®
Beacon Adhesives Tacky Glue
Spellbinders Dies & Grand Caliber machine
Mason Jars

Instructions:

Roll out Straw clay into a thin sheet using the clay roller.

Cut letters from the clay.


Place remaining damp clay between two layers of wax paper.
Place a scalloped die on top and run through die cut machine.
Peel off both layers of wax paper to reveal the die cut elements.
Using wax paper ensures that the clay does not get stuck in the die when cutting with fresh clay.


Use the clay roller and roll out brown clay to a thin layer.
Use the largest round cutter to cut 4 circles.


Mix assorted colors of clay together and roll to a thin panel using the Ultimate Clay Machine®.
Begin with the highest setting #1.

Continue placing the panel in the clay machine, turning the dial up each time until the panel is thin.  I finished on setting #5. 

Look at all the fun combinations of colors you can create!


Die cut an assortment of leaves from the clay panels.
Assemble the circular elements and letters.
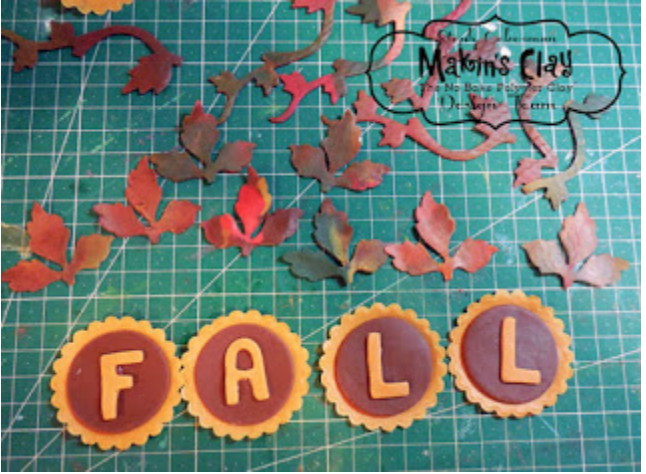

Emboss leaves with a texture sheet.
I allowed this layer of clay to dry overnight, then die cut scalloped circles for the tops of the jars.
Dried clay die cuts easily and there is no need to use wax paper as you need to when the clay is fresh.


Finally, assemble the jars.
Use Tacky Glue to adhere burlap around the jars. 
Adhere the letter panels and leaves to the burlap.
Place the die cut scallops on the top of the jars.


These make great decorations for the holidays.  They would also make great hostess gifts don't you think?

Thanks for stopping by.


Wednesday, August 3, 2016

Altered Clock by Steph Ackerman

ALTERED CLOCK 
Designed by Steph Ackerman 
Hi everyone, Steph Ackerman here with my newest post for Makin's Clay® and I've got a fun altered clock to share with you today.

Supplies:

Makin's Clay® - White, Black, Red, Green
Makin's Professional® Cutting Mat
Makin's Clay® Roller and Cutter Set
Beacon Adhesives - 3-in-1 Advanced Craft Glue
Unity Stamp
Spellbinders® dies
Paint

Instructions:

My inspiration for this project was the Spellbinder's Eiffel Tower die.  I am hoping to travel to France within the next year so this this project sits on my desk reminding me of the adventure that is to come.

Since I wanted to use the Eiffel Tower die, I first mixed black and white clays together.  I love the marbeling effect on the clay

Using the Clay Roller, I rolled out the clay until it was very thin.  (You can also use the Ultimate Clay Machine® to achieve the same effect.)  I placed the clay between 2 layers of waxed paper, placed the die on top of the wax paper then ran it through my die cut machine.  Due to the intricate detailing of the die, the wax paper allowed the die to be easily removed from the clay.  It just takes a little patience to remove the wax paper from the die cut elements.  (Note:  While this technique does work, we normally recommend you let Makin's Clay® dry before die cutting to help prevent any clay being left in your dies or machine).
I also wanted a picket fence so I rolled out white clay, placed it between 2 layers of waxed paper and
ran it through my die cut machine. 
I mixed green and white clays together so I could create some leaves.  I then die cut the leaves in the same manner as the Eiffel Tower. 
Because I rolled the clay very thin, the details in the leaves really shows.  To highlight those details I lightly painted on several colors to emphasize those details.  
I cut travel paper to fit the back of the clock then adhered the Eiffel Tower to the background.   A paper tag was added regarding the journey.  A Unity stamp was stamped on a wood tag which was added above the paper tag. 
The clock was painted with assorted colors of  paint.  The flowers were created by mixing red and white clays together.  After rolling out the clay, assorted sized flowers were die cut in the same manner as the Eiffel Tower, then lightly painted.  The flowers were layered with leaves and placed with the fence across the clock.  Larger flowers and leaves were added to the top of the clock. 
I love that I can use all my favorite dies with Makin's Clay®.   What will you create today?


Steph

Tuesday, May 31, 2016

Tuesday, May 17, 2016

Framed Clay Sunflower by Irit Shalom


Framed Clay Sunflower 
Designed by Irit Shalom

Hello my dear crafty friends and welcome to my first, but sure not the last clay flowers tutorial.
As this is my second year on Makin’s Clay® Design Team, I can pretty much make any project I desire and right now I am in a "flowers" mood and from this month on I will do some different clay flower tutorials monthly for the Makin’s Clay® blog.   The first one is a Sunflower tutorial and the techniques used are clay sheet die cutting and acrylic paints coloring over the dry clay.
The flexibility of Makin's Clay® is just perfect even when we work with  already dry clay, so we still can reshape our dry clay pieces. The perfect ability to be colored with acrylics makes it possible to work with just white Makin's Clay® and to paint the final shape into any possible color.
So here is my tutorial for May.  April showers sure brought us my May flowers!

Products used:

Makin’s Clay® White, Black
Makin’s Professional®Roller and Cutters set®
Makin’s Clay® Professional Clay Tools® 
Makin's Clay® Texture sheet set D- Woodgrain 
Makin’s Professional® Cutting Mat

Other products:
Dies- Sizzix® Sunflower set
DecoArt® paints
Beacon™ Fabri-Tac glue
Photo frame 4*6''

Instructions:

Step 1:
Flatten a big piece of white Makin's Clay® using a roller from Makin’s Professional®Roller and Cutters  set®. You also can use the Makin's Professional® Ultimate Clay Machine™ and roll to setting 5, but for this project I decided to use the roller only.
Let the  rolled clay dry for a few hours.


Step 2:
Die cut the dry Makin's Clay® sheets with Sizzix Sunflowers die set. As you can see the set contains two dies that build the flower, three  dies for leaves, the bottom die and the top die (the one with dozens of smallest possible flowers). I die cut the flower parts twice with each one of those two dies and die cut the leaves twice. The one parts were die cut just once. Do not push the small flowers out of the die cut sheet for now; it's almost impossible to paint them out of the sheet.


Step 3:

Add shaping to the die cut clay pieces using Makin's Clay® tools from Makin’s Professional® Clay Tools® .


Step 4:

Paint the shapes with acrylic paints. I used DecoArt Mixed Media line paints, but with Makin's Clay®, any acrylic paint works just perfectly!  Let the shapes dry and don't forget to paint the white backs too.


Step 5:

Arrange the painted dry leaves over a circle of black Makin's Clay® and use Beacon Fabri-Tac to
adhere shape to shape. This is the glue I have and it works just great with Makin's Clay® too.

Step 6:

Arrange flower parts as shown over the glued leaves.


Step 7:

Paint the small top flowers with a mix of DecoArt paints and now push them of the die cut sheet.


Step 8:

Glue the painted flowers on the top of the sunflower.


Step 9:

Make the background using Makin's Clay® in black, roller and Makin's Clay® texture sheet (woodgrain) from set D. Cut the background to the size that fits the photo frame.


Step 10 and final:

Glue the black background over the glass inside the photos frame. Cover with glaze and glue the sunflower over the background. Cover the sunflower with glaze. Let it dry and enjoy your first  Makin's Clay® flower.

More to come next month and so on!


Tuesday, January 26, 2016

Declaration of Love Card by Martha Lucia Gomez

Today on our blog we share this cute "Declaration of Love" card with a die-cut Makin's Clay® accent made by Design Team Martha Lucia Gomez.  Martha shared this card here recently on her blog.  Makin's Clay® is perfect for card making and scrapbooking as it can be die cut, cut with clay cutters, craft punches or scissors, push molded, and more to create lightweight, flexible, and acid-free embellishments!

Monday, September 28, 2015

Glow in the Dark Pumpkin Card by Amanda Phillips


Glow in the Dark Pumpkin Card
Designed by Amanda Phillips 


Good Morning!!! 

Amanda here and I am delighted to share with you my newest and silliest creation to date for your Makin's Clay® pleasure :)

It is Halloween all over the place and when I saw Madeline Arendt's die cut inspiration leaves, I ran to the studio and started rolling out clay into sheets quicker than frankie rolled out skin :)

My fun supplies are as follows.

Makins Clay® - Glow in the Dark, Terra Cotta, Brown, Black, Olive, Grape Leaf
                        - Ultimate Clay Machine™ 
                        - Push Mold - Florals
Die cutting machine, pumpkin dies 
Beacon® Tacky Glue 
A couple of pieces of fun paper 
A standard 6 1/2 x 5 greeting card blank
7" ribbon of choice
1/2" punch, 1/4" punch (both of these are for eye detail)
Chalk ink in pinks, browns, oranges and dauber for rosy cheeks shading.

Instructions:

I must remind you that your sheets of clay should 100% be dried before using in your large dies (foam backed) so that your pieces don't get gummed into the crevice vortex.

Start rolling half of your 120g package of Terra Cotta clay into your machine starting with your largest setting (#1) and slowly working the clay to the eventual #3 setting. Do this repeatedly using 1/2 package of the Glow in the Dark (so it's big enough) and a 1/4 package of the other colors..same process.   Let all rolled clay dry 24 hours.  Die cut shapes.

Use Floral push mold to create leaves from green clays.  

Now I could have made some groovy curlies with my Ultimate Clay Extruder™ but the scissors were handy and they worked great. But as I said..if perfection is on the menu..The Ultimate Clay Extruder™ seriously cannot be beat. We'll get into my unnatural obsession with that in another post ;)

Use circle punches to punch pieces for eyes.  
Add shading to pumpkins with chalk inks. 

Assemble your pumpkin and mount to your card with Beacon® Tacky Glue. 

I want to thank you for coming by today and seeing all the fun projects that the Design Team and myself love sharing with you!

Contact us

Name

Email *

Message *