Pages - Menu

Search This Blog

Showing posts with label black cat. Show all posts

Thursday, October 3, 2019

BOO! Halloween Wall Panel


BOO! Halloween Wall Panel by Steph Ackerman
​
​Hi everyone, Steph Ackerman here today and I've got a new Spooky project to share for Makin's Clay®.

​Supplies:

​ Makin's Clay® - Black, Brown, White, Earth Tones
​ Makin's ProfessionalⓇ Ultimate Clay MachineⓇ
​ Makin's ProfessionalⓇ Cutting Mat
​ Makin'sⓇ Clay Cutters - Rectangles, Halloween Set
​ Beacon Adhesives - 3-in-1
​ Mod Podge clay mold
​ Memento Fireworks Shimmery Craft Sprays
​ Sizzix dies
​ Burlap Panel
​
Instructions:


​Start by spritzing the panel with assorted colors of Fireworks Inks.  I started with lighter colors then realized I wanted a darker effect so I added a darker blue and gray.
​
Begin by conditioning the white, black and brown clays.  Then place each individually in the clay machine at the highest setting.  Reduce the setting on each pass until you have the thickness you need for your project.
​
​
​
​
As I was creating a Halloween scene, I die cut a haunted house from the black clay.  To be sure the clay did not stick to my die, I place the clay between wax paper and then ran it through my die cut machine.  Although still damp, it die cut beautifully. 
​
Picking up the left over black clay, I mixed it with some white clay and again ran it through the clay machine until I had a mottled effect.  I then die cut the roof of the house and placed it atop the main image. 
​
As the clay was still damp/fresh, no glue was needed to adhere the pieces.​

​
​ 
​
​Next, I die cut 2 trees using another Sizzix die.  Again, I placed the clay between wax paper so it would not stick to the die.                           
Once all my elements were ready, I started creating a spooky scene.  I began by adhering some torn strips of paper across the panel then put the trees in place.  Realizing I wanted fence posts, I used the left over black and white clay and die cut the fences.  I also had left over brown clay so I free hand cut a sign.  Using the small pumpkin cutter, I created several pumpkins, used a craft stick to create texture, then spritzed each with Fireworks Craft Sprays.  They were placed around the sign onto which I added letters spelling BOO.
​
​
​
​Using the ghost clay cutter, I created a number of ghosts that I adhered to the panel.  In the upper corner I created a moon and placed a ghost on top. 
​
​
​
The black cats are standing on the fence and the witch's hat is in the tree.  Yellow clay was added behind the house to simulate light in the windows then the house was adhered to the panel.  Using the remaining black and white clay panel, I used a rectangle cutter to create bricks for a walkway.
​
​
​
​Hoping you have a Happy Halloween!
​
​Thanks for stopping by.
​
​Steph

Thursday, September 13, 2018

Halloween Pencil Toppers - DIY Video


Cindi McGee shares how easy it is to make fun pencil toppers for Halloween with Makin's Clay® and our Makin's® Clay Cutters!  There's even GLOW IN THE DARK clay as an option! 


Thursday, September 14, 2017

Black Cat Halloween Pin

Black Cat Halloween Pin by Patricia Roberts-Thompson

Do you love black cats and Halloween? I sure do!  Let’s make a cute pin with Makin’s Clay®!

Materials:              

Makin’s Clay® Black 30G, Yellow 20G, Straw 20G 
Makin's Professional® 
  • Ultimate Clay Machine®
  • Cutting Mat

Makin's® 
  • Clay Roller 
  • Texture Sheet Set A - Brick (or brick pattern fondant roller)

Craft knife
Clay blade
2 ¼” round cutter
Black acrylic paint
DuraCoat Americana matte varnish
Pin back
Gorilla Superglue

Instructions:

Step 1:   

Roll the black clay on the thickest setting of your Ultimate Clay Machine® (2mm). Then cut a
Rectangle that is 2 ¼” long by 1 ½” wide. Curve the top if desired. Place remaining clay in a
Ziplock bag until needed. Roll the Yellow Clay on the 3rd thickest setting (1mm) cut it into a
Rectangle to match the black. Use a large round cutter (2 ¼”) or your craft knife to round
one side of the Moon. You will trim the yellow to fit the brick. Roll the Straw Clay
on the 2nd thickest setting (1 1/2mm) Add some cornstarch to the Fondant roller or Texture Sheet, and roll the brick texture into the clay. Cut this piece 1 ½” wide by 5/8” tall.

Step 2:   

Cut a piece off the bottom of the yellow moon, the same size as the brick piece. Place it on the Black background clay.
                 
Step 3:   

Add the brick piece to the bottom of the pin


The template can be found below. 

Step 4:   

Roll the remaining black clay on the thickest setting of the Ultimate Clay Machine. Place the
Drawing of the cat on the clay, and lightly trace the outline. Use a craft knife to cut the shape
of the head and body. Roll a snake of black clay to make the tail. I used two tiny ovals of yellow to make the eyes, and a small piece of Straw clay for the nose.

Step 5: 

Assemble the cat onto the brick wall. I used a small straw to create the mouth. Let the pin dry
For 24 hours, then paint the brick with black acrylic paint, and wipe it from the high parts
(antiquing) When the paint dries, seal the pin with a matte varnish. I used DuraCoat Americana.
Add the pin back with Gorilla Super glue, and you’re done!


Happy Halloween!


Tuesday, September 27, 2016

Halloween Clothespin Clips


Halloween Clips by Erin Reed
I wanted to make some cute clay clips for Halloween to place on various projects such as cards, tags, scrapbook pages, treat bags, banners, really the uses are endless for these fun little clips.

Materials:

Makin's Clay® - 

  • Black, White Clay, Neon Orange
  • Clay tools
  • Halloween Cutter Set

Makin's Professional® 

  • Cutting Mat
  • Professional Clay Tools 

Mini wooden clothespins 
Tattered Angels paints & mists 
Beacon™ Mixed-Media Glue
Procedure:
1) Roll out white, neon orange, and black clay and cut out cats, bats, pumpkins, and ghosts, a few of each for fun with the Halloween cutters.


2) Use the professional stylus tool to add in ridges to the pumpkin, shapes to the for eyes, wings, and mouth, for the cat face and ears, and the ghost eyes and mouth.
3) Roll our little balls or lines in white or black for the faces of the animals and ghosts for eyes and whiskers.  Use Beacon Mixed Media glue to hold the little parts in place.
 

4) Let dry over night to harden and set.
5) Use Tattered Angels paints and mists to add color to the pumpkin and pupils to the eyes.


6) Cut out shapes of the faces in black paper for the jack-o-lanters and glue.


7) Glue each little shape with Beacon Mixed Media Glue to a black Canvas Corp clothespin to make your clip.


Here is a full video tutorial on how to I made these fun little clips!!

https://youtu.be/lA8wBzrdepg

Erin Reed - Designer & Artist
Blog
YouTube
ETSY
Instagram

Tuesday, September 13, 2016

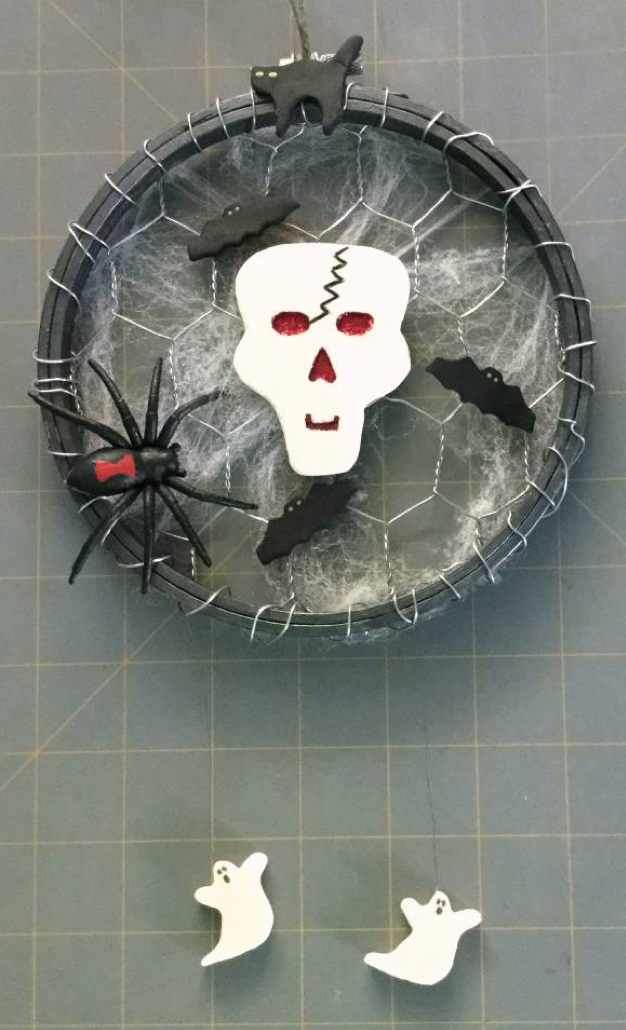
Nightmare Catcher with Makin's Clay®

NIGHTMARE CATCHER 
Designed by Patricia Krauchune
Following the theme of a dream catcher, I made this Nightmare Catcher. All your scary dreams will be caught in this web.

Supply List:
Makin's Clay®: Glow-in-dark / Black
Small piece of chicken wire/wire to attach to hoop.
Small piece of plastic
Beacons™ Tacky Glue
Martha Stewart Crafts™ Black Nickel Paint
Plastic Spider
Beacon™ 3-in-1 Glue
Adirondack® Alcohol Inks: Red Pepper
Black Marker
Beacon™ Power-Tac
XMas Red Stickles™
Spider Webbing: (Michael's)
Beacon Quick Grip™
Jewelry Thread
Piece of hemp for hanger
6" Embroidery Hoop


Recommended Makin’s® Tools:
Makin's Professional® Ultimate Clay Machine®
Makin's® Clay Cutter Halloween Set A
Makin's Clay ® Cutting Mat


Instructions:

1. Paint the embroidery hoop with the Martha Stewart Crafts™ Black Metallic paint.
2. Cut some chicken wire to fit  the outside diameter of the hoop.

Prepare your hoop
3. With some wire, lash the chicken wire to the hoop. Add some dobs of Beacon™ Power-Tac to several spots on back to further secure the chicken wire to the hoop. Then run a bead of Beacon™ 3 in 1 Glue around the entire back perimeter.

Add the chicken wire 
4. Roll out some Glow in the Dark clay on the #1 setting of the Ultimate Clay Machine®. Cut out a skull from the clay using either a craft knife or scissors.

Roll the glow in the dark clay
Trace your skull template
5. You also want to cut out, from the Glow in the Dark clay, 4 ghosts using the Halloween Set A clay cutters. When the ghosts are dry, add some tacky glue to one ghost, lay some jewelry thread into the glue then top with another ghost. Make another ghost "sandwich". Draw eyes and a mouth on each ghost with a black marker.

Make your ghost "sandwiches"
6. When the skull is dry, add a small piece of plastic that you tinted with Red Adirondack® Alcohol Ink to back of skull with 3 in 1 Glue.  Turn skull over and add XMas Red Stickles™ to the eye, nose and mouth openings. Set aside to dry.

Add your red accents
7.  After the Stickles has dried, attach the completed skull to the front of the hoop and secure from the back with Beacon Quick Grip™ glue at points where there is wire.  Make a hanger from a small piece of hemp and attach it to the hoop screw. 

Mount the skull
Back view
8. Now roll out some black on the number 1 setting on the clay machine. Using the Halloween cutter set, cut out a cat and three bats.  

9. I had a plastic spider from Michaels' and I painted an hourglass figure on the spiders back.


Roll black clay 
Cut cat and bats
Add detail to your spider
10. I attached the two ghosts that are on the jewelry line to the bottom of the hoop. Now is the time you use your imagination and glue the bats, cat and spider to a spot that suits your fancy.  I painted little green eyes on the cat and bats and I also glued some spider webbing that I purchased at Michaels to give my catcher a spookier look. 

Have fun and remember all is possible with Makin's Clay®.

Ready to hang!


Contact us

Name

Email *

Message *