 Design Team Member Donna Budzynksi shares these pretty embellished paper clips with a bit of a country feel. Makin's Clay® is very versatile - it can have a rustic or vintage feel, or be bright and modern.
Sunday, July 31, 2016
Pretty Paper Clips by Donna Budzynski
Design Team Member Donna Budzynksi shares these pretty embellished paper clips with a bit of a country feel. Makin's Clay® is very versatile - it can have a rustic or vintage feel, or be bright and modern.
Saturday, July 30, 2016
"Inch by Inch".... Inchies by Erin Reed

Thursday, July 28, 2016
Favor Boxes by Steph Ackerman
 |
| Flower Favor Boxes by Steph Ackerman made with Makin's Clay® |
 Design Team Member Steph Ackerman recently shared this elegant cupcake stand she decorated and the customized favor boxes she created for display. Her pretty boxes included flowers made with Makin's Clay® and the Floral push mold. Find out more about the entire project here on her blog.
Wednesday, July 27, 2016
Faces of the Moon Mixed-Media Display by Lucy Reese
 |
| Celestial Mixed-Media Display by Lucy Reese made with Makin's Clay® |
Faces of the Moon Mixed-Media Display
Designed by Lucy Reese
Supplies:
Makins Clay®-White, Black
Makins Professional® Cutting Mat
Makins® Borders Mold
Heidi Swapp Color Shine-Black Velvet
1 Ziplock Sandwich Baggie
Silicon Moon Face Mold
Unmounted Rubber Script Stamp
Staz On ink pad - Black
Wooden Vaneer by Simply Surfaces
Wooden Base by ArtC
Various Acrylic Paints
 Instructions:
First, we are going to add some color to the white clay by putting the clay into a ziplock baggie and spraying in some of the Color Shine.
 Mix it well by squeezing the baggie. Once you take it out of the bag the clay will be somewhat sticky, I suggest letting the clay rest for a minute or two before continuing to mix it completely.
Just because Color Shine has mica in it, you will not see the glimmer. But, you will end up with a beautiful grey color
Now you have your beautifully custom colored clay to add to the moon face mold. Being that my piece is thick, I let it dry overnight.


After the moon face mold dried thoroughly. Take the borders mold and black clay to form your edging. I chose the twist form. Lay down a layer of adhesive to the side of your moon face and attach the border. Let it dry completely.
Add accent painting and let dry. Stamp with script stamp and permanent ink.
To finish off the project add your piece to your painted wooden vaneer embellishment and then the entire piece to a completed wooden base. For a cute touch, I added mine to a miniature wooden easel.
I hope you enjoyed my project this month. Remember, you can find me on my blog at tecniquefreak.wordpress.com, Pinterest at reesel03, and Instagram at LReneeDesigns.

Tuesday, July 26, 2016
Stargazer Lily & Dragonfly Pendant by Lucy Reese
 |
| Stargazer Lily & Dragonfly Pendant by Lucy Reese made with Makin's Clay® |
Design Team Member Lucy Reese recently shared this pretty pendant made with Makin's Clay® - We can't decide which we like best, the stargazer lily, the dragonfly, or the purple flowers!
Monday, July 25, 2016
Fish Key Chains by Erin Reed
 |
Fish Key Chains made by Erin Reed with Makin's Clay®
Fish Key Chains
Designed by Erin Reed
I wanted to make something fun for the boys (my boys and nephews) for the summer, but what little crafty items do you give to boys - key chains!!! They do not have to use them just like a key chain as what little boys have keys? But, as a backpack fob or vacation bag zipper pull, why not?!?!?
 Materials:
Makin's Clay® - White
Makin's Clay® Clay Tools
Makin's® Cutting Mat
Gem - Eyelet Outlet
Beads
Hemp
Key Ring
Gem Tac Glue - Beacon
Instructions:
1) I used some of the amazing white Makin's Clay® mixed with blue DecoArt Traditions paint to make 8 fish from the Makin's® Sea Shells push mold in a fun light blue color. Then I painted the fish with the same blue paint to highlight the details and added in little gem for the eye.

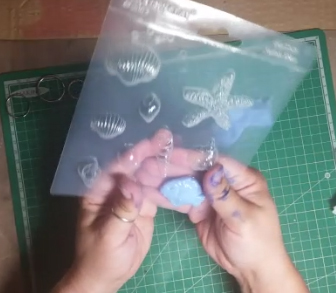

2) While the fish dry, roll out the white clay with the clay roller and cut out 8 circles with the largest cutter from the 3 piece Circle Clay Cutter set. String on the key chain top and then some pony beads in white and seal the ends of it with the clay disk. Paint the edges fo the disc blue to match the fish. Glue on the fish, one to each side and spray with a sealant to protect the fish.


 |
| Close up view of fish key chains made with Makin's Clay® |
Here is a video tutorial of the entire process!!
What little kid or adult would not want these super cute little fish?
Sunday, July 24, 2016
Seahorses Beneath the Sea ATC's by Cindi McGee
 |
| Seahorse ATC's made by Cindi McGee with Makin's Clay® & Gel Press® |

Saturday, July 23, 2016
A Whale of a Shadowbox by Steph Ackerman
 |
| Finished shadowbox with Makin's Clay® accents. |

Friday, July 22, 2016
Iridescent Garden Fairy Cameo Pendant by Cindi McGee
 |
| Garden Fairy Cameo Pendant made by Cindi McGee with Makin's Clay® |
Thursday, July 21, 2016
"Summer Blue" Floral Necklaces by Donna Budzynski
 |
| Floral Necklaces by Donna Budzynski made with Makin's Clay® |
"Summer Blue" Floral Necklaces
Designed by Donna Budzynski
I designed
these with the help of my grandkids. They wanted to make a necklace out of clay
and I thought why not use Makin’s Clay®, it is lightweight, non-toxic, hypoallergenic and perfect for all ages - the perfect option for our summer necklaces! They wore them to the movies
and told everyone they made them! They were a walking billboard!
We nicknamed Donna's necklaces "Summer Blue" Floral Necklaces because her pretty clay color reminds of a bright summer sky!
Materials:
Makin’s Clay® - Blue
Testors White Acyrilic
paint
Tools:
Makin’s Clay® Cutting Mat
Makin’s Professional®
Ultimate Clay Machine® or Rolling tool
Makin’s® Clay Cutters – Round
Floral stamp of choice
Hemp cord
Toothpick
Instructions:

1.
Gather your blue Makin’s Clay® and your paint.
2.
Add some paint to
the Makin’s Clay® Blue to make it a light ocean blue.
3.
Once the paint
was added I took a hint off of the Makin’s Clay® blog! After adding paint to
clay, put into a plastic bag and mix in the bag. FYI….Great tip’s can be found here on the
blog!


4.
Once your clay
and paint are mixed thoroughly, either roll out using your Makin’s® roller tool or
the Makin’s Professional® Ultimate Clay Machine® to about 1/8" (setting #2).

5.
Stamp your image
into the clay.
6.
Using Makin’s® round cutter, cut out your images. We used the largest cutter in the 3 piece set. Make a hole for your hemp.


7.
Set aside to let
dry. This won’t take long. Mine were dry in a few hours (Makin's Clay® is usually fully dry in 24 hours depending upon your atmospheric conditions - a thin piece like these will take much less time!)
8.
Once dry, using a
paintbrush add paint into the stamped image. Lightly wipe away paint with a
damp paper towel, leaving paint inside of image.


9.
Add hemp cord to
length and enjoy!

Wednesday, July 20, 2016
"Dreaming of Morroco" Pendant by Carole Monahan
 |
| Moroccan Inspired Tassel Pendant by Carole Monahan made with Makin's Clay® |
"Dreaming of Morroco" Pendant
By Carole Monahan
Tassels are EVERYWHERE right now. I thought I would add to
the craze with my Moroccan inspired necklace.
Materials


Makin's Clay® Black 2 oz
Viva Décor Inka Gold
–Platinum
Adirondack inks assorted
colors
2 inch Tassel
5 Oval jumprings
Silk cord 24 inches
Toggle clasp
2 fold over cord ends
Tools
Makin's Professional® Ultimate Clay
Machine™
Makin's Clay®
Professional Tool Kit
Makin's Clay® Floral push
mold
Waffle design plunge
cutter
Pliers and paint brushes
Directions:
Fill your push mold *remember less is more! Set the push mold aside to
set up.

Roll out the remainder of your 2 oz of clay to setting #2 on
your Ultimate Clay Machine™.
Cut out the desired
shape. I used a plunge cutter. Make holes to hang your tassel and attach jump rings. Embellish the edge with the detail tool from the professional tool
kit.

Add the molded piece onto the flat part. I trimmed sections from
the molded piece to better fit on the background. You can use another tip from
the professional tools sculpting kit to add more details and to help secure the
molded item down. Let dry 24 hours.

Let the paste set and dry before adding the alcohol ink colors
with a small detail brush.

Now you are ready to add the tassel with one of your oval jump
rings and string the necklace as desired. I used a silver silk cord and a toggle clasp to complete the look.

If you want to see what other mischief I have been up to you can
find me here!
Subscribe to:
Posts (Atom)