 |
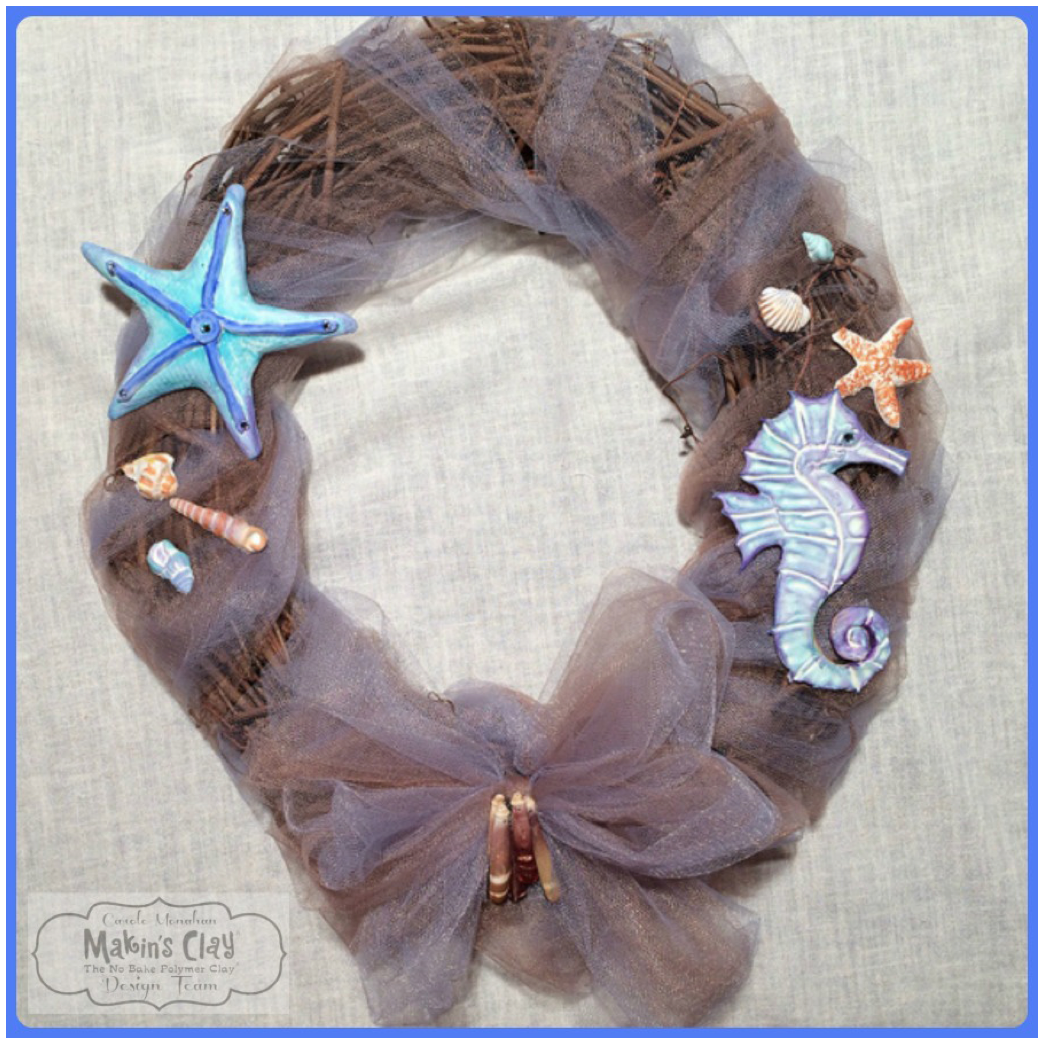
| Seashore Wreath Designed by Carole Monahan |
This is a fun and easy summertime project you
can do with the kids before they head back to school.
Materials:
120g pack of White Makin's Clay®
Pan Pastels
Wreath of your choice
about 12”wide
2 rolls of tulle 2 different
colors taupe and blue/grey 8”wide
Swarovski flat back
Crystals
Beacon Quick Grip glue
Sea Urchin spines
Printed media a
seahorse and a starfish
 Scissors
Screen for texture
Tools
Makin's Clay® Professional Clay Tools
Makin's Clay® Seashell
Push mold
Makin’s Clay cutting
mat
Instructions:
1. Make a 6” wide round
mound of white clay.
Trim your printed starfish and seahorse.
2. Lay the starfish over the mound of white clay and
Do the same thing with
your Seahorse as well. Roll the seahorse flatter.
3. Remove stencil and
trim with the plain cutting wheel from the pro tools kit.
Shape the rough edges.
4. Add texture. I use
this very flexible wire mesh screen that I have been hoarding on my texture
pile.
You can also use the
texture sheets you would just have to roll out a thin sheet enough to cover the
project and texture it while it is flat and then lay it on the sculpted piece

5. To add more details I used my Makin’s Professional® Ultimate Clay Extruder™ Disc # 18 to add the top ridge detail.
6. To highlight all the details and textures I
lightly brushed on some Pan Pastels in some of my favorite colors.

7. Press a small amount of clay into the
Makin’s Clay® Seashell molds.
It is very easy to see if you have the mold
filled in properly since they are clear.
You can always trim up any excess from the
back after the clay has dried. You can also easily remove your molded pieces from the mold when the clay is fresh or dry, as the molds are flexible. When dry, color with the pastels.

8. I wrapped the 2 colors of 8” wide tulle
around a grape vine wreath that I already had.
It is ALWAYS good to upcycle! Never toss a
wreath just because the details on it got a little sun faded.
9. After everything is cured about 24 hours, it's time to add your sparkle glue of your flat back crystals. You can arrange them on your wreath however you choose.
(Live and learn... the 1st wreath I
made was HUGE and the items seemed lost on it -
So maybe make the items 1st and
bring them with you when you pick out your wreath!)
10. I used
Beacon Quick Grip glue since it is water and weather proof. My front door gets
HOT!
Then you can
proudly hang your wreath anywhere!

I have mine
on my front door but after I took a photo of it hanging there I realized I
REALLY have to
repaint my front door! Lol!
If you would
like to keep up with all my other projects you can like and follow me here.
Facebook:
2 comments:
Cool!
Neat idea by the ocean!
Post a Comment