Pages - Menu

Search This Blog

Tuesday, June 30, 2015

Makin's Clay® Totem Pole Cans with Jonathan Fong - DIY When Creativity Knocks Video


Makin's Clay® is a sponsor of the When Creativity Knocks All-Star Designers Summer Series!  We can't wait to see what creative projects Jonathan Fong, Mark Montano, Judi Watanabe, Ana Araujo and Cindi Bisson share in the coming weeks.  This week, Jonathan Fong shares a very fun idea for creating Totem Pole Cans with die cut Makin's Clay®.


Seabed Pencil Holder by Andrijana Katavic

SEABED PENCIL HOLDER
Designed by Andrijana Katavić

Hello everyone! I love my cat Zvrle, who loves to play with piece of rope and to eat certain types of food that is packed in cans. As an ecologically conscious being, I like to recycle. I love the sea, which is not surprising since my dad is retired captain of cargo ships and I crossed all the oceans with him. Also, I love to play with Makin’s Clay®. So this holder is a combination of several of my loves. It is great for its multifunctionality, and will bring a touch of summer in every room and remind your on holiday even during winter days. 

MATERIALS LIST:
Makin’s Clay® - Natural 60 g
                         - Push Mold - Sea Shells
                         - Clay Mixing Ruler™
                         - Roller & Cutters Tool Set
                         - Professional® Cutting Mat
2 Empty and clean cans
Hank of thinner rope - about 5 to 10 meters in length
Beacon’s™ Quick Grip Permanent Adhesive
Beacon’s™ Premium Tacky Glue
Heyda Ink Pads - gold, turquoise and lavender 
Wide hard painting brush
Small bowl for color mixing
Water - 4 to 5 tablespoons
Pliers
Hammer (optional)
Sharp scissors

INSTRUCTIONS:

STEP 1.
Place Makin’s Professional® Cutting Mat on your working table. Unpack Natural Makin's Clay® and using the Mixing Ruler measure piece of clay in H hole. With fingers press one part of measured clay in the starfish segment in the Sea Shell push mold. Flat clay in the mold with Makin’s® Roller and remove any possible excess of clay with spiky (pointy) modeling tool which is included in Mixing Ruler set. Release the piece from mold (flexibility and non-sticky of the push mold allows you to remove the clay quite easily) and bend it around one can. Repeat whole process 4 more time, because for this project you’ll need 5 starfish. Then measure clay in G hole and make thin shell. Also, measure two pieces of clay in F hole of the Mixing Ruler and make two smaller shells. 
NOTE: Having the right of amount of clay for the mold work better than trying to add large amount of clay and trim away. So, use Mixing Ruler for measuring. How to use this great tool you can find out HERE, and also if you check other April's projects made by Makin’s Clay® Design Team.

STEP 2.
Take gold ink pad and dub lightly on every starfish. Move the can to ease access to clay. Take lavender ink pad and dub lightly on all shells. Then use turquoise pad and dub it on all shells. Finally, dab the gold pad on shells. This way, the shells will get a pearlescent appearance. Now bend shells around tin too. Leave clay on can aside to dry for at least 12 hours.

NOTE: You do not have to cover the complete surface of clay with ink pads, but only to accentuate certain parts of the textures.

STEP 3.
While the clay dries on one can, take another tin and with pliers squeeze the sharp edges inside it. If you need, process edges additionally with a hammer to make sure that you can’t be injured on it.

NOTE: I used cans of Zvrle’s (my cat) food, but you can use any tin regardless of the size and depth.

STEP 4.
Apply small amount of Beacon’s™ Quick Grip Permanent Adhesive near the opening of can. Place
rope (as shown in photo) on Adhesive to secure it in place. Leave for few minutes to dry, and then start to wind up rope tightly around can.

STEP 5.
During the winding, periodically press threads with fingers for better adhesion and to prevent visibility of metal as much as possible. At the end of winding, apply a thin layer of Beacon’s™ Quick Grip near the bottom of can, cut the rope with sharp scissors and place end of rope on glue. Leave aside for few minutes to dry.

STEP 6.
In the bowl mix 4 to 5 tablespoons of water with 1 tablespoon of Beacon’s™ Premium Tacky Glue. Dip brush in the mixture and apply it on rope. The mixture is quite liquid, so be careful that there is no uncontrolled leakage. Also, be sure that you smeared all surface of rope and that mixture is entered between the threads. Leave aside for about 10 to 15 minutes to dry. This way rope will stick to the can and will get a nice, subtle sheen.


STEP 7.
Remove the clay from the can. On the bottom of each clay form apply a small amount of Beacon’s™
Quick Grip and put it on a wrapped can. Press clay pieces a bit to shape them around the wrapped can and to secure them in place. Leave to dry for another 12 hours.

NOTE: After drying for about 12 hours the clay is still flexible, but at the pressure you can’t disrupt its shape or texture.

Put your pens or crayons in the holder, and enjoy your creation. This holder is multifunctional and also can be used as a vase (just add water inside and put a flower bouquet) or as pot for succulents, spices and other plants.


P. S. If you want to see other multifunctional pieces that I made visit my blog http://www.studioartesania.com/2017/12/15-diy-projects-makins-polymer-clay.html

Monday, June 29, 2015

Rectangular Links Bracelet by Amanda Phillips

Design Team Member Amanda Phillips shared this fun geometric bracelet made with Makin's Clay® and our rectangle cutter setter on her blog recently.  It reminds me of leather and would make a great accent for a casual outfit.


Patriotic Decorations by Martha Lucia Gomez

There is still time to add some patriotic decorations to your home - like those created by Design Team here on her blog recently along with instructions.
Member Martha Lucia Gomez featuring Makin's Clay® accents!  She shared these projects

Sunday, June 28, 2015

Woven Gift Box by Candice Windham


Makin’s Clay® Woven Gift Box
Designed by Candice Windham 

Summer celebrations can run the gamut from weddings to birthdays to graduations and beyond. All of the occasions call for gifts, and what better way to present a gift than in a gift in itself?

Dress up an ordinary paper mache box with the beautiful art of Makin’s No Bake Polymer Clay, and you’ll have a gift that will be remembered. This clay remains flexible when dried in thinner pieces, so you can bend it around the lid to get this great effect. 


Here’s how to do it:

Supplies:

Makin’s Clay® - Blue and Terra Cotta, 1 pack each, 4.2 oz.
                          - Roller and Cutters Set
                          - Texture Sheets, Honeycomb and Weave, 38003 Set C
                          - Ultimate Clay Machine™
                          - Work Mat
Paper mache box with lid, 6” x 6” x 5”
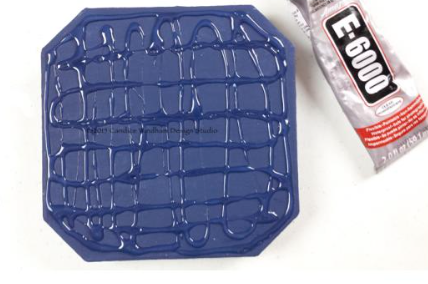
Strong adhesive (E 6000)
Spray Adhesive (3m Super 77)
Printed paper (Affinity Slab, Paper Studio)
Viva Décor Inka Gold, Lime, Violet, Rose Quartz, Blue
Viva Décor Pearl Pens, Violet, Copper, Blue
Navy Blue Craft Paint (Deco Art Crafter’s Acrylics)
Scissors, craft knife, brush

Instructions:

Use ¾ of the package of blue clay and the entire package of terra cotta clay.

Condition the clay by rolling it through the Makin’s Ultimate Clay Machine™ several times on setting one, then setting two.

Place the clay on the work mat and roll again with the clay roller to smooth out any raised areas. It should be approximately 8 ½” x 6”. Place the honeycomb texture plate on the blue clay, roll with the roller, line it up again and complete texturizing the entire sheet. Cut the clay into six 8 ½” x 1” strips. 

Repeat this step with the terra cotta clay, rolling it out to 8 ½” x 9”, using the weave texture plate and cutting nine 8 ½” x 1” strips. Set all clay aside to dry overnight, turning upside down occasionally to allow even drying.

Tip: I used some of the remaining clay scraps to blend together to make a nice warm brown, then rolled it out, pressed with the honeycomb texture plate and added it to a formica sample from the hardware store. If you ask, they often have outdated samples that they will give you. No need to raid their sample shelves. I used the remaining excess clay to press into a mold to make seashells that I will use on a later project.


Paint the box with inside and out with two coats of navy blue paint.

When clay has dried, lightly rub Viva Décor Inka Gold over the
strips, blending the colors.

Weave six blue and six terra cotta strips together, then turn it upside down on your work surface. 

Place the box lid upside down on the woven strips to make sure you have the weave tight enough to border the edges of the top. Apply E6000 to the entire lid, then place it down on the back of the woven strips. Place a heavy object such as a book on top until it dries.

Flip the box lid over and wrap the two corner pieces across each other, trimming to fit the lid edge. Don’t worry if this isn’t perfect. It will be covered with the final strips of terra cotta clay.

Fold every other remaining strip down and adhere to the box edge with E6000. Use clothes pins to clip the pieces in place until the glue dries. 
Allow the adhesive to dry. Once the adhesive is dry, remove the pins and attach the remaining strips around the outside edge, beginning and ending each strip at a point where one of the remaining strips from the top will cover the seam. Clip the strip in place with clothes pins as you go. 

When all of the side strips are in place, fold the remaining strips down over the edge, adhere in place and clip with clothes pins. 

Remove the pins and use a craft knife to trim the excess clay from the box edge.


Cut two strips of paper to fit the box bottom, coat evenly with spray adhesive and attach to the box. 
Use the Viva Décor Pearl Pens to highlight the paper pattern, but don’t add any within the top 1 ½” of the box lid line so that the lid still fits properly.

Now, just add a little tissue and tuck your gift inside. That’s it. Easy peasy, and the recipient will not only be overjoyed at your thoughtfulness, they will be amazed when you say, “I made this just for you.”
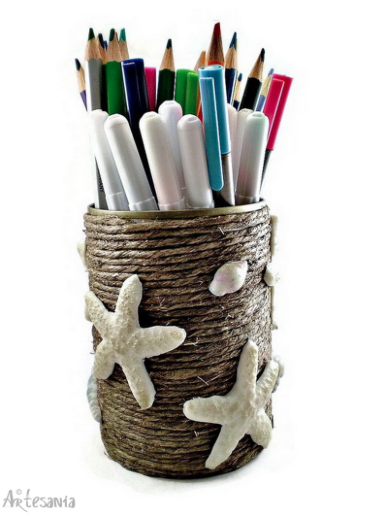
Saturday, June 27, 2015

Life is Better in Flip Flops Key Chain by Cindi Bisson

Cindi Bisson recently shared this fun neon pink flip flop key chain made with Makin's Clay®.  Find the instructions here.

Tropical Earrings by Andrijana Katavic

Design Team Member Andrijana Katavic recently shared these stunning Tropical Earrings made with Makin's Clay® here on her blog!

Friday, June 26, 2015

Viral Spiral Necklace by Carole Monahan

Design Team Member Carole Monahan created this fun and colorful extruded Makin's Clay® necklace and shared it on her blog recently.  You can find her full instructions on how she used the Ultimate Clay Extruder™ and our Neon clay to create the project here.

Thursday, June 25, 2015

Beach Themed Cards by Stephanie Ackerman

Design Team Member Steph Ackerman is in a beachy keen mood this month and has been sharing some lovely beach themed projects - she recently posted these cards with Makin's Clay® accents here on her blog.

Wednesday, June 24, 2015

The Courage to Cross the Ocean Shadowbox Frame by Irit Shalom


The Courage to Cross the Ocean Shadowbox Frame 
Designed by Irit Shalom 

Hello my dear crafty friends! Irit is here again and this time with my Summer project.
I live in a very hot country, Israel. Actually we say that we have only two seasons here: Summer and a very hot summer. So for me every day a year is a summer day and to make a shore project is something that is very close to the heart as we live maybe 20 minutes ride to the shore. (Need to add that this very pink girl doesn't spend a second on the beach and is in a permanent struggle with her close family members about the issue). But then I do love our sunset shores a lot. I even love sand and pebbles and to collect shells with my grand kids.  But this piece is not about collecting shells and about the lovely shores. It's about a courage to cross the ocean even when you lose a sight of the shore. So this is my tribute to anyone who needs a bit of courage to make a first step. Believe me, the next step is easier, and the next, and so on...

And now for the real thing: shadow frame in the canvas.

Materials:

Makin's Clay® - White, Natural, Blue, Earth Tones (mostly Adobe Brown, Sand) 
                           - Sea Shells Push Mold
                           - Texture Sheets Set       Summer time
8x8'' canvas
Stamp - Inspired by Stamping
Ink- Clearsnap®
Cork and cardstock stickers - Paper House Productions
Micro beads - Martha Stewart®
Mist - Tattered Angels™
Paints, varnish, powder - Earth Safe Finishes

Step by step instructions:

1. Use Light Adobe clay from Earth tones set with Cobblestone texture sheet from the Summer Time set. Then texture additional Adobe clay with the Sand texture sheet.  If you have an issue with your fresh clay sticking to your texture sheets, try applying a small amount of corn starch to the texture sheet before applying your clay.  Excess corn starch can be wiped from the clay after texturing. Let the clay dry after and then tear them and arrange one over another as stones and sand on the beach. 

2. For the next step mix a lot of white or natural clay with Adobe Brown and Persimmon colors and make a few sea shell shapes using the Sea Shell push mold. The colors may vary and can be totally mixed or partially mixed as it is with nature. Release the pieces and let them dry.

3. Mix about 1/2 of a small white clay package with just a bit of blue clay. Don't mix it to the light blue color, but make this marble look with a partial mixing only. On the back, INSIDE of the canvas, arrange a big "ocean and sky" clay piece and cover it on the bottom with your      "stones and sand" pieces. Make the arrangement random. Later I decided to add some wavy texture with another Texture Sheet and just re-arranged some small blue clay pieces. Take the clay landscape out of the canvas and let it dry 24 hours.
4. In the meantime paint the inside of your canvas. I used a couple of Chalk It Up ESF paints and even made some splashes with water mist over the dirty paint brush. Anyway, most of the painted space will be covered by clay arrangement, so don't try to be a great painter.
5. And now I just glued the clay piece inside the painted canvas and added all those push molded sea shapes that are already dry.

I added some color splashes over the shapes with ESF Ann Butler's Iridescents powders in a couple of shades.  A couple of cardstock and cork sea stickers were added over and inside the frame. The sand on the bottom was made with ESF Varnish and a mix of golden micro beads. And now is was a time to add the stamped sentiment.  Makin's Clay® can be rubber stamped with permanent inks, however; if you have trouble getting your stamped sentiment to be clear on the clay, stamp over white tissue.  Bingo! It's the best way as you can't even say where the tissue begins and where it ends.  I used ESF Gel medium under and over the tissue and the piece was almost done.  Not yet! I  few teal mists over the piece were added and I was happy with the final result.

I hope that you like this art piece too and will try the same techniques too.

Tuesday, June 23, 2015

Bluebird on the Faucet Plant Decoration by Patricia Krauchune

Design Team Member Patricia Krauchune has done it again!  Her creativity is endless and she is mastering so many techniques with Makin's Clay® that we are in awe.  For this fun faucet plant decoration she mixed paint with clay to make a new color, she liquified clay and used it over a custom made armature, and extruded clay for the "treads" at the base of the faucet where the tiny crystal water drop is dripping.  

Patricia shared the project on her blog here.  Check it out and also take time to see her other amazing projects on her blog!

Monday, June 22, 2015

Flag Sun Catcher by Kim Hale

Design Team Member Kim Hale finished the flag sun catcher she gave us a sneak peek of in her star earrings project post and shared it recently here on her blog.  Kim used the Ultimate Clay Extruder™and Makin's Clay® to create her flag.

Sunday, June 21, 2015

Happy Father's Day


Baroque Style Earrings by Carole Monahan

Baroque Style Earrings
By Carole Monahan


Materials List: 

Makin’s Clay® - Black ½ ounce
                          - Push Mold Florals # 39005 
Mica powder 
Beacon® Tacky Glue 
PYM Sealant Spray
2 Headpins 3” 21 Gauge  
2 oval jump rings
1 Pair Earwire 
6 crystal beads (3 pairs) 

Tools:
2 Chain nose pliers
1 step looper pliers 
(these are my favorite short cut)  
Sharp Exacto Knife

Directions:

This is a fun technique that can be used with many of  Makin’s Clay® push molds!
Here I used the Florals mold and took advantage of the mirror image of this Baroque style design.  

It takes a tiny amount of clay but they have a BIG impact! 
The amount of clay shown here I made about 8 pairs of earrings.

Step 1 I filled the desired design in the Push mold with the 
Makin’s Clay® and I made sure it was as flat as possible on the back and I trimmed any access away with an exacto blade while clay was still soft. You will need to do this step 2 times


Step 2 After waiting a few hours for the clay to cure I removed it from the mold and dusted the still damp clay with Mica powder: I used Pearl Ex Interference Violet. 

I made this chart so I can see what each color Mica powder looks like on the black clay I have one for white clay as well.

As you can see I have used this for YEARS ! 


Now for my 1st installation of LIVE AND LEARN------ What I should have done was to color the clay with Mica powder after ALL the other steps right before gluing the sides together. I should have lightly coated it with the Beacon Tacky glue and THEN coated it in the mica powder. Since I ended up applying the mica over again with the glue, since I rubbed it off during the other steps. 

Step 3 After the piece is fully cured, usually overnight: it is the best to assure it is completely cured. You can now trim to your desired shape. Keep in mind they are to be glued together so you want the sides even. Just trim with a sharp Exacto knife. You also want to clean up any edges at this time with the Exacto blade. 

Step 4 Sanding… You want to further clean up any edges and make sure the black of the piece is as flat as possible. (See how I’m messing up the mica!) 

A flat back will ensure the 2 side glue together tightly. 
Step 5 Glueing: Lightly coat each side with Beacon Tacky glue let it rest for a few minutes before joining the sides together. Note I placed the Head pin WITH the large bottom stone in place before
joining the sides together. 

At this point you want to spray seal your piece with PYM or another waterproof sealant.
You want to do this before you add the earwires. 

Step 6 : Findings Add the rest of your beads to the top of your Headpin.

Then Take the One Step Looper and make a Loop on the top. There are some great videos that show this tool in action! 

Then add the Oval jump rings (I love the Oval rings I think they just look better.) 
Open the Jump ring with the Chain nose pliers and add it to the top loop from the earing and add the Earwire. 

Remember….. Be boundless…. Be Creative!
There are NO mistakes only learning and growing!


Contact us

Name

Email *

Message *