
Friday, November 29, 2013
Feeling Frosty on When Creativity Knocks with Makin's Clay® - How-To Video
Makin's Clay® is a sponsor of the When Creativity Knocks All-Star Designers' Holiday Series and our products are featured in many of the videos, as well as being shared with viewers each week in great prize boxes! In this week's video I show you how you to create two unique home-decor pieces with a frosty feel - each featuring Makin's Clay®! - Cindi
Thursday, November 28, 2013

Wednesday, November 27, 2013
Makin's Clay® Leaves Push Mold
By now you must realize my favorite Makin's Clay® push mold is the "Leaves" one. I use it for so many projects so I thought I would share a photo of the mold here for you.....

I used the "Leaves" push mold for the Makin's Clay® Napkin Rings and Candle Sleeve posted earlier this month. I also used it to create the Fall Clay Wreath and Clay Mask in October. This is just one of the many push molds that are available from Makin's Clay® so check out the great selection as they are all just as versatile as my favorite one!

I used the "Leaves" push mold for the Makin's Clay® Napkin Rings and Candle Sleeve posted earlier this month. I also used it to create the Fall Clay Wreath and Clay Mask in October. This is just one of the many push molds that are available from Makin's Clay® so check out the great selection as they are all just as versatile as my favorite one!
Monday, November 25, 2013
Makin's Clay® Pinterest Board

Thursday, November 21, 2013
Clay Leaves Candle Sleeve
Now that you have created the napkin rings from last week why not make a candle ring to match....then you are set for your Thanksgiving Table......


Same process....
use the Makin's Clay® Leaves Push Mold
to create several leaves using the
Earth Tones Clay....let dry.
Overlap the leaves slightly to form a ring the size
you need for your candle and glue in place with
Tuesday, November 19, 2013
Another Holiday Table Idea - Adaptable Napkin Rings with Makin's Clay®

This project was originally shared on my personal blog as part of a blog hop challenge featuring Makin's Clay® in 2012. I thought I'd share it again here as another option for Ann's clever idea of using the paper towel rolls! The brown tone of the clay, along with the texture provided from the texture sheet results in what I think looks a bit like leather. By sticking with a simple color palette, these adaptable rings will coordinate with almost any color or pattern of napkin, for any theme or holiday. The metal stamped embellishment serves as a holder for silk flowers, dried flowers, colorful autumn leaves, long stems of grasses, or any other embellishment you’d like to tuck behind it to customize your rings for the occasion. The verses stamped on each are basic enough that they too are versatile.

Materials:
Makin’s Clay® - Earth Tones multi pack (If creating 4 rings of the same colors, 2 multi-packages of clay will be needed)
Makin’s Professional® Ultimate Clay Machine® Makin’s Clay® Texture Sheet - Set A "Sand"
ImpressArt® Metal Stamps - Lowercase Newsprint
ImpressArt® brass stamping hammer, steel stamping plate, & Stamp Straight Tape™
Copper sheet
Westcott Craft Titanium Bonded Non-Stick Scissors
Sharpie marker, soft cloth
Small copper brads
Brown flat fiber trim
Elmer’s Craft Bond Adhesive
Small hole punch, tapestry needle (optional)
Instructions:
 Begin by cutting a paper towel roll into desired number of 1 1/2” rings, then cut through each ring to create napkin ring.
Remove clay from box, remove from outer sealed plastic wrapping. Cut individual wrapped piece of tan clay in half and remove inner wrapping from one half. Makin’s Clay® is ready to use right from the package - no conditioning is needed.
Use Ultimate Clay Machine® to roll on #3 setting. This will create a piece large enough to cover your chipboard ring. Repeat with 2nd half.


Place a light coat of Craft Bond adhesive onto inside of chipboard ring. Place clay onto ring, using fingers to gently ensure entire surface is covered with clay. Remove any access clay extending off of chipboard. Repeat on second ring.
Place texture sheet over clay on ring. Press into clay to transfer texture.

Cut individual wrapped piece of dark brown clay in half and remove inner wrapping from one half.
Use Ultimate Clay Machine to roll on #3 setting. This will create a piece large enough to cover your chipboard ring. Repeat with 2nd half.
Place a light coat of Craft Bond adhesive onto outside of chipboard ring. Place clay onto ring, using fingers to gently ensure entire surface is covered with clay, extending slightly over edges onto back. Repeat on second ring.
Place texture sheet over clay on ring. Press into clay to transfer texture.


 Reform rings, supporting sides as needed, and let dry overnight.
Measure and cut flat brown fiber trim to fit along inside edges of ring where two colors of clay meet. Mount to cover edge.
To create metal plates, cut two pieces of copper sheet approximately 2” long by 1/2” wide.
 Use ImpressArt® Stamp Straight Tape™ on bottom of first piece to
  hold in place on steel stamping block. Use lowercase Newsprint metal stamps and brass stamping hammer to stamp “be thankful” on first piece, and “be grateful” on second piece.
Distress edges of each piece by lightly tapping with stamping hammer.
Color each stamped verse with Sharpie marker. Gently rub marker from copper sheet with soft cloth.
 Ink will remain in stamped areas to highlight text.
Punch small hole in each end of each metal plate.
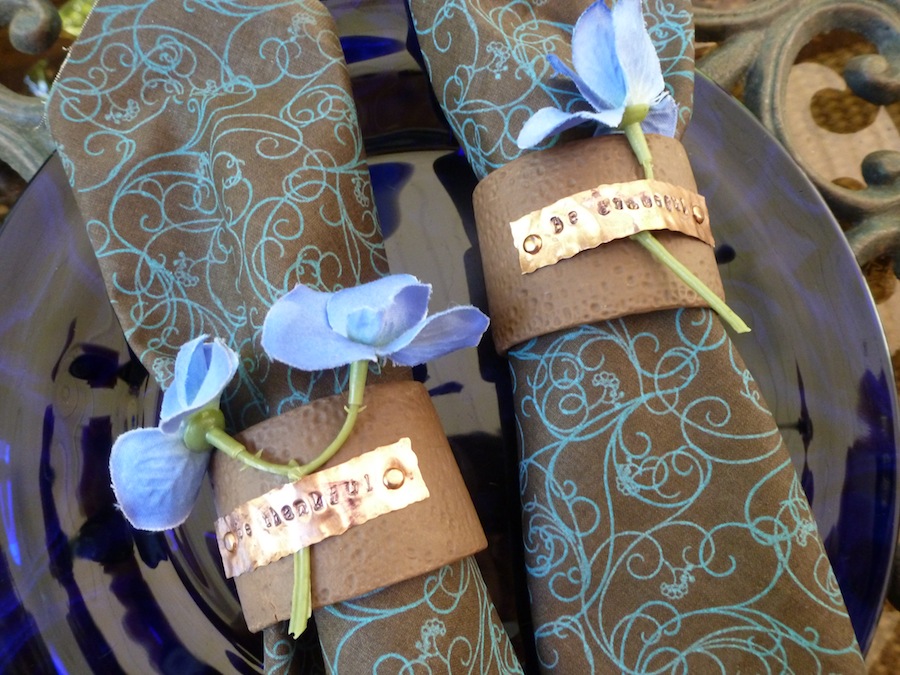 Determine placement on clay napkin rings. Do not mount flush to ring, bring ends in a about 1/8” to allow metal plate to bend outward to accommodate embellishment inserted behind.
Use tapestry needle, or small point of scissors, to gently push holes through clay and chipboard where needed.
Mount plates to rings using copper brads.
To add embellishment, slip behind stamped metal plate.
- Enjoy using these faux leather, adaptable napkin rings at a special dinner soon! - Cindi
Thursday, November 14, 2013
Makin's Clay® Napkin Rings for Fall
My favorite push mold from Makin's Clay® is the "Leaves" and my favorite multi pack is the Earth Tones.....I have used these two items for several projects and the great part is they are so versatile....


You can create a set of napkins rings quickly and easily just by
gluing some of the leaves onto a paper towel holder that has been cut into
1" sections and slightly over lapping the leaves.
Makin's Clay® Attending 2014 CHA Winter Conference & Trade Show
Press Releases
Makin's Clay® Exhibitor at the 2014 CHA Winter Conference and Trade ShowFOR IMMEDIATE RELEASE: 31 OCTOBER 2013
Makin's USA is pleased to announce Makin’s Clay® and Makin’s Brand® products will be on display and for sale to retailers during the Craft and Hobby Association Winter Conference and Trade Show at the Anaheim Convention Center in Anaheim California, (January 11th-14th, 2013). Show attendees are invited to stop by the Makin’s Clay® booth (#1701) for an overview of the Makin's® product line. Visitors will find new products for 2014, exciting "make-n-take" projects, product demonstrations and application tips & techniques led by professional designers. FREE Makin's Clay® tote bags, product samples, promotional items and catalogs will be available in the booth during show hours while supplies last. Buyers can schedule private appointments by sending a meeting request to info@makins-usa.com or by contacting your sales representative directly.
Monday, November 11, 2013

Impress ART Metal Stamps with Makin's Clay®
Stamping and Makin's Clay® go hand in hand.....they work so perfectly together. There are Red Rubber Stamps, Clear Stamps and even Metal Stamps and they all work well with Makin's Clay®.....here is a perfect example:


First of all I mixed together some blue and white clay, to get a lighter shade,
then I rolled it larger then the mat from inside one of the
Makin's Clay® Memory Frames.
I then took the Baby Feet Stamps from Impress ART

to create the perfect boarder, I then added some
over the top to soften it even more,
then I let it dry.

I made the baby feet impressions, let them dry and then glued
them onto the clay background with Beacon Adhesives Tacky Glue,
and placed them into the Makin's Clay® Memory Frame.
One the other side of the frame.....

I added a photo of my grandson Jaxson matted onto a piece of dried clay
and used an alphabet stamp set from Impress ART
to stamp out his weight at birth....on some of the left over
light blue clay.....with the metal stamps you are able to stamp into the clay
even after the clay is dry which is perfect!
I then added more of the Earth Safe Finishes Pearl Powder over the top
and glued these onto a piece of card stock.
 and placed these into the other side of the Memory Frame.
and used an alphabet stamp set from Impress ART
to stamp out his weight at birth....on some of the left over
light blue clay.....with the metal stamps you are able to stamp into the clay
even after the clay is dry which is perfect!
I then added more of the Earth Safe Finishes Pearl Powder over the top
and glued these onto a piece of card stock.

Give stamping into Makin's Clay a try, it is so easy and the results are wonderful!
Thursday, November 7, 2013
NEW! Zoo Animal Plunger Cutters

Tuesday, November 5, 2013
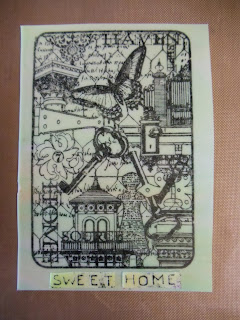
Makin's Clay ATC's
Makin's Clay® is the perfect product for so many crafts and if you like to collect or trade Artist Trading Cards you need to give the a try.
One important thing to remember is that there is a small amount of shrink during the drying process of Makin's Clay® so be sure and wait until the clay is completely dry before cutting to the 2 1/2" x 3 1/2" size for your Artist Trading Cards.
Roll out your clay as thin as desired, let dry, cut to size and embellish it is that simple....here are some examples:

For this one I used the blended clay technique
let the clay dry, cut into ATC size then stamped the image...
punched out a few stars and glued them on.

For this on I simply rolled out some clay very thin,
let it dry and cut it into ATC size. I used a stamp and then
stamped out Sweet Home and glued it onto the bottom.

For this one I used the Makin's Clay® Texture Sheets and Cutter
to create the squares......and stamped the words onto clay
then cut them out and glued them on.

This is a piece of textured clay cute to the ATC size,
with scraps of blended clay cut into squares and glued onto the left side.
A pice of text was glued onto the right side with words stamped onto clay,
cut out and glued on top.
You can make dozens of Artist Trading Card's quickly and easily with Makin's Clay®.....give it a try and let us see your results by posting them onto our FaceBook Page!
Friday, November 1, 2013
Thanksgiving Votive Candle Holder How-To Video

Subscribe to:
Posts (Atom)